Collective drawing in non-traditional techniques in the second junior group “Goodbye, summer!”
Yulia Mishchenko
Collective drawing in non-traditional techniques in the second junior group “Goodbye, summer!”
Collective drawing in non-traditional techniques in the second junior group “Goodbye, summer!”
Goal: create an emotionally positive mood, develop the imagination and creativity of children.
Tasks:
— Develop children's fine motor skills.
— Develop children's creative abilities.
— Develop an aesthetic perception of the surrounding world.
— Learn to work in a team.
Materials: a sheet of whatman paper, gouache of different colors, a brush, pokes, plastic forks, stamp pads, a glass of water, a simple pencil, a small piece of napkin.
Progress of the lesson:
- One palm, two palms
We became a little friends,
Let's smile at each other!
Voss: Tell me, please, what time of year is our warmest, most affectionate, sunny and cheerful?
Voss: Yes, guys, it’s summer! And why?
(the sun is warming with its rays, flowers are blooming, butterflies are flying, we go to the forest to pick berries and mushrooms)
Demonstration of illustrations about summer, conversation.
Summer. What it is?
This is the freshness of the breeze.
This is the sun in the clouds.
These are insects running.
These are lilies of the valley in the forest.
Voss: Guys, it’s time for us to say goodbye to summer. Why are you sad? (children's answers).
Would you like to keep a piece of summer as a souvenir?
Me too. Look what I came up with.
(I show a blank sheet of Whatman paper.)
You and I will draw our summer, everything that you remember.
I think flowers and butterflies will remind me of summer all year long. I suggest you paint a picture in different ways. But first, let's get our fingers ready for work.
“I paint summer”
I draw summer: (Draw with a finger on the table)
Sun, (Draw “sun” in the air)
There are roses on the lawns, (They clench and unclench their fingers)
Blue paint – the sky (Paint “clouds” in the air)
And a singing stream. (They draw a “stream” with their finger on the table)
(I invite the children to choose for themselves what they would like to draw).
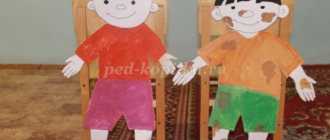
Sunny - with fingers and palm.
Weed - with a plastic fork.
Flowers - with a finger and stamp pads.
Butterflies are made from napkins.
Voss: Guys, look at what a beautiful picture it turned out to be.
Well done, you all did your best.
Thank you for your attention!
Photo report “Collective drawing with palms in the second junior group “We draw Summer” Photo report “Collective drawing with palms in the second junior group “We draw Summer” Goals and objectives: We continue to introduce children to non-traditional things. Abstract of the GCD on drawing in a non-traditional technique “poke” in the second junior group “Autumn Tree” Drawing “Autumn Tree” using a non-traditional technique (poke method) Integration of educational areas: HER; PR; RR; SKR; FR. Notes on drawing using non-traditional techniques in the second junior group “Summer Mood” Goals and objectives: We continue to introduce children to the non-traditional method of drawing. To develop the ability to draw with palms and fingers. Develop. Abstract of GCD on drawing in the non-traditional technique of blotography in the second junior group “Flowers” Topic: “Flowers” Goal: development of creative abilities. Objectives: To introduce parents and children to one of the non-traditional drawing techniques. Summary of a lesson on drawing in an unconventional technique in the second junior group “Thorns for a hedgehog” Summary of a lesson and photo report of work in the second junior group on the development of children’s artistic creativity using non-traditional techniques. Summary of a lesson on non-traditional drawing techniques in the second junior group “Summer Glade”. Drawing with soap bubbles LESSON SUMMARY ON NON-TRADITIONAL DRAWING TECHNIQUES IN THE SECOND JUNIOR GROUP TOPIC: Collective work “Summer Meadow” Drawing with soap bubbles. Master class on drawing in non-traditional techniques in the second junior group “Flower” Children’s master class on drawing with elements of non-traditional drawing “Flower” Second junior group. Educator: Slepova Galina Nikolaevna.
Source
Sandy beach: drawing for kindergarten
The warm ocean, gentle sea and clean sandy shore are what both children and adults dream about. However, if you currently do not have the opportunity to fly to warm countries on vacation, you can find another way out. Even the smallest artists can handle this by depicting their dream on paper. Prepare your pencils and crayons and let’s begin the creative process.
- We separate the lower right corner with an arc, this line marks the shore. Next we depict a wavy sea and an umbrella on a leg. Let's complement the beach with a towel on which you can soak up the sun. Let's make it striped.
- Let's draw the texture of the sand, leaving regular dots with a felt-tip pen. At the top of the canvas we draw a smiling sun. We fill the parts of the umbrella with different colors. We paint the ocean in a variety of shades: blue, turquoise, blue, green.
- We fill the shore with yellow and beige chaotic strokes. Color the terry towel to your taste, the main thing is that it does not blend into the background, do not forget to highlight the fibers.
- Let's fill the sky with blue pigment, and the sun with yellow chalk. We denote seagulls with black jackdaws.
This is the kind of summer beach we have. Don’t keep the drawing with you, give it to your grandma or dad, they will definitely be happy with such a gift!
Preview:
Abstract of GCD in the second junior group in art
Strengthen the ability to draw simple objects and phenomena
reality. Using straight, round, inclined, long,
Identify knowledge of primary colors and shades as a means of transmission
variable attribute and emotional and moral characteristics
Strengthen the ability to use paint, brush, napkin, stand
under the brush, rinse the brush in a glass of water, dry
Continue to cultivate an interest in drawing and a love of beauty.
Preliminary work: Drawing straight, round, long, short
lines. Coloring contours with colored pencils and paints. On
classes in art activities, outside of class, individual work.
-The teacher brings in a large beautiful tassel decorated with a ribbon
and paint. Guys, do you know who came to visit you today? Right,
This is a brush, but not a simple one, but a magical one. She can draw very beautifully.
Can your brushes paint? We'll check this now. My brush
dipped in paint. Which one? That's right, green. What can you draw
green paint? Of course, grass. Here is my magic brush painting the grass
(short vertical lines) – teacher’s display. And now your tassels
They will draw exactly the same grass (children draw on their own).
— After painting with green paint, the brush got dirty. What do you need
do? (Rinse, dry).
- Help your tassels, well done (children put their tassels on
The flower goes to bed
— What other paint do you have on your table? That's right, red.
— What can you paint with red paint? Berries, flowers (show
teacher of drawing with round lines). - We draw flowers by touching the brush.
What else can you draw on a summer theme?
- A master class for the little ones, with the help of which a young artist will be able to depict a cheerful girl swimming in the sea. This drawing idea is suitable for both 1st and 2nd grade:
- In the next lesson you will learn how to paint tropical flowers. You will get a real bright Hawaiian still life:
- The following step-by-step video instructions are suitable for those who want to depict a summer meadow with butterflies, a drawing idea for kids:
sunny Beach
Materials for drawing lesson:
- paper;
- a simple pencil;
- set of colored pencils.
How to draw a summer landscape step by step
Prepare the materials necessary for work. The summer landscape will fill the entire A4 sheet without gaps. Draw an arc in the lower left corner, showing the hill in the foreground. Show lines above - the trunks of slender palm trees.
At the top of each trunk, draw balls, showing coconuts, and wide palm leaves. Each tree can have 5-6 leaves: draw arcs and add cloves to each one.
Draw a couple of palm trees with coconuts with spreading leaves.
Show the coastline. In the background behind the trees, draw a horizontal line and smoothly lower the wavy thread down to the lower right corner.
Also draw a horizon line and outline the hills on the right side of the picture.
Near the hills, show a semicircle - sunset. On the shore, draw an umbrella and litter. Or a whole series of such beds for vacationers.
If desired, draw a small boat or yacht that floats on the water.
Proceed to decorating the landscape with pencils. Paint the palm leaves with different shades of green, repeating the outlines of the cloves. Brown color is suitable for trunks and coconuts.
Using a blue pencil, move along the central area, which will become a pond. In the center, smear the stripe with a yellow pencil, and again draw blue on top, showing the reflected rays. Also decorate the sun with yellow and orange. The result is a believable overflow.
Draw the sand on the beach in orange. Green for hills, and draw light clouds in the sky. A beautiful summer landscape is drawn. This painting can also be done with watercolors, acrylic, or gouache.
Forest landscape in pencil easy: 2-3 grade
So, now let’s depict a sunny, summer birch grove. During this warm season, the forest amazes with its carefree nature, pristine purity and incredible beauty of Russian nature. It may seem that this is a very complex drawing, but it is not at all, and now you will see it. In addition to paper, you will need pencils, markers and a white pen. Creative success!
- First we draw a square frame. We use a light gray marker to mark the horizon line approximately at the height of the lower third. We select a brown branched path. The closer it is to the viewer, the wider it will become.
- We outline the tree trunks; it is better to make them not perfectly straight, but with a slight slope and bend. In the foreground, the birch trees will be wider; the further they are from us, the thinner they need to be drawn. We draw the greenery with loose strokes. We go upstairs and paint the entire space between the trees by about two-thirds. Using a dark green felt-tip pen, we move higher towards the light fill. Add leaves with small strokes. At the border of shades we make the texture more dense.
- We highlight the long shadows from the trunks. We darken the thicket of the forest in the lower part with a deep green pigment, highlighting the leaves and grass. Apply the dark blue shade in an arc, so the focus will be on the center of the image, where the path begins. It's time to add a continuation of the shadows to the path using dark brown. Next, we will add volume to the trunks; to do this, we cover them almost entirely with gray, except for a thin strip on the left side.
- Let's go over the distant trees with a second layer so that the darkening is more clear. We recommend using cool shades. Using a yellow felt-tip pen, draw the sun's rays directly over the forest. Using a pencil, highlight some contours, thin branches and strokes on the bark. At the bottom of the composition we will add fireweed flowers. We draw them with pink spots, which are collected in brushes. In general, we make them very conditional and simplified.
The last step is to add sunbeams and blades of grass using a white pen.
Refreshing ice cream: drawing on the theme of summer with colors
Drawing is the best way to relax, relax and become happier. To clear your mind of pressing problems, we recommend doing something creative with your children in the evening after work. Now you will learn how to draw the most delicious summer sweet - ice cream in a waffle cup! It is truly refreshing, saving you from heat and thirst. Here's what you can draw in the summer:
For work we need:
- Watercolor paper A5 size
- Pencil and eraser
- Liner
- Brushes and paints
- Water
- Palette
Let's get creative:
- Let's start by building our composition. To do this, put a notch in the center and draw a line of symmetry. We designate the sizes and parts of the future ice cream. We outline the trapezoidal shape of the cup and the delicacy itself resembling a cone.
- Now we draw all the lines of the cup more roundly, so we convey the volume. Let's denote the checkered texture of the waffle by drawing diagonals in one direction and then in the other. Draw the ice cream in light waves to create swirls. We add a loop on top.
- We outline all the contours with a liner. To create a subtle color effect, dilute the lilac shade with plenty of water. Let's go over it on the right side under the contours of the curls. While the top part is drying, let's work on the bottom. We fill the glass with translucent ocher, leaving empty spaces in some places. We highlight the right side with a more saturated tone, since the light in our composition falls from the left.
- Using purple pigment, we once again go over the treat, blurring the boundaries. We’ll create a pink halo around it, without a clear outline; we should get a slight haze.
Our illustration is ready. After completing this, you will definitely want to buy a real ice cream in the store!
What other drawing options are there: video master classes
- Master class for those who want to draw a summer landscape with a simple pencil:
- A summer image in a non-standard technique that kids will definitely like. We will draw using a regular sponge. This method will develop imagination and fine motor skills:
- A very simple and cute picture of a watermelon, which is so refreshing in hot weather. Children from 3 years old can cope with the work:
A master class on drawing spring with a pencil will also be useful to you.