The meaning of visual activity
Drawing (FSES) in the first junior group is included in the visual arts program. Children not only draw, but also make various applications and sculpt, which is necessary for the comprehensive development of the personality of preschoolers.
Drawing in the first junior group attracts children because they independently create something beautiful and original. Children accumulate and expand the personal experience they gain through their senses. It is advisable to introduce children to active visual arts from the age of 2-3 years.
A variety of drawing in the first junior group is carried out according to a program developed by M. A. Vasilyeva.
Preview:
Notes on artistic and aesthetic development (drawing) in the first junior group
Topic: “Hide the bunny”
Compiled by: teacher Shilova A.V.
When compiling the notes, the following literature was used: Artistic creativity. The first junior group of O.V. Pavlov. Publishing house Uchitel 2014
Objectives: Continue to introduce the non-traditional fine art technique of finger painting. Develop a sense of rhythm, fine motor skills, memory, attention, speech. To make children want to help the bunny hide in the winter forest - draw a white fur coat for him.
Material: Sheets of blue paper with a drawn silhouette of a bunny; white gouache; calyxes; napkins. Preliminary work: conversation “Winter Forest and Its Inhabitants”, reading the book “Who Lives How” by E. Charushin, story “Bunny”.
Children sit on the carpet in a semicircle.
Educator: Guys! This morning, when I came to kindergarten, I saw that someone was hiding in our group in the play corner. Who do you think? (Children's answers).
Educator: No, you didn’t guess. I’ll tell you a riddle now, and you try to guess it.
Riddle about the hare:
Jumps deftly, Loves carrots?
Children: Bunny Teacher: That's right, it's a bunny. Let's call him. Children: Bunny, come out! Come to us!
(The teacher takes out a toy from behind his back. The children greet Bunny.)
Educator: Guys, Bunny just told me in my ear why he came running to kindergarten. It turns out that he can’t hide from the fox in the forest. He did not change his gray fur coat for summer or his white coat for winter. There is snow and snowdrifts all around in the forest. The snow is white, but the bunny has a gray fur coat.
That's why the hare is visible in the snow and he can't hide! We need to help the bunny - give him a white fur coat. But first, let's show the bunny how we can play with our fingers:
Finger gymnastics “Hares”
The bunny is jumping with a scythe (Use your right hand to depict a galloping bunny: shake your hand up and down).
Under a tall pine tree. (Use your right hand to draw a tree).
Under another pine tree, (Draw a tree with your left hand).
Another bunny is jumping. (Use your left hand to depict a jumping bunny).
We had a good time playing with our fingers. Now, let's help the bunny. I suggest sitting down at the tables and drawing a white fur coat for the bunny. On your tables there are sheets of blue paper with the outline of a bunny, and there is white gouache in cups. Today we will paint with our fingers. The teacher shows an unconventional drawing technique - with a finger (dip your finger in gouache, make prints inside the outline). You only need to color the bunny. The teacher reminds that you need to work with paint carefully. Children do independent work; if possible, the teacher supervises the work. In case of difficulty, he helps individually.
Educator: So the fur coat for the bunny is ready! Guys, how great you are! What beautiful drawings you made! You can do everything: draw, play, and most importantly, you are kind and will never leave anyone in trouble.
Changed the bunny's fur coats
They scattered across the lawn.
Everyone has white fur coats!
Are they bunnies or snow?
We have worked fruitfully, now let's play.
Outdoor game "Bunnies and fox"
Bunnies scattered across the forest lawn. These are the kind of bunnies, bunnies - runaways. The bunnies sat in a circle and dug a root with their paw. These are the kind of bunnies, bunnies - runaways. Suddenly a little fox, a red-haired sister, runs, looking for where the bunnies are, the runaway bunnies. (At the end of the song, the “bunnies” run away from the teacher who is wearing a fox hat.)
Educator: Guys, the Bunny says goodbye in dreams, now he’s not afraid of anyone in the forest! Goodbye Bunny.
Purpose of the program
It includes not only drawing in the first junior group, but also modeling and appliqué. The lessons are arranged in a specific order, in order of increasing difficulty. If necessary (taking into account the individual characteristics of the children), some adjustments to the content of classes are possible, as well as a change in the sequence of their implementation.
The program must take into account the regional characteristics of the territory and the focus of the preschool institution.
Program provisions
Drawing with cotton swabs in the first junior group is carried out taking into account the following theoretical principles:
1. Such visual activity in a preschool institution is an integral part of educational and educational work; it has connections with various areas.
For the full development and upbringing of a child, it is important to connect modeling and drawing classes with active play activities. Non-traditional drawing in the first junior group increases the interest of preschoolers in art. The teacher uses various forms of connection between play and artistic creativity.
For example, children paint napkins to decorate the table in the doll's corner. In addition, the teacher uses a variety of gaming techniques and methods. Children draw friends for their favorite toy, make treats for pets.
Plasticine and paints for children turn into an interesting game filled with pleasant surprises.
2. To develop children's imagination and creativity, it is important to create a developing aesthetic environment.
Paints for children successfully cope with this task. Kids get involved in a fun and exciting process. Together with the teacher, they become real graphic designers. Children's drawings with pencil and watercolors are turned into decorations, they decorate the walls in the group.
Of particular importance for the formation of artistic taste in preschoolers is the correct selection of materials, as well as the friendliness of teachers towards their students.
3. To develop abilities, knowledge of phenomena and objects is necessary.
Children's pencil drawings help develop finger motor skills. While working on a drawing, a preschooler forms a figurative idea of the size of an object, which is fixed in the brain. With the constant enrichment and development of such experience, the creation of a correct understanding of various objects and phenomena occurs.
Drawing flowers in the first junior group allows children to teach form-building hand movements. With a gradual transition from simple figures to complex geometric shapes, the preschooler learns to depict various phenomena and objects of the surrounding world.
Finger painting in the first junior group differs from the sculpting process. Drawing involves the transfer of contour lines, and modeling is associated with volume and mass. By mastering form-building movements, children gain complete freedom for creativity. For example, at the first stage, kids simply trace the patterns with their fingers, getting an idea of artistic creativity.
Psychologists are convinced that drawing, appliqué, and modeling have a positive effect on a child’s imagination, thinking, attention, and memory. In addition, artistic creativity contributes to the development of independence and creative activity of children, which is one of the main tasks set by the Ministry of Education for teachers of preschool institutions.
The teacher encourages children to analyze the work done. For example, drawing in the first junior group on the theme “Winter” can be turned into a real holiday. First, the children use paint to depict their associations associated with winter and the New Year holidays. Then the pictures “come to life”, and together with their teachers, preschoolers come up with interesting and unusual fairy tales.
It is advisable to complete the drawing in the first junior group on the theme “winter” by collectively viewing all the images made by the children. You can also arrange a colorful exhibition for parents before the New Year's party.
Each age group has its own distinctive characteristics, so the teacher makes adjustments to visual arts classes. The number of colors in the palette gradually increases, and the task becomes more complicated. We offer options for activities that can be carried out with children in a preschool institution.
Features of the visual arts program
Classes are aimed at developing aesthetic perception, creating a sense of joy and beauty. The drawing process gradually includes movements with both hands on the object, its girth, and work on tracing the contour.
Thanks to the creation of a positive emotional mood, preschoolers gain an understanding of the features of making appliques and drawings.
Drawing
Children are offered topics in the classroom that would help convey the beauty and uniqueness of the world around them, and instill in the younger generation a caring attitude towards living objects around them. Drawing in the first junior group on the theme “Autumn” involves depicting colorful falling leaves. While working, kids learn to work according to a template and mix paints. The teacher develops in his students the skills of correctly gripping a pencil, brush, and felt-tip pen.
He controls the correct work of the brush, checks the relaxation of the hand during movements with the brush. During classes, children develop accuracy, because they must dip the brush in water to remove the remnants of one paint and apply another color to the brush. The teacher accustoms preschoolers to working with a paper napkin. The guys carefully dry the brush on a cloth or napkin to remove excess water.
To consolidate the acquired skills, you can conduct drawing in the first junior group on the topic “Pets”. The topic of the lesson is not chosen by chance. Indeed, in addition to instilling visual skills in preschoolers, the teacher’s task also includes the development of children. When drawing their favorite pets, children not only improve their artistic skills, but also develop an idea of the animal’s appearance and its distinctive features.
Drawing in the first junior group “Wild Animals” will be no less educational. After the kids get an idea of pets, you can move on and invite them to pretend to be other representatives of the animal world.
To reinforce children’s ideas about the names of colors, the teacher can play interesting games. To introduce kids to decorative activities, one of the activities can be devoted to making New Year's toys. Ready-made decorations can be used to decorate a New Year's beauty placed in a group.
Images of snow, falling leaves, and raindrops are ideal for learning to rhythmically apply strokes, spots, strokes, and lines.
In order to lead preschoolers to the image of rectangular, round objects, as well as combinations of several shapes, you can draw trailers with a train, tumblers, and snowmen.
By repeatedly repeating simple plot lines, for example, Christmas trees, bugs, butterflies, the teacher teaches the child to place the depicted objects evenly across the entire sheet.
During art classes, the teacher teaches his students to create small plot compositions. Such activities captivate children and stimulate the development of their imagination and creative imagination.
Lesson - game “Introducing pencils “Hide the picture”
Marina Obukhova
Lesson - game “Introduction to pencils “Hide the picture”
Goal: to teach children to hold a pencil , to draw independently (scribbling, to develop interest in visual arts, to teach them to play outdoor games , using imitation movements, playing with them with toys; to develop children’s speech, using the example of onomatopoeia; to consolidate the names of primary colors (blue) , yellow, red, green)
.
Materials: toy cat, mice drawn on leaves of white paper, pencils of primary colors (red, blue, yellow, green)
.
PROGRESS OF THE LESSON : Children enter the group to the music, the teacher pays attention to the guests, the children greet them.
The teacher invites the children to listen to the poem. After reading, the teacher asks the question: Who is this poem talking about?
In a warm and fluffy fur coat,
In soft slippers on the paws
And purrs quietly, quietly
That's right, the cat, and the cat Murka also came to visit us.
Look how soft and fluffy she is. And how she meows, let's all meow together: Meow, meow, meow. The cat loves milk very much, when she is full she purrs: Pur, pur, pur. Cats love to play , so our Murka wants to play . You and I will be mice. Outdoor game "Cat and mouse"
.
Here we are again, children, and our mice hid on pieces of paper . The teacher shows a piece of paper with mice drawn on it, look what you have drawn? Masha, what have you drawn? And you? Offers to hide them from the cat . Shows pencils , primary colors, and shows how to hold it correctly. Invite children to hide the mice by scribbling , and give them the opportunity to choose the color of the pencil themselves . If necessary, help to take it correctly - place the baby's fingers on the pencil and , holding the child's hand in your hand, draw several lines, allowing the child to feel the pressure on the pencil .
Now all the mice hid from the cat .
What are you, cat, guarding? I'm guarding a mouse at the hole. If a mouse comes out, I’ll accidentally invite him to tea!
Sensory education for young children. Play is the main activity. Didactic game “Hitch the trailers” d/game: “Hitch the trailers” goal: To teach children to distinguish a square; fix the primary colors: red, blue, yellow. green; develop small Didactic game "Find your house" To study the primary colors (yellow, red, blue, green, I created a didactic game "Find your house" I needed.
Source
Skill requirements for preschoolers after drawing classes
By the end of the first year of learning to draw, children should demonstrate emotional responsiveness when viewing a variety of illustrations, examining natural objects, and works of art.
They should easily recognize materials with which they can draw pictures, distinguish colors, and have an idea of folk toys (matryoshka, tumbler).
In addition, preschoolers should use felt-tip pens, pencils, and paints to depict simple compositions and think through a simple plot for their work of art. The requirements that are put forward for children who have completed the first year of drawing instruction in kindergarten are requirements according to federal state standards:
- select a color scheme taking into account the features of the image;
- hold markers, pencils, paints, brushes correctly;
- choose a composition from several items.
Option for distributing program material for the academic year
In the fall, you can plan an introductory lesson where the children will get acquainted with pencils. In addition to holding it correctly in the hand, the teacher should teach the kids to leave a pencil mark on the paper. Then the children trace their fingers along the lines they have made to remember the features of different configurations and objects.
To maximize the effect of the lesson, in addition to drawing, you can also offer the children modeling objects of different shapes. For example, if preschoolers draw circles with a pencil on paper, they will also have to make them out of plasticine.
The second lesson can be done on the topic “Rain”. Its goal will be to teach children to transfer images that they see in everyday life onto paper. During the lesson, children learn to draw short lines and small strokes, and hold a pencil in their hand. Using game techniques in the classroom, the teacher develops a desire to draw in his children.
Finger painting “Autumn tree”
For example, children 3-4 years old will be quite capable of depicting an autumn tree by applying droplets of rich colors to the main trunk with their finger.
Draw leaves with your fingers
For such work, you will need to prepare in advance a palette and templates for drawings of tree trunks and branches. We invite the kids to cover the tree with leaves, choosing the most autumn colors from the palette.
Autumn with finger paints
Kids just love to draw with stamps. Stamps made from natural materials, such as potatoes, are especially attractive. The child dips the stamp in paint and the autumn leaves are ready to fall! You can pour the paint into a small saucer for convenience. You can make saucers with different colors and several different stamps.
Autumn drawing with potato stamps
Children 4-5 years old can be offered more complex drawing techniques:
Colored threads for balls
This lesson is aimed at introducing kids to straight lines. By adding straight and even lines to the balls, children form an idea of the image of objects. In the process of work, preschoolers develop an aesthetic perception of the resulting image.
To develop the skill of drawing solid lines, you can conduct a lesson on the topic “Striped rug”. The teacher shows the children his work and explains exactly what colors he used in his work. Next, children are encouraged to use their imagination and create their own creations. In order for kids to develop their imagination, they are not limited in the choice of colors.
In addition to pencils, this activity can also be done with a brush. Kids learn to pick up paint on a brush and carefully distribute it over the surface of the paper to create a beautiful and even layer. In addition, during the lesson, preschoolers acquire the ability to remove an extra drop from a brush, rinse the brush in water, and apply a new color of paint to it. The teacher continues to introduce the children to the color palette and forms in them an idea of the possible mixing of several colors.
In a lesson on the topic “Multi-colored carpet of leaves”, aesthetic perception is developed, imaginative ideas about objects and natural objects are formed. Kids learn to dip a brush with full bristles into the paint of their choice and use it to paint leaves of a certain shape.
In the “Colored Balls” lesson, preschoolers draw continuous circular lines with smooth movements, without lifting a pencil or felt-tip pen from the paper. During the lesson, the teacher invites them to use different colors to see the beauty of the resulting palette.
When drawing multi-colored soap bubbles, children gain the skills to properly hold a pencil in their hand, which will be useful to them while studying at school. In addition, the lesson involves the development of color perception, since preschoolers are offered different colors to work with.
Among the interesting options for activities, we will highlight such drawing lessons in kindergarten, during which children get the opportunity to independently think through the plot of the future drawing. This approach stimulates the development of creative thinking in preschoolers and helps them develop their imagination.
“METHODOLOGY FOR ORGANIZING VISUAL ACTIVITIES IN THE FIRST JUNIOR GROUP.”
“METHODOLOGY FOR ORGANIZING VISUAL ACTIVITIES IN THE FIRST JUNIOR GROUP.”
The world will be happy only then
when every person will have
the soul of the artist. In other words,
when everyone finds
joy in your work.
Rodin
Preschool age is a sensitive period for the development of productive activities in children: drawing, modeling, applique, design. Visual activity at an early age has an artistic and figurative basis. Creating an image is associated with the manifestation of various feelings and emotions. Cultivating in children an emotional attitude towards the phenomena depicted is necessary, since the process of drawing and sculpting is not only the transfer of individual features and properties, but also the moment of active entry into the image, when strokes, lines, and forms seem to come to life in front of the child.
The baby's first actions with a brush, pencil, or lump of clay are determined by the content of the object or phenomenon that he perceives. The resulting image begins to be recognized gradually. The process of perceiving one’s drawing and modeling that occurs is pleasant to the child and makes him happy.
Any activity at this age takes the form of a game, including art activities. Game techniques help create an emotional attitude to the process of drawing and modeling. The image becomes alive for them.
For example: a sad gnome came to visit - we drew a sun for him, at the end of the lesson he became very cheerful and danced with us; Grandfather and grandmother discovered that the kolobok was missing, they asked the children to make them a kolobok. The buns turned out beautiful.
The kindergarten education and training program recommends one drawing and one modeling lesson per week. The number of modeling and drawing lessons should be the same. However, their alternation can sometimes be disrupted: two drawing classes can be held in one week, and two modeling classes in another. This makes it possible to consolidate the acquired skills: a week-long break is too long for the child, and he forgets what he learned in the previous lesson.
Program tasks for drawing in the first junior group are:
- to arouse children’s interest in activities with pencils, felt-tip pens, brushes, paints, and clay.
- to form the idea that they draw with pencils, felt-tip pens, paints, and sculpt from plasticine;
- develop children’s perception, enrich their sensory experience by highlighting the shape of objects, tracing them along the contour with one hand or the other;
- lead children to images of familiar objects;
— draw children’s attention to the fact that a pencil (brush, felt-tip pen) leaves a mark on the paper. Learn to follow the movement of a pencil on paper;
- attract children's attention to the various lines and configurations they depict on paper;
- encourage them to think about what they drew, what it looks like;
- evoke a feeling of joy from the strokes and lines that the children drew themselves;
- encourage the addition of characteristic details to the drawn image; to the conscious repetition of previously obtained strokes, lines, spots, shapes;
- develop aesthetic perception of surrounding objects. Learn to distinguish the colors of pencils, felt-tip pens, and name them correctly; draw different lines (long, short, vertical, horizontal, oblique, intersect them, likening them to objects: ribbons, scarves, paths, streams, icicles, a fence, etc. Lead children to drawing round-shaped objects by organizing their perception of the surrounding life and play;
- form the correct posture when drawing (sit freely, do not bend low over a sheet of paper, your free hand holds the sheet of paper on which the child is drawing);
— teach how to treat materials with care and use them correctly;
- learn to hold a pencil and brush freely and correctly.
Material used in junior group I
when conducting art classes - these are pencils, felt-tip pens, paints, brushes, plasticine. In this case, we choose large and soft pencils of the main color. The brushes are large, the paint must be gouache, diluted to the desired consistency (red, blue, green, yellow, black).
In the first drawing lessons, it is better to give all children the same color of paint to focus their attention on how to use a brush and use paint. At the next lesson, you can change the color of the paint, but again give all the children the same color of paint. Only when the kids master the actions with a brush and paint can paints of different colors be placed on different tables; By the end of the year, paints of two to four colors should be placed on one table.
We use the following drawing techniques:
paints:
- brushing (leaf fall, traces): “top-top” - a brush walks across the paper;
- stretching a brush along a sheet - from top to bottom - a beautiful red ribbon, from left to right - a long road;
- a combination of horizontal and vertical movements with a brush
- a beautiful fence;
When drawing with pencils, use the following techniques:
- short vertical strokes - rain, grass, fence,
-horizontal (path, ribbons, cat’s whiskers);
- circular lines in a spiral (smoke from a chimney, a ball of thread);
- circular closed lines (steering wheels, ball, balls).
At the first lessons, we introduce children to pencils and paints, and the king, Pencil, and Princess Brush, can come to the lesson and talk about the rules of working with them. In the future, these materials are alternated in classes, but in order to consolidate the skills of working with them, it is necessary to conduct several lessons in drawing with a pencil, then several with paints.
For example: we draw rain with a pencil: we convey raindrops with the rhythm of strokes, while teaching us to hold the pencil correctly in the right hand, highlighting the blue color among other colors;
The cat's mustache was completed by drawing rhythmically short horizontal lines at close distances from each other;
They drew multi-colored balls (red, green, blue) - they taught how to draw balls of thread in a circular motion, while fixing the colors.
After two or three lessons, in which the content of the drawing is determined by the teacher, a lesson is conducted according to the children’s plans. Of course, these activities cannot be called activities “by design” in the literal sense of the word: kids depict what they want, many simply move a pencil on paper or repeat images learned earlier.
When children master some skills and abilities, they can draw collectively. Collective work is carried out in small subgroups of 8-10 children. This work gives children the joy of drawing “side by side” and always looks very beautiful.
Painting topics can include the following topics:
“On a level path” - we learn to draw with a brush, rhythmically make an imprint on paper;
“Chicken” (handprint) - evoke an emotional response in children to the bright color of the paint, enjoy the color spots;
“Autumn leaf fall” - we convey natural phenomena with the rhythm of strokes, teach how to hold a brush correctly in the right hand, and enjoy bright strokes.
“Let’s decorate a sundress for a nesting doll” - we decorate the sundresses of the nesting dolls with strokes, apply strokes to the silhouette of the sundress, and fix the colors.
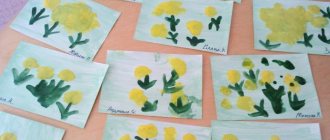
The group should have a stand or easel for viewing finished drawings. When looking at them with children, first of all you need to draw the children’s attention to the work as a whole: praise it, pay attention to the color. This develops figurative perception in children and helps enrich their vocabulary.
For example: “Look at how many beautiful flowers we drew. It turned out elegant, as if a large field was strewn with flowers,” or “How many large nuts fell from the tree - enough for the squirrel for lunch.”
Work completed within a month can be posted on an exhibition stand (file folder) for parents to view, where the topic, purpose of the work, and date of completion are indicated.
Each work must be signed in the lower right corner (the name and first letter of the child’s surname). The rest of the work can be stored in a plastic folder, in separate files for each child. They are necessary in order to observe the process of development of children’s skills and abilities, for diagnosis and for evaluating the work of the teacher.
To monitor a child’s development, you can use diagnostic cards for drawing and modeling, which contain the results of examinations of children 3 times a year. Based on the monitoring results, it is necessary to carry out individual work and make changes to planning.
In drawing classes, you must use the following methods and techniques:
1. Observing the subject of the image,
i.e., examination of objects and phenomena of the surrounding world and didactic games, during which ideas about objects and their properties are clarified and enriched (observation of leaf fall, a walk on the lawn, games - “roll the ball in the goal”, “wind a thread on a ball”, “Our feet walked along the level path.”
2. Passive movement method
- used to make it easier for the child to master the appropriate movements when drawing; makes circular, vertical or horizontal movements in the air.
3. Showing Picture Methods
. - numerous dots or strokes - this is snow or rain;
- rotational movements - circles, balls, balls, smoke;
- unidirectional movements - horizontal: paths, rulers;
- vertical: posts, fence, grass.
The show is often accompanied by the reading of nursery rhymes and songs.
4. The relationship between various types of artistic activity
to create an imaginative situation - look at fairy tale books with illustrations: “Kolobok”, “Teremok”, poems by A. Barto, nursery rhymes “I bake, bake, bake. ”, albums with pets.
Modeling classes in kindergarten begin in the first junior group. They open up great opportunities for the baby, develop children's creativity, and equip children with visual and technical skills.
Teaching modeling in the first junior group comes down to the following tasks:
- arouse children's interest in modeling;
- introduce plastic materials: clay, plasticine, plastic mass;
— teach how to use materials carefully;
— teach children to break off lumps of plasticine from a large piece, rolling the lump between their palms with straight movements, sculpt sticks, sausages, connect the ends of the stick, pressing them tightly to each other (ring, lamb, wheel, etc.);
- learn to roll out a lump of plasticine using circular movements of your palms to depict round-shaped objects (ball, apple, berry, etc., flatten the lump between your palms (flat cakes, cookies, gingerbread); make a depression in the middle of the flattened lump (bowl, saucer) with your fingers);
- learn to combine two sculpted shapes into one object: a stick and a ball (rattle or mushroom, two balls (tumbler), etc.
— teach children to put plasticine and molded objects on a board or special pre-prepared oilcloth.
Modeling classes alternate with drawing (1 lesson per week).
Acquaintance with plasticine was carried out like this: “This is plasticine. You can tear off a piece from it and, placing it between your palms, roll it out into a sausage or bun.
First, children begin to sculpt objects of the simplest cylindrical shape. For example: columns, pencils, sticks. Then spherical shapes: koloboks, balls, spheres.
After which they begin to depict more complex forms. For example: “a log cabin for Mishka”, “bagels for treating your favorite doll”, “cookies and gingerbread for New Year’s gifts”.
Using previously learned methods of working with plasticine, by the end of the year children can combine pieces in different ways, rolling and unrolling them, obtaining similarities with real objects; it is in this kind of play with clay that children engage in modeling according to plan.
Finished works can be placed on an exhibition board, where each child has their own picture.
When analyzing, you need to pay attention to all the work as a whole, praise the children’s work and beat them.
For example, Grandfather and Baba came to praise the sculpted “koloboks”; molded “bagels” were offered for treats to bear cubs and puppies; “Gingerbread” and “cookies” were given to the clown Klepa during the New Year’s song.
Before the next lesson, you can turn to these works again, admire them, and play with them again (“What delicious bagels we prepared for a treat”, “I wish spring would come soon so that our beautiful caterpillar would go out for a walk on the grass”).
The works are stored until the next lesson; parents can take them home if they wish.
Individual work
In order to quickly develop and consolidate drawing and modeling skills, it is necessary to carry out individual work with children. You can study outside of class in the morning or in the afternoon.
You need to work in subgroups of 2-3 children under the guidance of a teacher.
During this work, it is necessary to consolidate the skills of correctly performing the work, using equipment, monitoring the posture and emotional state of the child, creating a desire to talk about your work, it is necessary to use nursery rhymes, songs, and melodies.
For individual modeling work, you can use plasticine or salt dough, since organizing work with clay takes a lot of time and the modeling process from it is more “messy”.
It is necessary to create a developmental environment in the group that promotes the artistic and aesthetic development of children.
To work on art, you need to purchase various types of paper, gouache, large brushes, large pencils, wax crayons, markers, felt-tip pens, all kinds of stamps, pokes, clay, plasticine, a container for paint and water, boards, an easel - this equipment is located in special containers out of the reach of children. On the shelves you can place - games for color, shape; albums for coloring and viewing, outlines for coloring, books, stencils, templates, inserts, pyramids, cubes (colored, puzzles by color, colored construction sets, flannelgraph - all this should be in a place accessible to children.