Application of geometric shapes
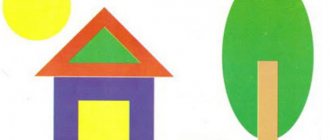
The simplest version of a person’s appliqué is made from geometric shapes. This technique helps develop a child's imagination. The main elements used are square, triangle, circle, and rectangles.
For the application you will need:
- patterns of triangles, circles,
- cardboard;
- glue.
The complexity of the work depends on the number of parts and elements used. The simplest option is to invite the child to arrange the figures so that they form a body, head, arms and legs. A rectangle (boy figure) or a triangle (girl figure) is used as a body. Instead of a head there is a circle. The arms and legs are made from thin rectangles.
They complicate the work with various details - pigtails, a hat, highlighting the hands and feet. Small details indicate the eyes, mouth, nose.
Tasks. Teach children to cut out houses from paper folded like an accordion or twice in half. Improve the technique of cutting with scissors: by eye in a straight line (walls of houses), along an oblique (roofs) and along folds (windows). To develop compositional skills - when creating a panorama of the city, rhythmically arrange houses in rows, starting from the top and partially overlapping the images.
Preliminary work. In independent artistic activity, a small group of children prepares the basis for a future composition - they tint a large sheet of paper or a strip of wallpaper, dividing the space into two parts (2/3 - green or yellow-brown ground; at the very bottom two stripes of a gray road, separated by white markings; 1/3 - blue or dark blue sky - see figure). A city tour or looking at illustrations and postcards with city panoramas.
Materials, tools, equipment. Strips of colored paper of different widths for cutting out buildings, rectangles and strips of colored paper for cutting out windows, simple pencils, scissors, glue, glue brushes, oilcloths, napkins, paper and cloth, a large sheet of paper or a strip of wallpaper to create an overall composition.
Contents of the lesson.
The teacher shows the children the basis for the future composition, explains that now there is space - the earth (the bottom of the sheet) to the horizon (holds his hand, showing the horizon line) and the sky. But soon, soon houses here will rise to the very sky, people will live in the houses, cars will run along the roads... And you and I will do this. Let's create our own city. The city is big, there are also a lot of houses in it. Now I will show you how you can create a big beautiful house.
— I want to build a brick house, so I’ll take an orange sheet. My house will have 2 floors, so I will fold the paper in half. I'll turn it around, you see - this is the first floor, and this is the second. How many entrances will there be in my house? Let's see. I'll fold the paper in the other direction - first in half, and then in half again. I'll unfold it. Help me count the entrances: one, two, three, four - four entrances in total. I'll fold the porches again and cut out the roofs - like this - I cut off a corner on one side, and then on the other. Let me turn it around and it turns out to be a house with a figured roof. Now we need to make the windows. I take a narrow strip of yellow paper. I fold it in half and in half again, smoothing out the fold. I unfold and cut exactly along the folds so that the windows turn out the same. I put up windows on the house. You see, there are not enough windows. I take another strip of paper, a different color (for example, blue, pink) and make exactly the same windows. I lay out the windows, alternating them by color or just as if the light is on in some windows and not in others (or the curtains are pink, blue, green) and glue them. This needs to continue until there is one window in every room of my house - on every floor, in every entrance. I will continue cutting out windows when you start making your houses.
The teacher invites one child to show the children how to make a house, clarifies and comments on his actions so that the children reinforce the idea and repeat the sequence again.
Children independently choose the color of paper for their house and windows. They start cutting. The teacher helps with advice and completes his work, and also cuts out round dances of men (ribbon applique) in order to interest the children in another new way, which they will master in the second half of the school year. Children transfer the houses to the general panorama. The teacher helps place them and explains that first we need to glue the houses on the horizon line, and then lower the next rows lower and lower. Partially overlaying the house on the house, we have a road below, cars will rush along it, which we will cut out on the next lesson.
After class. The composition “Our City” is hung for general review and discussion.
Man in motion
The appliqué of a person in motion helps develop a child’s creative abilities and imaginative perception. The difficulty of this task is that rectangles and squares of different sizes are used for the work.
For the application you will need:
- blanks of squares and rectangles made of paper;
- cardboard;
- glue.
The work consists of several stages:
- The child is asked to choose cardboard - the base on which he will stick the figure.
- The adult pronounces the pose that will be depicted in the form of an appliqué. He explains how the arms and legs are positioned in this pose, and what features there are. For example: a person runs, bends over, jumps.
- The child takes the prepared templates and lays them out in the desired position on the cardboard. If you have completed the figure correctly, then glue the rectangles with glue.
- If mistakes are made in a pose, the adult tells you how to correct it.
The application of a person in motion will be useful for children of primary school age and art students.
abstract of the application in the senior group "Postcard for Victory Day"
Summary of the application in the senior group “Greeting card for Victory Day”
Kolosnitsyna Tatyana Sergeevna
Target
:
Expand children's knowledge about the Great Patriotic War
Tasks:
— make a greeting card for Victory Day and give it to WWII veterans;
-continue to arouse children’s interest in working with the application;
- strengthen the ability to cut a strip from a sheet of paper in a straight line;
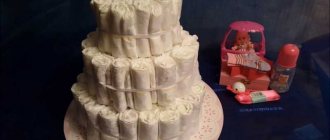
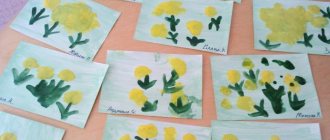
- strengthen the ability to crumple a napkin to get a flower;
-develop the ability to compose a composition;
- to cultivate accuracy in work, perseverance, and a sense of patriotism.
Equipment: colored cardboard, colored paper, dove template, napkins, glue, oilcloth, scissors, rags, step-by-step sample application on the topic of the lesson, leaves prepared in advance.
GCD move:
-Dear Guys! On May 9, our country will celebrate the most solemn, wonderful and bright holiday - Victory Day! Every year we remember this great day!
-We celebrate many holidays. We all dance, play, sing.
And we meet the beautiful Autumn, and we wait for a beautiful Christmas tree.
But there is one holiday - the most important!
And spring brings it to us.
Victory Day is solemn and glorious.
The whole country celebrates it.
-Look, our group also prepared for this holiday. Various illustrations, posters, layout.
-Guys, Victory Day is not just a holiday. On this day, the war, which lasted for 4 years, ended.
-There are a lot of poems dedicated to this day, guys, maybe you want to tell us some poems? (Children's answers).
- Guys, what about in our country?
(Veterans put on orders and medals, meet at the monuments to the dead, tell how they fought. The whole people congratulates their liberators, wishing them long life).
-And, guys, WWII veterans will also come to us and tell us how they fought, we will congratulate them and give them cards, which we will make today.
-Please go to your workplaces.
-So, today, as I said, we will make greeting cards for veterans.
-For this we will need: colored cardboard - this will be our background for the postcard; colored paper green, orange, black; glue; scissors; napkins of different colors; rags for wiping off excess glue and a dove template.
- Guys, check if you have everything? (Children's answers).
-Then let's get to work.
-Please look at the board. I have a finished postcard on my board with what is depicted on it. (Children's answers).
-Guys, what do you think the white dove means? (Children's answers are a symbol of peace).
-And the St. George Ribbon? (Symbol of military valor and glory).
-On my board there are shown the steps of how we will make a postcard. So the first thing we will do is flowers.