Of the classic triad “reading – counting – writing”, perhaps it is the third component that causes the most problems both for the future first-grader himself, and for his parents, and then for teachers.
Preparing your hand for writing. Photo - Lori's photo bank
In order to make it easier for a child at school, it is necessary to prepare his hand for writing. You can and should start doing this long before the child has to go to school. Of course, they also do preparation in kindergarten, but often this is not enough. Parents should definitely pay attention to this important stage of preparation for school. Especially if the child does not attend preschool institutions and does not develop fine motor skills in modeling or appliqué classes.
Why prepare your hand
Many parents do not even suspect that it is necessary to prepare their hands for writing. The better developed the fine muscles of a child’s leading hand, the easier it will be for him to master the skill of writing at school. Otherwise, the consequences will be sad: a first-grader at school will become very tired, will not have time to complete the teacher’s assignments, and will become upset when he sees the successes of his classmates and his own failures. Therefore, preparation is absolutely necessary.
But it is important to take into account one circumstance: preparing your hand for writing and learning to write are not the same thing. The child will learn the second at school, but our task, as parents, is to deal with him first. Don't force your preschooler to pore over copybooks, but train his arm muscles.
What about before?
Don't think that preparing your hand for school is a newfangled trend. In fact, the best teachers in both the 19th and 20th centuries were puzzled by the development of “manual skill” in their students. Under their guidance, children were engaged in paper folding, construction using sticks, matches, peas, buttons, modeling and much more. The famous Maria Montessori also paid great attention to manual dexterity. And in our ordinary lives, you and I did a lot of things that prepared our hands for writing: we whittled sticks, cut out figures from wood, folded paper airplanes, boats and frogs, pulled threads between our fingers in a bizarre way...
Preparing your hand for writing contains several stages:
- learning to work with your hands (various kinds of crafts, modeling, painting and drawing). This means: the development of motor skills, eye, spatial orientation, attention, the ability to work carefully, to finish any task, and not abandon it halfway.
- formation of a sense of rhythm - learning to coordinate movement and words in compliance with a certain rhythm;
- teaching drawing and graphic work - coloring, drawing in cells, shading, etc.
- formation of correct orientation in space - orientation on the working surface (for example, on a sheet of paper).
From early childhood
There is no need to think that it is very difficult to prepare your hand for writing. As we said above, the simplest and well-known types of children’s activities are aimed at this, among other things. But you shouldn’t let everything take its course either.
What to do with children so that it is beneficial and prepares their hands for writing and at the same time brings pleasure to preschoolers and you and me, and does not become a boring routine? The choice is huge:
- Do finger exercises.
From large, broad gestures and movements, gradually move on to smaller, more precise ones that require the participation of all fingers.
- Draw and color. Pay attention to accuracy, especially when coloring. The child should try not to go beyond the contours and not leave white, unpainted areas. Make sure coloring pages are age appropriate. The older the child, the smaller the details should be.
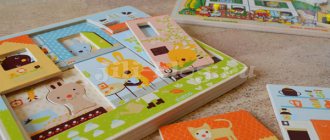
- Cut from paper. Already at two or three years old, your baby can make simple cuts using special scissors with rounded ends under your control. Give children old magazines with colorful photographs or illustrations. Let the crumbs cut out people, animals, cars, trees. This will not only keep them engaged for a long time, but will also bring great benefits. Over time, complicate the tasks, ask to cut out small objects with a lot of details. The cut out pictures can then be pasted onto sheets of paper, creating collages and comics about events in the child’s life. The precise and careful movements that must be made when working with glue also train your hands.
- Sculpt from plasticine, dough, clay. Try to make the elements you perform smaller and more varied, and the figures are sculpted in detail (with noses, ears, hair, fur, if they are people or animals, leaves and flowers, if they are plants, etc.).
- To string. Nowadays they produce a lot of wooden and plastic bead figures that can be assembled on strings. Often these laces end in hard, long tips. They are very comfortable for babies. But if the child has already learned how to string easily, then it is better to replace such special ropes with ordinary laces. This will complicate the task and force the child to make more precise and small movements.
If there are no special beads, then you can use thick pasta with large holes and ordinary shoe laces. Your little one will string them with no less pleasure. They help develop precision of movements, and, therefore, fine motor skills and entertainment such as “Make a hedgehog” (dry pasta is inserted into the holes of an inverted colander).
- Lace up. The simplest lacing can be bought or you can easily and simply make it yourself using thick cardboard and a hole punch. To make it more interesting for your baby, make them in the shape of a butterfly, car or flower. Lace in all directions.
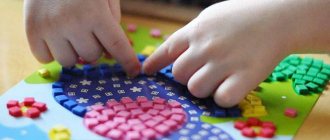
- Collect mosaics with many small parts.
- Hatch in different directions: horizontally, vertically, diagonally. Draw or print any outlines: an apple, a truck, an elephant. And let the baby do the shading. Ask your child to draw lines from top to bottom, then from bottom to top, then from right to left, then from left to right. Make sure that it does not go astray and does the work exactly in the given direction, maintaining the slope of the lines and parallelism, without drawing them too often or rarely.
- Sew on buttons. This task is suitable for older children, those who have already mastered all of the above. To start with, large buttons, thick threads and large needles are suitable. Embroidery and other types of needlework also perfectly prepare the hand for writing.
- Perform any other work that requires precise and small hand movements: sorting cereals, sorting screws, bolts, nuts, washers, buttons, beads, etc.
All these simple exercises gradually, day after day, imperceptibly for the child, develop the fine muscles of the hand, and it is its sufficient development that is necessary for the child to master writing easier, faster and more successfully at school.
Hold a pen and pencil correctly
It is important to teach your child to hold a pen and pencil correctly. It is easier to do this when the baby is just beginning to show interest in drawing. The sooner he gets used to it, the easier it will be for him later when it comes to writing.
There are many ways to teach your child to hold a pen correctly. For example, these:
1 way:
Give the baby a piece of paper and ask him to press this piece to his palm with two fingers (ring and little fingers), with the remaining fingers he will have to hold a pen or pencil.
Method 2:
Show your child how to hold the pen: not with a pinch, but by placing it on the middle finger and holding it with the thumb and forefinger. In this case, the index finger can move freely, and the handle will not fall off. She has enough support on her two remaining fingers. You can even play the game "Birdy". Explain to your child that the index finger is a bird that pecks grains, and tap your finger on the handle: knock-knock-knock. If your child subsequently forgets how to hold a pen or pencil correctly, just ask him: “Where is the bird?” And the child will immediately remember both the game and how to hold writing instruments correctly.
Graphic dictations
Graphic dictations are very useful for preschoolers. They not only develop attention and teach how to navigate on a sheet of paper, but also prepare the hand for writing. And children, as a rule, really like such tasks. For them, these are not lessons, but an exciting game with a prize in the form of a funny figure at the end, if everything is done correctly. Please note that most graphic dictations begin and end at the same point, i.e. The figures are obtained with a closed contour.
It rarely takes more than 10 to 15 minutes to complete even the most difficult graphic dictations. Even the busiest parents will probably be able to fit them into their busy work schedules. And the benefits will be enormous.
How to conduct graphic dictations:
- We use only a simple pencil or pen. Working with felt-tip pens has its own nuances and does not teach the correct pressure.
- We read clearly, without repeating, so that the child gets used to listening carefully and remembering the task.
- We gradually increase the pace.
- At first, you can write the letters “L” (left) and “P” (right) in the corners of the sheet. When the child becomes confident in navigating the sheet, discard this hint.
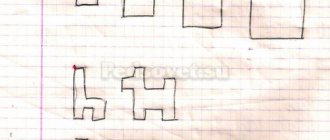
Graphic dictation “First-grader”
Attention! Before performing the dictation, ask the child to step back 4 cells to the left and above, and put a dot in this place. This is the beginning and end of the drawing that will be obtained as a result of performing a graphic dictation. We start work from this point, and we must return to the same point. If this does not happen, it means there was a mistake somewhere.
3 grades to the right, 1 cl. left up diagonally, 1 cell. to the right up diagonally, 2 cells. down, 1 class. to the right up diagonally, 2 cells. down, 1 class. left up diagonally, 3 cells. down, 1 class. left, 1st cell. down, 2 cells to the right, 1 cl. to the right down diagonally, 2 cells. down, 2 cells to the right up diagonally, 2 cells. left up diagonally, 1 cell. up, 1 cl. to the right down diagonally, 1 cell. to the right up diagonally, 1 cell. to the right down diagonally, 1 cl. to the right down diagonally, 1 cl. to the right up diagonally, 1 cell. down, 2 cells left down diagonally, 3 cells. down, 2 cells left, 2 cells up, 2 cells left down diagonally, 1 cell. left, 2 cells up, 1 cl. left up diagonally, 2 cells. down, 1 class. left down diagonally, 1 cell. down, 1 class. to the right down diagonally, 1 cell. down, 1 class. to the right down diagonally, 2 cells. down, 1 class. left, 3 cells down, 1 class. to the right, 1 cl. down, 2 cells left, 4 cells up, 1 cl. left, 4 cells down, 2 cells left, 1st cell. up, 1 cl. to the right, 3 cells. up, 1 cl. left, 2 cells up, 1 cl. to the right up diagonally, 1 cell. up, 1 cl. to the right up diagonally, 1 cell. up, 1 cl. left up diagonally, 2 cells. up, 1 cl. left down diagonally, 3 cells. down, 1 class. left down diagonally, 1 cell. left, 1st cell. up, 1 cl. to the right, 4 cells. up, 1 cl. to the right up diagonally, 2 cells. to the right, 1 cl. up, 1 cl. left, 3 cells up, 1 cl. left down diagonally, 2 cells. up, 1 cl. to the right down diagonally, 2 cells. up, 1 cl. to the right down diagonally, 1 cell. left down diagonally.
The result should be a figurine of a first-grader with two bows and a bouquet of flowers.
Did it work? Well done!
Something incomprehensible came out, but the circuit is not completely closed? Dont be upset! This is just an excuse to practice one more time. You can come up with graphic dictations yourself or use those that are easy to find on the Internet or in stores.
How to hold a pen correctly
It is also important to pay attention to how to hold the pen correctly. Invite your child to write something and watch him pick up the pencil. False if the child:
- holds his fingers as if he wants to add salt to the food, i.e. a pinch;
- clasps the pen in his fist;
- the writing instrument is located on the surface of the index finger, instead of the middle one;
- the end of the writing instrument points to the side, and not to the shoulder of the writer;
- The child’s fingers are located at the wrong distance from the stylus (close or, conversely, far from it).
A distorted hand position when writing will interfere with the correct development of this important process, so it is necessary to begin training to correct the situation. We bring to your attention a very effective corrective exercise for such a case called “House for Letters”.
Is your child ready for school?
How to determine if a child is ready to write? For this purpose, teachers have compiled many tests. For example, the Kern-Jorasick “School Maturity” test (easy to find on the Internet) is aimed, among other things, at determining whether the future student’s hand is properly prepared.
You can ask your child to complete the following tasks:
- Show your preschooler a drawn circle with a diameter of 3 - 3.5 cm. Ask him to draw exactly the same one. When evaluating assignment performance, consider the following:
- The child must draw a figure close in size to the original one.
- The circle should resemble a circle (even if not perfectly smooth), not like some other geometric figure.
- The line should be solid (continuous), smooth, and fairly confidently drawn.
- The pressure should not be too weak.
- The child’s movements when completing the task should be free and confident.
- Ask your preschooler to shade any simple silhouette (cloud, ball, pear). If your child has not done shading before, show him a sample. The child can choose the direction of the shading (horizontally, vertically, diagonally). When evaluating the results, consider:
- Evenness and parallelism of lines. Accuracy of execution.
- Precision of movements.
- Maintain approximately the same spacing between lines.
Note! If the small muscles of the hand are not well developed, then the child will turn over the sheet on which he is working, because it will be easier for him to do this than to arbitrarily change the direction of movement of the hand.
Even if your child doesn’t start school this year, do these tests and you will see whether your baby’s hand needs to be prepared more carefully and purposefully. If yes, then use the methods suggested in the article or come up with your own. And everything will work out for you.
Formation of writing skills in children
Writing is a special form of speech. The writing skill has a complex structure, and the process of its formation is long and multi-stage. In order to write a word, a child must correctly perceive it by ear (this also requires sufficiently developed articulation), correlate sounds with letters, remember graphic images of letters and their spatial orientation, and also finely regulate hand movements.
According to physiological studies, a child reaches the level of development of the nervous system and muscles necessary for full writing by the age of 7.
Experts also highlight three aspects of writing development in preschoolers:
- Phonemic aspect (the ability to distinguish the sounds of a word and compare them with letters);
- Graphic side (the ability to correctly display signs and symbols on paper, including letters and numbers);
- Technical side (ability to use office supplies).
In our article we will dwell in detail on the development of graphomotor skills. The preschooler is just getting acquainted with writing, so this period is called the indicative stage. Initially, the baby has to make great efforts and consciously control all his actions, visually checking each element of the letter with the model. At this stage, it is very important that the child develops a solid image of the letter based on sensory experience. Automation of writing can be achieved through regular exercises.