Many parents know that from an early age it is very important to develop fine motor skills in a child, since this is directly related to the development of speech. Special educational toys can be bought in the store, or you can make them yourself by reading our article today, in which we have collected interesting DIY ideas for creating such toys. All you need is a little time and some household items that you were probably going to throw away. In addition, your baby will definitely like a toy made by mother’s hands and will be a useful tool for him.
Sorter
A sorter is a box into which you put various figures. It helps develop attention and perseverance in a child. Inserting figures into holes of appropriate shape and size develops fine motor skills and trains the eye. In addition, during the game, the child becomes familiar with various geometric shapes, colors and sizes of objects. We liked the funny sorter in the shape of an elephant, which you can make yourself from what you have on hand.
Why you need to develop fine motor skills
Many people know about the need to develop children's fine motor skills from an early age. However, not everyone understands why this is needed and what such activities are.
Fine motor skills are the ability to perform precise movements with the hands and fingers. It is coordinated by the work of the nervous, muscular, skeletal and visual systems. Its development begins in the first months of a child’s life with looking at his own fingers and hands. Then the baby gradually learns to master them by picking up toys. Motor skills have a positive effect on manual dexterity, the formation of a student’s future handwriting, and reaction speed.
It has been established that the level of development of a child’s speech directly depends on the degree of formation of finger movements. In the human brain, the centers responsible for speech and motor skills are located nearby. Thus, when one area is stimulated, the other is also activated.
Volume book
For the early development of a baby, books are often used, with which you can play and develop various skills. Look what an amazing soft toy book Olga made with her own hands! A little imagination and creativity - and you too can do something similar.
Baby sling beads and bracelets for babies
These toys are more suitable for babies to chew and feel. You can’t always trust the assortment in stores; there is no guarantee of the safety of the products. And at home you can make them yourself using step-by-step instructions.
These are the earliest toys that look like beads or bracelets. Mothers often wear them to distract the baby while he is in a sling or in his arms.
Important! This will require crocheting skills. The ability to tie objects (bracelets, beads) and knit individual elements (animal figures, soft balls).
What you will need:
- wood beads;
- cotton threads;
- hooks;
- waxed cord/ribbon (base);
- filler (silicone fiber, cotton wool);
- rustling or any rattling objects (if necessary).
Operating procedure:
Decide in advance whether it will be a small bracelet, full-fledged beads or a biting toy. The base is a wooden object.
Bracelet - toy
Option 1. Take a small wooden ring and carefully tie it so that the knitted fabric covers the entire surface. In a similar way, tie a small wooden bead - the “head” of the toy. Separately tie a pair of ears to it, decorate the muzzle. When finished, connect the parts.
Option 2. Here wooden balls alternate with soft, knitted ones. You can tie several wooden balls - beads or tie balls, stuffing them with cotton wool/foam rubber. Let soft balls alternate with ordinary wooden ones in the bracelet. Connect them by using a thick, cotton thread.
Option 3. A bracelet with different balls is complemented by a pair of wooden rings.
Option 4. Bracelet - hippo. Tie a wooden base bracelet with cotton thread, just tighter and secure the ends. Tie the 4 legs and head of the hippopotamus separately. Fill them with cotton wool or other soft filler.
Option 5. Multi-colored knitted balls are collected together, with a figurine of a small hippopotamus. Tie each ball separately. You can use multi-colored threads to make the toy brighter. When collecting ready-made balls, alternate them with small beads. Sew a knitted animal figurine in the center.
INTERESTING: Proper DIY toys for kids
Sling beads are made in a similar way, only they are larger. Mom wears such a practical aid for the baby, at the same time a distracting thing.
Such toys are also suitable for one-year-old children, 1-2, even 1-3 years old. Over time, you can complicate the structure of the beads or bracelet by explaining to your child exactly what elements it consists of.
Soft cube
Kids love to play with bright, colorful blocks. And if the cube is made of fabric and has all kinds of ribbons, pockets, jingles and rustles, then this is not just a toy, but an excellent educational aid! You will find a detailed master class on sewing such a cube here.
What toys/games can you make yourself?
Among the most popular options for DIY toys are:
- Busy boards or development boards. There are different types of such aids for the development of fine motor skills: soft and hard boards, panels, stands, rugs. The type and elements are selected based on the age of the baby and the capabilities of the parents. Such objects can be used for the development of baby’s fingers from 6 months (soft version) until school (large wooden stands). We discuss their production in a separate article;
- Tactile bags and pillows . They are divided according to the items sewn in instead of the filling. Most often, cereals or various buttons, natural materials, are used. Offered to children from six months;
- Laces and other toys that involve working with small ropes, lacing, ribbons that need to be threaded through holes or tied together. Available for children from 8 months;
- Sorters . Small and large, cardboard and plastic, for babies and older children. The simplicity and benefits of this type of toy allow not only to develop fine motor skills, but also to keep the baby occupied while the mother is working. Applicable from 10 months;
- Massage mats. For legs, body, arms. Available from 8 months;
- Games made from lids and clothespins . The option when creating a toy requires a little imagination and time. Shown to babies from 10 months;
- Abacus . A classic, simple way to teach simple arithmetic. Used after one and a half years;
- Educational cubes . There are many types of these toys, the main thing is to understand what you want to offer your baby. Can be used from 6 months.
A truly impressive variety of items can be created with your own hands using simple household items and some store-bought items. Let's look at simple technologies for creating these toys at home, and safety precautions. Among the proposed options, there is sure to be one that you can complete even without much experience in needlework.
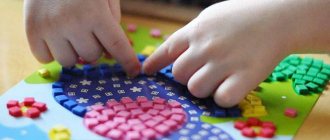
Tactile bags
Tactile or sensory bags are another great option for developing fine motor skills that can be easily made at home. Children enjoy sorting through a variety of bags, sausages, and soft animals made of fabric. Up to 3 years they feel, after 3 they sort, find a pair, build soft paths and bridges.
Making sensory bags does not require much time or expense. To create you will need:
- Fabric for base;
- Thread and needle or sewing machine for stitching the base;
- Scissors and meter for forming the base;
- Fabric chalk or other tool for drawing patterns;
- Pins for fastening;
- Spoon for filling the bag;
- Filler.
You can choose any fabric. The main condition is tensile strength. Usually several bags are made at once and to enhance the developmental effect from different pieces of fabric.
Felt, satin, and cotton work well.
The filler for the tactile bag is selected based on the baby’s age: the smaller the baby, the smaller the size of the filler. You can immediately choose from all possible options. Most popular among mothers:
- Beans;
- Pasta of different types, but small in size;
- Peas;
- Mustard seeds;
- Rice;
- Rock salt;
- Pearl barley;
- Acorns, peeled, chestnuts;
- Buckwheat;
- Flour or starch;
- Millet;
- Soybeans or dry corn;
- Oats;
- Candies and nuts;
- Shells and pebbles;
- Buttons and beads.
When creating a bag, try to maintain the proportions of the cereals; they should be approximately the same weight.
- Creating a sensory bag begins with determining the desired size of the finished product and creating fabric blanks. It is recommended not to make large bags, but to give preference to options that fit in a child’s hand.
- It is convenient, having decided on the size, to make a pattern for the future product from thick paper or cardboard. Using a blank, apply the outline of the future object to the fabric. Cut, leaving 1-1.5 cm for seams. After the fabric is cut, fold the elements in pairs.
- Fold the two parts right side inward and secure with pins, then sew completely on three sides, and halfway or less on one (a spoon should fit into the hole).
- Turn the product inside out and fill it 75% with filler.
- Sew up the slit. The bag is ready.
Additionally, you can use a variety of appliqués and fabric stickers. It’s good when elements that are useful for the baby’s development (numbers, letters, images of animals or objects) are glued or sewn onto different bags. These toys can be used not only to develop fine motor skills, but also to learn counting, letters and other useful knowledge.
Finished products can be used as a massage material, inviting the baby to walk along a path of bags, sit or lie down on them.
An excellent option for games is to guess the filling, build towers and walls from them, and develop dexterity when using the toy as a ball.
Some safety rules for sensory bags:
- Before pouring cereals into the finished product, it is advisable to heat them to avoid the appearance of unwanted insects inside the toy;
- All natural materials must be washed and dried;
- Finished products are stored in a dry place;
- Be sure to check that all the bags are strong and the baby will not be able to tear them.
By spending an hour of your time creating sensory bags, you can give your baby a lot of new sensations and impressions. Toys that are simple to make but have great potential will help your baby not only develop fine motor skills, but also dexterity, logic and other skills that you suggest. These simple items will become a good friend for several years.
Sensory pad
It is a hybrid between tactile bags and bodyboards. It is distinguished from bags by its size, and from busy boards by its filling. These toys are filled with various materials for sensory development and massage, and are lined with additional elements for study. In size they are usually created in the form of a pillowcase or sofa cushion. The most interesting option are sensory options with windows in which you can see what is hidden inside. This window is made of transparent material, which is sewn into the base.
It’s good when it is sewn from squares of different fabrics, this enhances the developmental effect.
To create your own sensory pad you will need:
- Fabric for the base. Can be made from different types of fabric or fur;
- Needle and thread or sewing machine;
- Scissors, meter, object for applying a pattern to fabric;
- Filler;
- Decorative elements for activities with the outside of the pillow;
- Zipper for options with large filler and children over 3 years old.
The first step to creating a sensory pad is to come up with a sketch or preliminary diagram. It is convenient to create a life-size plan for a future product from cardboard, immediately making patterns.
Having determined the appearance of the product, all the necessary parts are cut out and sewn together according to the intended pattern.
For small children, it is good to use filling made from cereals and natural materials that are sewn into the base. The finished product will look like several sensory bags sewn together. But with this option, you shouldn’t rush to fill the inside; first attach all the decorative elements, then finish the job by filling in the filler and sewing up the holes.
For older children, you can use a zipper to be able to remove hidden objects. To do this, two pieces of the base are sewn together on three sides, and a zipper is sewn into the fourth. It is convenient to use a hidden version of this item to make it more difficult for the child to open it.
It would be good if the pillow had a certain theme or the appearance of a house with windows. You can sew several pockets in which residents (animals, letters, numbers) will hide.
By using a little imagination and spending an hour of time, you can surprise your little one and keep him occupied for a long time, because it’s so interesting to find out who lives in this soft, colorful house.
Laces
A separate element for the development of fine motor skills that captivates children is a variety of lacing. Depending on the age of the baby, you can offer different options for activities. Sorting, tying, stringing objects, threading them through holes. All these actions perfectly stimulate the development of coordination and precision of finger movement. These toys are great for teaching counting.
To create a toy, you don’t need to have great handicraft skills, the main thing is to have desire and a little imagination.
You will need:
- A small board made of wood or plastic; you can use thick cardboard or a plastic cover for very small products;
- Laces, rope, ribbons.
It is best to make holes for laces in a wooden plank using a drill. Plastic boards and lids are easy to use with a screwdriver or an awl. The hole size must be at least 5 mm.
If you don’t have time to create large lacing, then you can use existing things for the activity. The easiest way is to use a colander. We thread a string through the holes and tie a knot on both sides.
We offer options for activities for the little one. You can thread it through other holes, string objects, or weave braids or knots from several ropes. If you tie it on only one side, you can show how to get the rope and ask to pass it on the other side.
The second option is to keep your little one busy: offer him a ribbon and pasta, cut up cocktail sticks, large beads or large buttons with a large hole, and ask him to string the items onto the ribbon.
If you have the desire and opportunity to create a more durable option, then you can approach the creation of lacing creatively by creating a real toy house, animal or other object. Color, add decorative elements. The main thing in such a toy is the presence of holes and a ribbon or cord for activities.
You can make your own beads for lacing. Make balls, cubes or other elements from clay in advance, make holes of the required size in them, and dry them. Ready-made items are smeared with PVA glue, painted with gouache or acrylic, and varnished. By creating your own elements, you can prepare educational material for learning not only counting, but also shapes, sizes, letters and other important knowledge.
If your baby is too small to string, you can make a miniature string from a plastic cap. Use an awl or screwdriver to make holes into which fasten multi-colored laces with a hard tip. Show your baby how to take the lace out and put it back in. He will definitely become interested in this activity and show how long he can do one thing.
Lacing is the easiest way to keep your little one occupied and develop his fine motor skills. Why not take advantage of this option?
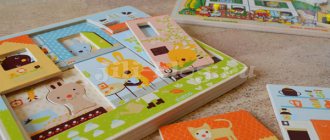
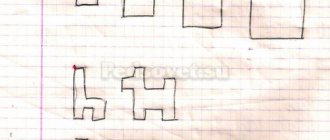
Sorters
Sorters are great for developing fine motor skills, attentiveness, logic and perseverance - toys that require the selection of objects to insert into certain holes. There are a variety of options on sale: from houses with animal figures to large cubes with various geometric shapes, which can not only be thrown into an object, but also installed on the outside of the toy.
Making a sorter at home is a little more difficult than lacing, but it is quite possible. For the simplest option you will need:
- A cardboard box of the required size for a large sorter. A jar or container with a plastic lid for a small pusher;
- Items to be used for sorting;
- A paper knife and scissors for making holes to create a sorter from a box, an awl or a knife for a pusher.
To make a large sorter from a box, you need to cut holes on one side (the bottom is usually used) for the items selected for sorting. Please note that the hole should be slightly larger in diameter than the object so that the baby can independently push a suitable toy. After this, the box can be decorated with a variety of stickers or appliques. The toy is ready.
For a small pusher sorter, you need to make a hole in the plastic cover for the selected items, preferably they are of different sizes. It is good if the child needs to use some effort to place the object inside the toy. Check that the sharp edges of the plastic cover are bent inward. You can start playing.
You can also use very small options as objects for the pusher: beans, buttons, beads, but when playing this way you need to carefully ensure that the baby does not try to swallow the proposed objects.
Foot massage mats
A separate type of fine motor training is toe stimulation. Most parents believe that only massage is used for these purposes, but many years of use of massage mats have confirmed the effectiveness of this method. Many orthopedists advise children to walk barefoot on different surfaces, but in city conditions it is not always possible to offer the baby variety. If in the summer you can go out of town and to the sea, where there are pebbles, sand, grass, then in the winter a massage mat for your feet, which you can make with your own hands, will come in handy.
Stimulating the feet, in addition to directly influencing the development of motor skills, allows you to form the correct arch of the foot (prevents flat feet), massages the nerve endings and improves coordination and blood circulation.
To create you will need:
- A piece of thick fabric for the base or plastic slabs for the floor in the nursery;
- Elements of the external side, sewn onto the base;
- A variety of suitable parts for gluing to the outside.
Fabrics that work well include:
- Felt;
- Carpet;
- You can also use a special soft floor covering in the nursery, consisting of multi-colored blocks and laid into a single sheet.
The following can be used as external elements:
- Flat stones and pebbles;
- Plastic covers;
- Buttons of different colors and shapes;
- Zippers with rounded ends, pay special attention to the pawl so that it is strong and does not fall off;
- Velcro;
- Laces and ribbons;
- Small rings, balls and cubes;
- Beads;
- Coffee beans;
- Beans;
- Small washers and chips with a flat top;
- It is good to sew tactile bags with various fillings onto the surface or use whole blocks filled with cereals or other small elements.
The essence of the massage mat is to constantly move the baby over an uneven surface, which helps him develop coordination and massages different places on the foot. This rug is easy to use in games, as a bridge, the ultimate goal in catch-up and tag games, or a playhouse for toys.
Games with clothespins/lids
Entertaining games can not only be made, but also found among everyday things. Perfectly stimulates the development of fine motor skills and imagination when playing with clothespins and lids. Using only the proposed items, you can create various heroes and build turrets, and if you additionally create some blanks, the game can be improved.
The most commonly used options are:
- Blanks made of felt or other dense fabric, cardboard (animals, trees, household items). First, it is suggested to remove the clothespins from the workpiece, and for older children to independently carry the clothespins from place to place and use them to fasten pairs of workpieces;
- Shoe box with plastic bottle top. Holes are made in the lid of the box into which cut off necks from plastic bottles are inserted and secured with tape. The child is invited to unscrew or tighten the cap on the neck. To make it more attractive, the box is decorated with colored paper or appliqués. To avoid wasting time collecting the lids after the game, attach them with strings to the box itself.
The main condition for maintaining calm when playing with lids and clothespins is to teach your child to put them in their place and use them only for their intended purpose. If this condition is met, a long, interesting and useful game is guaranteed.
Abacus
When teaching your little one mathematics, it is convenient to use an abacus, but it is not necessary to buy them. This handy arithmetic tool can be easily created at home from simple items. For the simple version you will need:
- Frame. You can use a ready-made photo frame or make it yourself from planks of the required size;
- Beads for counting. Determine how many rows you want to make, prepare the appropriate number. In one row there are usually 10 beads, of which the central two differ in color from the rest;
- Sticks or twigs of the same length and diameter for stringing beads. The length of the sticks should be greater than the width of the frame.
The process for making household bills is as follows:
- First you need to prepare the twigs by stringing 10 beads on them;
- The resulting counting sticks are glued to the back of the frame;
- If you are making the frame yourself, you can make small recesses in the walls to insert twigs into them. With this option, for additional strength, it is better to secure it with glue (you can also use liquid plastic);
- After the glue has dried, check the abacus for sharp corners and irregularities;
- The product is ready.
Such abacus will keep your child busy when playing independently and will help you visually teach your little one simple arithmetic operations.
Educational cube
Our list of toys that you can make with your own hands is completed by an educational cube. There can be many options for execution. Among those that you can do with your own hands are:
- Crumbs. Sewn or knitted;
- Sensory. They are made like soft bodyboards with various elements for study;
- Rattles. Sewn or made of thick cardboard, filled with a variety of bells or balls;
- Towers, construction sets, classic hard cubes;
- Puzzles.
It would seem to be a simple design, but with regular use, changing its purpose based on the age of the baby, it is a real simulator that develops fine motor skills, sensory skills, color and visual perception, and specimens with a noise effect have a positive effect on hearing.
Children love to play with blocks, using them to learn a variety of concepts and build towers and castles. Thanks to the volumetric shape, spatial thinking and a sense of balance are well developed. To build a high tower, the baby needs to concentrate, show accuracy and dexterity. When working with multi-colored cubes, the baby develops imagination and stimulates creative impulses. Understanding all this, many creators of teaching methods for preschool children use the cube shape in their techniques. One of the most striking examples is Zaitsev’s cubes, which propose to teach reading to children from the age of 3 by applying syllables on the sides of the cube. The game approach plays a crucial role in the application of educational technology.
To create cubes at home, you need to spend a lot of time, but it will pay off with the baby’s joy and achievements.
To create you need:
- Base material;
- Filler;
- Decor elements.
The base material can be:
- Cardboard;
- Plywood or plastic;
- Fabric for crumbs and sensory cubes;
- Styrofoam;
- Tree.
The filler depends on the type of cube chosen:
- Cereals and natural materials (sensory and crumbs);
- Cotton wool or foam rubber (crumbs and rattles);
- Bells, balls (rattles and hard cubes), etc.
The choice of cubes depends on the age of the child. For small children, it is good to offer crumbs, simple sensory cubes, and fabric rattles. For older children - solid options. Giving very young children hard cubes is irrational, based on their desire to put everything in their mouth and bite. Thus, cardboard options will very quickly become unusable, and wooden or plastic copies can injure your gums. Let's look at the technique of making different versions of cubes.
Crumbs, sensory cubes, rattles for babies
For very tiny children, these versions of the cubes are sewn from fabric. Most often, needlewomen use felt as a material that does not crumble, holds its shape and does not stretch. But you can choose any fabric you like. If the option you choose is very thin, then you can use non-woven fabric as a backing so that the finished product holds its shape.
Crumbs and sensory cubes are filled with different materials, the simplest ones are filled with padding polyester or small foam rubber, but to increase the functional load you can add small cereals or smooth pebbles.
To attract the attention of the baby, appliqués and various sewn-on elements are additionally prepared.
When preparing items to create cubes, do not forget a thread and needle or a sewing machine, scissors and a ruler.
The production of cubes of this type begins with determining the size of the finished product; 5 and 10 cm blanks are usually used.
Sensory cubes are created from materials of different textures and colors, which are duplicated with non-woven fabric. It would be great if a piece of fur is sewn on one side, felt on the other, satin on the third, velvet on the fourth, etc.
Decorative elements for sensory cubes must be strong so that the baby cannot break or tear them off. The most commonly used are buttons, ribbons, ropes, and rings.
Rattle cubes are made using the same technique as crumbs, but in addition to soft filler, bells or balls are added.
Steps for creating crumbs and sensory cubes:
- Preparing the base. You can use a pattern for a cube in the form of a square made of thick cardboard that is 1-1.5 cm larger than the desired size. Transfer 6 squares to the fabric and cut them out. If you are using a non-woven backing, then do the same with it, but the sides should be 1-1.5 cm smaller than the base;
- In the case of non-woven fabric, you need to glue the two layers together by ironing them. If you are using felt, then proceed to the next step;
- Decor is sewn in on all sides;
- The finished sides of the cube are sewn together along the edge of the glued interlining, in the case of felt, retreating 1–1.5 cm from the edge;
- Having sewn 5 sides together, carefully sew the sixth side on three sides, turn the cube right side out;
- Filler is poured or stuffed into the remaining hole. To enhance your baby’s interest in cubes with soft filling, you can insert a small bell;
- Sew up the hole;
- The product is ready.
Towers, construction sets, classic cubes
This type of cubes is offered to children from 1.5 years old and differs from crumbs and sensory ones in its rigid base. You can use a variety of cardboard and wood. Depending on the chosen base, the creation technique has its own characteristics.
Cardboard cubes are the easiest to make. To do this, you need to select a sufficiently large piece of this material. You can use a special purchased option or leftovers from shoe boxes or equipment.
To make cubes from cardboard you need:
- Determine the size of the future cube (for example, we will take 5 cm);
- Draw a blank on a piece of paper. To do this, multiply the selected edge size by 4 and draw a rectangle of the resulting length. The width of the rectangle should be equal to the size of the edge of the future product. If the cube is 5 cm, then the rectangle should be 20x5 cm. Divide the resulting figure into 4 equal parts. Add squares of the required size to the second rectangle element on both sides. To firmly glue the cube, add 1.5-2 cm to all future edges of the object. Cut out the blank and first fold it into a cube, checking the correctness of the blank;
- Transfer the finished piece to cardboard and cut out the base for the cube. Fold all sides of the future cube in half to make gluing easier;
- Assemble the base along the edges, moving additional margins inward. Glue, leaving the top part;
- If desired, at this stage you can put a variety of small objects into the cube that will make a sound;
- Glue the last side;
- After creating the base, you can start decorating the cube. For this, a variety of paper and fabric applications are used;
- To make the product more durable, you can carefully wrap it with tape;
- The product is ready.
Developmental mat
Another teaching aid that helps make your baby’s fingers more dexterous and skillful is a soft developmental mat. It could be a themed rug, where an entire city is drawn as an appliqué, each house or tree has a different texture, and you can actively play with the figures. Olga has a great idea for such a rug on her blog. And at the Masters Fair we noticed some very cool rugs from master Galina. Filled with inspiration and ideas, you can make a truly unique rug for your child, with which he can not only play, but also develop.
DIY toys for children under one year old
You can find many educational toys on store shelves. But let's clarify what an educational toy is.
A toy with the help of which a child learns something new is considered educational. We can say that every toy is educational.
After all, even the simplest rattle will teach the baby to control his hands and understand where the sound is coming from. To develop your children's abilities, you don't have to buy expensive entertainment. You can make simple and useful toys. For example:
- Educational cube. Each side of such a cube is made of different surfaces: smooth, rough, rustling, fabric, yarn. You can add flowers, pockets, appliqués, whatever your imagination suggests. The cube will be interesting for children up to one year old.
- Figures . You can make a toy with figures from cardboard and colored paper. The child will become familiar with colors and shapes. Finger motor skills also develop. Toy from one to two years.
- Developmental board . Children from young to old will like it. Thanks to her, logic and fine motor skills develop. The baby can be carried away for a long time by studying all the details of this wonderful device.
DIY pompom toys for children
Toys made from pompoms are soft and pleasant to the touch. You can easily make them yourself. Make a toy out of a pompom with your child; children from two years old will love this activity.
You can buy ready-made pompoms or make them yourself from yarn.