Benefits of classes
Drawing in an unconventional palm technique will allow the child to develop the muscles of his hands, and parents will be able to establish psychological contact with the baby. Such activities not only entertain, but also bring benefits:
- develop motor skills;
- give new knowledge about the shapes of objects;
- teach color recognition;
- develop taste.
Regular finger painting classes allow you to strengthen your hand muscles and develop motor skills, and this has a beneficial effect on speech and abstract thinking. The child will be able to learn about new objects by depicting them, and will also become familiar with geometric shapes, different colors and shades. Such home lessons will help parents prepare their child for the first grade of school.
Small objects help develop coordination of movements. Children will be able to expand their horizons and gain new tactile and visual sensations. The child will receive many pleasant emotions from creative activities, he will develop a taste and a craving for beauty. Children express their experiences through colors. Each drawing reflects the joys and fears of a child. Parents should pay attention to what exactly he depicts.
You can start classes from 10-11 months, but the baby should draw only with the help of his parents. It is better to make the first lessons short - 5-10 minutes. Over time, they can be extended to 20-30 minutes.
You should not force your child to draw; it is better to observe his mood. Creativity requires a good mood and inspiration.
Materials and tools
All materials can be found in any store that sells office supplies. Children do not need professional expensive paints. It is better to choose those with a safe composition, because the child can taste them.
Required tools and materials:
- paper;
- finger or any other paints;
- dry and wet wipes;
- cotton swabs and disks;
- old toothbrushes;
- oilcloth or mat for creativity.
You can choose any paper for drawing - A4 or A3 sheets, Whatman paper, coloring books, colored cardboard. You don’t have to buy expensive goods; just buy a standard album or sketchbook. But the paper in them should be thick so as not to get wet from water. Suitable paints include watercolor, gouache, and special materials for fingers. They can be purchased at any art stores. The colors should be bright; there are watercolors and gouache with glitter. Such materials will interest children. You can draw figures not only with your hands - the child can use cotton pads or sticks, toothbrushes.
It is advisable to seat the baby at a comfortable table, and lay a blanket or pillow on the chair to make him comfortable. It is better to cover the workplace with oilcloth or a special rug. In any case, the children will cover it with paints. It is also recommended to dress the child in old clothes that you don’t mind getting dirty. And to cleanse the skin you need to use dry or wet wipes.
Kids won't be able to draw serious pictures yet.
Their first attempts will resemble meaningless scribbles: dashes, sticks, crooked lines, blots. But the more often the child practices, the more interesting his images will become. With age, technique will improve, and the most talented children will begin to create real masterpieces.
Ideas for finger paintings
Finger painting is the most accessible form of creativity for babies starting from six months. At about the age of two or three years, the child will ask the parents to draw something. Then you can use a little trick. Ask your child to make paint impressions with their fingers. And then turn them into different drawings: images of animals, flowers, transport. Older children will also enjoy this method of finger painting. Any preschooler will love the idea of turning their prints into funny drawings. This is an opportunity to develop fine motor skills, imagination, creativity, and an idea to have fun.
Precautionary measures
Small children get tired quickly; for the first time it is enough to practice for no more than 5 minutes . Further, the child’s attention will not concentrate on creativity. The first few lessons are an adaptation period. You should not set difficult-to-achieve goals while you need to conduct lessons in the form of a game. While drawing, children, with the help of their parents, will be able to study geometric shapes, names of colors, various animals and types of transport, even body parts.
It is important to properly prepare the workplace and monitor the baby. First you need to deal with the paints. If it is watercolor, then it is diluted with water to a paste-like state. Thick gouache should also be made more liquid. Finger paints are ready to use. You can add glitter to them to make drawing more interesting.
It is better to pour the material into a flat saucer or plate. It is difficult for kids to get paint out of a small jar with their fingers; it is much easier to scoop it out of a large bowl. It is recommended to place a bowl of warm, clean water nearby. The child will wash his hands in it in order to continue using a different color. You also need to place a towel nearby, which can be stained with paint.
It is not advisable to leave your baby alone during classes. A small child can be so inventive that he will paint more than just paper . The role of parents during creativity is to channel the children's energy. The mother or father must communicate with the baby, prompt or help him. But you need to be allowed to make mistakes. Let a child draw crookedly or ugly - this is how he still expresses his “I”.
If the baby is not yet a year old, then it is better to provide him with a floor instead of a table. It is advisable to remove the carpet from it and lay down oilcloth. It is also recommended to remove all items that a child could damage. Wardrobes and beds can also be covered with oilcloth, otherwise they may be painted. If parents are afraid that the baby will freeze, you can put a warm blanket under him.
Paint Recipes
The technology called “Finger Painting” involves the use of paints. But many parents worry that they may be dangerous for the child. After all, many kids taste them, and they contain many harmful chemicals.
Some mothers prepare their own paints. The ingredients are quite simple:
- 2 tbsp. flour;
- 1.5 tbsp. water;
- 7 tbsp. l. salt;
- 1.5 tbsp. l. vegetable oil;
- glycerol;
- food colorings.
First you need to mix the dry products - flour and salt. Add water to them and stir until thick sour cream forms. Then add vegetable oil. The ingredients can be mixed with a whisk, fork, mixer or blender. Glycerin is added as desired, it gives the paint shine.
The finished mass is poured into different jars; you can use empty containers from gouache or baby puree. Then you need to add dyes. They can be natural - juice of carrots, beets, celery, turmeric. You can also use food colorings that are added to baked goods.
At home, you can prepare three-dimensional paints for finger painting. You will need few ingredients:
- 1 tbsp. flour;
- 1 tbsp. salt;
- 2 tbsp. water.
The products must be thoroughly mixed and placed in different containers. Then dyes are added to them. For additional shine, glitter or glycerin is added to the mixture. Next, the jars are placed in the microwave for 1.5 minutes at 180 degrees. The result will be a voluminous material. While drawing, the paints will lie on the paper so that any image will acquire a 3D effect.
You can also use porridge for cooking:
- 0.5 tbsp. fine-grained cereals;
- water;
- dyes.
Semolina is suitable for creating paints; it is quite small. It is cooked according to the usual recipe; the consistency of the porridge should resemble sour cream. For greater viscosity, you can add PVA glue to the mixture. The mass is also laid out in small jars and mixed with dyes. This material will also allow you to create three-dimensional drawings. But after applying it to paper, you need to handle the painting more carefully - it must dry. You can fix the cereal with regular hairspray.
Mastering new opportunities
The baby is already old enough to use real art materials - gouache, watercolor or special paints for finger painting. Unlike a brush, the smooth surface of the finger does not hold enough paint to draw a long line, so to create paintings it is better to “dip”, “rub” or “print” paints on paper. To print by hand, the paint must be diluted to the consistency of liquid sour cream and poured in a thin layer onto a flat plate.
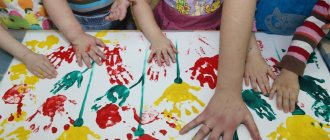
It will be useful and interesting for a child to explore the capabilities of his own hand, because with the help of one single palm you can get a huge number of different prints, and by adding your own imagination, turn them into real masterpieces. You can smear, draw and print any abstractions, enjoying the color and painterly flavor. Or - create interesting plot pictures. For example, a print of an open palm with your fingers down can become a cheerful octopus, you just need to draw its eyes and mouth.
With the help of mom and dad's palms, you can draw a whole family of octopuses of different sizes. And plant them on the seabed, with imprinted pebble fingers and waves or algae, which are obtained if you dip four fingers in paint and draw wavy lines in the desired direction. And a closed palm will give an imprint of the silhouette of a fish. All that remains is to finish drawing her fins and tail with your fingers.
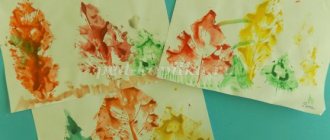
The same palms can also turn into magical flowers with finger petals - you can print an entire meadow from them! Or you can “limit yourself” to the wings of a beautiful bird.
Printed palms with pressed fingers can become amazing butterflies, just draw long antennae on them. A hand clenched into a fist produces a round imprint that looks like a shell or a snail's house. In addition, from the resulting circles you can print a snowman, a sun, or a funny little man.
A half-open fist makes an arc.
When printing the pads and phalanges of the fingers, the resulting impressions are rectangles or small segments of different lengths. Each finger has its own unique fingerprint.
By turning your hands in different ways and adding recognizable details to the printed elements, you can realize any ideas. Thus, by connecting and combining simple elements, the baby develops imagination, spatial and imaginative thinking, and finds the first design solutions. With this method of drawing, you can use both hands alternately, or use them simultaneously, which perfectly develops coordination. T
Some simple creative exercises are especially important for left-handed children, as they unobtrusively stimulate the full development of the right hand. This, at first glance, not very neat and downright dirty work on large sheets of paper serves as an excellent means for relaxation and relaxation, liberates the child, relieves him of the fear of spoiling something or getting dirty, and gives the child the necessary creative courage, the lack of which little children often suffer from. artists.
Creativity with mom in the kitchen
Paper and paints are not at all necessary attributes for finger painting. Beautiful finger paintings can be created on a tray or baking sheet sprinkled with flour or semolina. A sufficient amount of flour or cereal must be leveled by shaking the tray so that the entire loose mass is distributed in an even, not thick layer. So your improvised sheet of blank paper is ready. You can use your finger to draw any objects or scenes that are not overloaded with details. Painted pictures can be easily erased by shaking the tray several times. A baby who is captivated by such an unusual drawing will free up a lot of time for his busy cooking mother.
“Artistic” cleaning
Another great place for finger painting is the bathroom. The little artist-experimenter can have tiled walls, a mirror, and the bathtub itself at his disposal. The choice of colors here is limited only by the assortment of the toilet shelf. You can draw on tiles, mirrors and bathtub walls with both children's toothpaste and dad's shaving cream. The main thing is that these “paints” do not contain fat - it is difficult to wash off.
You can draw by dipping your finger in paste or cream. Or - run a clean finger over a dense foam base, which is obtained if you cover some smooth surface with a thin layer of shaving foam. A shaving brush or sponge works well to apply the foam. The tile can be used as a basis for ornaments: let the child find a pattern and repeat his mother’s drawing on the adjacent tile.
Such hygienic paints will not only entertain the baby, but will also help clean the bathroom. You don’t need to scrub anything special, just wash off the drawings with a shower, and the bathroom will only become cleaner. If you want brightness here, you can use gouache or watercolor. These paints are water-soluble and can be completely washed off with plain water.
Instead of paints - plasticine
Drawing... with plasticine will further strengthen your fingers and prepare them for writing. You need to apply a simple design on the cardboard base, and then pinch off small pieces of plasticine and smear them over the design with your fingers, as if painting over it. The work turns out complete and very decorative if the entire surface of the picture is covered with such “paints” - both the drawing and the background.
Plasticine pieces mix well with each other and new, unexpected colors are obtained. From a distance, this work looks like it was painted in oil. Hands and fingers are a universal tool that is always with the child, and instead of paper and canvas, the whole world is at his disposal.
Is it possible to resist drawing with a tanned finger on the warm sand at the edge of the sea, so that the waves, like a huge eraser, wash away the drawing?
How can you help but draw a funny face on the foggy glass or run your finger along the dusty side of the car?
How can one avoid oddly picking at the ice on a frozen trolleybus window, if sometimes even adults can’t resist doing it?
By allowing a child to feel and try everything for himself, to put everything through his own hands, we expand the boundaries of his knowledge and creative horizons. After all, a dirty finger can easily be washed off with soap or a damp cloth, and the desire to create, suppressed in early childhood, may never wake up.
Tips for parents
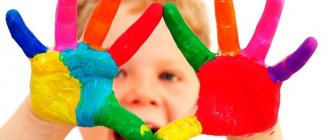
Parents should show the little ones exactly how to draw a picture with their fingers. The unusual technique of fine art should interest the child. Use your fingertip to scoop up some paint and make a dot or draw a line on the paper. The baby can repeat this. But you can draw not only with your fingers, but with your entire palm.
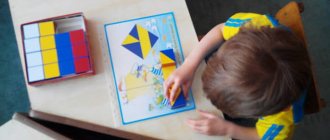
Older children enjoy using ready-made templates. You can find them on the Internet and print them or draw them yourself. These are images of fruits, vegetables, animals, transport. They are usually already painted, but have white areas. The child must paint them so that the colors match, or trace the outlines of the drawings .
There are popular pictures that kindergarten teachers use. The finger painting technique is also suitable for depicting natural phenomena. A child can draw the sun, rain, snowfall, and starry night with his hands.
The background is painted over with your fingers, evenly distributing the material over the paper. But you can use colored cardboard. Large images - sun rays, clouds, fish, flowers - are drawn with palms. And small details can be depicted with little fingers, cotton swabs and even toothpicks.
Finger painting will allow you to prepare greeting cards and themed posters for kindergarten. The child will be able to take part in decorating the house for any holiday. And parents will help kids master more complex painting techniques with each new lesson.
Developing fine motor skills in a child
Psychologists believe that creative experiments with finger paints can begin at 10–11 months. Even then, the baby can trace the relationship between the paint and the mark on the paper. But it’s better to focus on your child’s individuality. If he can already move freely, crawling or on his feet, and is fully engaged in research activities, it’s time to introduce him to creativity and introduce him to finger paints.
It is advisable to start finger painting in the first half of the day, when the child is more active. The baby will remind you about the end of the lesson, because it is simply impossible for a one-year-old baby to hold attention for a long time. The first lessons, as a rule, do not last long - literally a couple of minutes. In the future, an enthusiastic child can draw for up to 15–20 minutes without stopping.
What do you need for finger painting? First of all, special finger paints, they can be bought in almost any store that has a department of goods for children's creativity. They have the desired consistency and do not require additional dilution with water. When choosing, pay attention to the jars themselves: they must close tightly so that the paint does not thicken too quickly. For your first experiments in fine art, it is better to choose bright, but not “acidic” colors. As for paper, A3 size watercolor sheets are preferred. They are big, the baby will have room to “swing”. And if you take a roll of old wallpaper on which you can draw on the reverse side, then there will be no limit to a child’s happiness. And also make a blank - a green leaf on which the ladybug sits. You will need it.
Step 1.
Taking into account the child’s age, we prepare a workplace: cover the table or floor with oilcloth (newspapers), put a sheet of paper and paint, open a couple of jars. It is better to start getting acquainted with finger paints with one or two colors. At first, the baby is surprised by the very fact that the paint leaves a mark on the paper, and does not try to change colors.
Step 2.
Take your time to dip your baby’s finger in the paint. He may get scared and flatly refuse to “get his hands dirty.” Better show him an example by leaving a long colored line on the paper with your finger or a print of your palm. Then invite your baby to “play around” with you. Celebrate the activity with rhymes or songs.
Step 3.
Now let the baby dip his finger in the paint and run it across the paper. Give your child time to get comfortable and understand that the line on the sheet is the work of his fingers. And then move on to simple game exercises.
Step 4.
Now we take our blank - a green leaf with a ladybug. Invite your child to finish painting her paws and dots on her back using a finger and black paint. Children love it when there is a playful moment in the lesson. This really captivates them. And if they like it, the next “lesson” will be a great success!
Vigilance first!
Before purchasing, check whether the finger paint you choose meets safety standards. Russian manufacturers must indicate the number of the sanitary-epidemiological report. On the packaging of imported paint, pay attention to the presence of the “CE” or “AP” marks. This marking means that the product meets the requirements of European or American standards and is safe for the health of its consumers.