Cosmonautics Day on April 12 has been celebrated all over the world for many years. This year marks 60 years since Yuri Gagarin first flew around the Earth. This is where the history of space exploration began.
On the eve of the anniversary, thematic exhibitions and events will traditionally be held in kindergartens and schools. Surely your child was also given the task of creating crafts for Cosmonautics Day with their own hands. We offer you a selection of ideas for inspiration, both from improvised means and from unusual materials. Children can do most of the crafts on their own. The task of parents is to organize, advise and unobtrusively help if necessary.
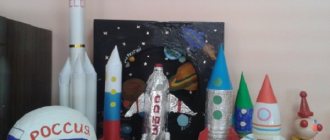
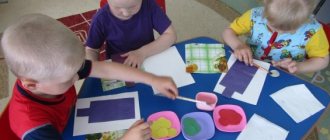
Crafts for Cosmonautics Day in kindergarten
The first manned flight around the Earth has long been history. However, the topic of space exploration has been of interest to children of all ages for several decades.
Constellation
Image source
This easy-to-make craft is suitable for little ones. In addition to the fact that the baby can easily create his own masterpiece, this is a great activity for developing fine motor skills. From a very young age, children can begin to talk about space during the creative process.
In this case, you will need a minimal set for creativity:
- plasticine and stack;
- colored cardboard.
Progress:
- Choose the constellation you will make.
- Count the number of stars in it and mold the same number of small balls from yellow plasticine.
- Flatten the balls with your finger, turning them into a cake. Cut out stars from them using a stack.
- Also make thin strings from yellow plasticine to connect the stars into a constellation.
- Lay out a constellation figure from the prepared materials on a sheet of colored cardboard.
Rocket
One of the most popular and easy-to-make crafts for Cosmonautics Day in kindergarten. This craft is sure to awaken a child’s interest in studying astronomy.
You will need:
- toilet paper roll;
- colored paper or paints;
- glue;
- pencil.
Progress:
- Make a large circle out of colored paper and cut a triangle out of it.
- Roll the resulting shape into a cone and glue the edges. This is the “top” of the future rocket.
- Glue it to one end of the sleeve.
- Cut out 2-3 small circles from colored paper and glue them onto the rocket. These are portholes.
- At the end of the sleeve, make symmetrical cuts of 4-5 cm opposite each other.
- Cut a wide strip of colored paper and fold both corners to form triangles.
- Insert this strip into the slots. The rocket is ready to launch.
solar system
Crafts for Cosmonautics Day are not only about rockets and airplanes. Try inviting your child to create a real solar system with his own hands. This will keep the child busy for a long time and will help him remember the names, colors and locations of the planets.
You will need:
- plasticine;
- empty box;
- toothpicks;
- scotch;
- scissors;
- sponge;
- a jar of water;
- needle and thread.
Design of a subject-spatial environment on the theme “Space”
SUBJECT-DEVELOPMENT ENVIRONMENT ON THE TOPIC "SPACE"
To create a subject -
development environment on the topic
“ World of Space ”,
the principle of maximum use of the group room space for children’s activities and the conditional division of space into zones were observed. In the same area, according to the principle of integration, different types of activities can be carried out.
They launched a role-playing game with costumes for astronauts, a space cafe, a computer for controlling a rocket, and a portable screen. There is a screen table with pockets where games on this topic are placed.
Creative activity zone - there are didactic materials “How to draw space”, “Space coloring pages” and materials for free creativity.
We have set up a space laboratory where children can be told in an accessible form how day and night and seasons change, how a solar eclipse occurs, why it is dark in space, and explain why all the planets revolve around the sun.
Our library hosts an exhibition of books about space, card indexes of poems and riddles.
There is a selection of didactic material “How to tell children about space?”
A child's whole life is a game. And therefore, the learning process cannot take place without it. Tactile sensations, fine motor skills, and mental operations are developed in children's play. Working with a child should be playful, dynamic, emotionally enjoyable, tireless and varied. And this objectively pushes us to search for both traditional and non-traditional gaming techniques and means in working with children.
Multifunctional felt aids were chosen as this tool.
The uniqueness of these manuals lies in the fact that felt toys not only embody the principle of clarity, according to which learning is based on specific images that are directly perceived by students when learning new educational material, but also carry great developmental potential. We made a “cosmic cube” with 4 games: “Labyrinth”, “Tic Tac Toe”, “Solar System”, “Tactile Paths”.
In the locker room there is an information center for parents, where consultations on the topic and exhibitions of children's works were presented.
In the speech therapist's corner, parents were invited to get acquainted with games for developing children's speech on this topic.
The choice of equipment, manuals, games and toys was approached creatively, based on the conditions and capabilities of the group room.
Source
Space crafts for school
When we hear about space-themed crafts, rockets, airplanes and stars immediately come to mind. We invite you to bring more original ideas to life.
UFO
Even though building a UFO seems like a very difficult task, we offer a simple and easy way. Such a craft will surprise school teachers and will definitely not go unnoticed at an exhibition of creative works.
You will need:
- 2 plastic bottles blue or green;
- 2 disposable plates;
- scissors;
- Styrofoam;
- hot glue;
- skewers;
- large beads;
- white cocktail tube;
- battery-powered garland (preferably with white light).
Progress:
- Trim the bottom of the bottles.
- In one of the plastic plates, cut a large circle in the center, slightly smaller than the diameter of the cut bottom of the bottle. Cut out a small circle in another plate.
- It is advisable to heat the edges of the cut bottom of a plastic bottle with an iron to even out the edges. This way the part will stick better to the craft.
- Apply glue to the edges of the cut bottom of the bottle and glue it to the plate where you cut out a large circle.
- Cut the foam into thin squares.
- Cut a strip from the remains of a plastic bottle and straighten it as much as possible.
- Glue the foam squares with a small distance from each other along the entire length of the strip.
- On a plate where a small circle is cut out, carefully poke 3 holes around it with scissors.
- Insert skewers into these holes, securing them with glue and beads. The skewers need to be attached not evenly, but so that they look slightly to the sides. These will be the legs of our UFO.
- Cut the white cocktail tube into 3 equal parts. Place each one on the “leg” of the UFO. If you don’t have a tube of the desired color on hand, you can paint the legs with white paint.
- Grease the tips of the legs with glue and put beads on them.
- Glue one of the strips of foam plastic along the diameter to the plate on which the legs were made.
- Place the garland inside, leaving the “tail” with batteries outside. Glue the top part - a plate with a bottle bottom.
The craft is ready. All that remains is to turn on the lights and go on a space adventure.
Saturn
To create a real planet with your own hands, you will need available tools. It should be noted that the craft will take a lot of time: in total, it will take about 2 days for the model of the planet to dry. Therefore, you need to take care of its production in advance.
You will need:
- PVA glue;
- brush;
- balloon;
- paper towel or white napkins;
- cardboard;
- paints.
Progress:
- Inflate the balloon.
- Using PVA glue, cover it with napkins, leaving a small space free at the “tail” (in order to later remove the ball from it).
- Let dry (about a day). Carefully burst the ball and remove it through the remaining hole.
- Cover the resulting void with paper. Let dry thoroughly (also about a day).
- Color the ball in the appropriate colors (yellow and orange shades). Leave to dry for 10-15 minutes.
- Make a ring out of cardboard (use a compass to measure the exact diameter).
- Attach the ring to the planet and color it.
star ceiling
An ordinary white ceiling in a starry room is boring and wrong.
The ceiling sets the direction of the style, so you can design it in the following ways:
- Tension. Such a ceiling can demonstrate galactic spirals, the surfaces of other planets, or become part of the night starry sky - the choice of pattern on the surface of the stretch ceiling is up to the owners of the room. If you install fiber optic threads and a projector behind the stretched fabric, then in the evening the ceiling will become a real sky, on which stars shimmer and galaxies replace each other.
- Plasterboard structures. With their help, the most complex design solutions are implemented, including semicircular vaults of the ship’s interior. A multi-level suspended ceiling with built-in spotlights and fluorescent lighting fits perfectly into the space theme.
- The metal beams on the ceiling look original, supporting the associative row associated with the interior view of the interplanetary spacecraft.
- Stickers and stickers. Ready-made luminous stickers with images of stars are attached to the ceiling to create constellations. In the evening, the pictures will glow, creating a special atmosphere in the room.
- Drawings. Made with luminescent paints or voluminous textured materials, such images will become an exclusive decoration of the room, fully meeting the needs of the little owner.
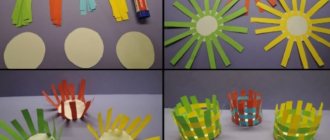
Origami
Material for these crafts can be found in every home where there are small children.
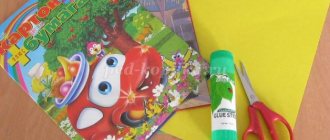
Application
A simple craft for kids aged 3-4 years, which will allow children to give free rein to their imagination: create a solar system or launch a rocket into space, and maybe even meet aliens.
Required:
- whatman;
- paints and brush;
- colored paper;
- PVA glue;
- scissors.
Progress:
- Paint whatman paper with dark paint.
- Constellations can be depicted with splashes.
- Cut out shapes and elements for our panel from colored paper. These could be rockets, the sun, stars, comets, astronauts, flying saucers, etc.
- Using glue, place the elements of the composition on whatman paper.
You can additionally decorate the “space” with sparkles or rhinestones.
Volumetric applique “Paper astronaut”
Image source
What would Cosmonautics Day be without astronauts? This simple and fun craft can be an excellent gift for a child to give to grandparents.
You will need:
- PVA glue;
- colored paper;
- White paper;
- scissors;
- pencil or felt-tip pen.
Progress:
- Cut out a large circle from blue paper - this is planet Earth. Glue simple shapes onto the “base” of our planet made of blue and green paper (imitation of land and water).
- Cut strips measuring 2 cm by 25 cm from white paper. These are the future legs of the astronaut.
- Using glue, fasten the 2 strips together with the letter “G” and then fold them as shown in the video instructions below. Repeat the same with the other two strips.
- To create the astronaut's hands, cut out 4 strips of white paper measuring 2 cm by 18 cm. Do the same manipulations with them as with the legs.
- Cut out 4 small circles and glue them to the base of the astronaut's arms and legs.
- For the body, cut out 1 strip of white paper measuring 4 cm by 15 cm. Connect its ends and glue them together.
- Cut 2 strips from white paper: one measuring 2 cm by 15 cm, the other 2 cm by 10 cm. Also glue both together in the shape of rings. Connect them to form a helmet.
- Cut out a circle with a diameter of 3 cm from light-colored paper. Draw the eyes and mouth of the astronaut on it. You can use decorative “eyes” if available.
- Make a ring from a white strip measuring 2 cm by 10 cm and glue the astronaut’s face onto it.
- Next, glue the body to the middle of the “planet”.
- Decorate the astronaut with colored circles or stickers.
- Glue the head to the body, then the helmet, arms and legs.
More details in the video:
Salt painting
Simple table salt is an unusual material for painting. You can offer this craft to both kids and primary schoolchildren.
You will need:
- cardboard;
- paints;
- sponge;
- pin;
- PVA glue;
- pipette;
- colored water;
- salt.
Progress:
- Use a sponge to paint a sheet of cardboard to your liking.
- Make splashes - constellations (using a brush or toothbrush).
- Use PVA glue to draw the outline of future cosmic figures (planets, rockets, etc.) and fill them inside with glue.
- Sprinkle the picture with salt. Let the glue dry.
- Shake off excess salt from the painting.
- Pour water into several glasses, paint it in each container a different color.
- Use a pipette to collect colorful water and use it to paint the shapes made of salt. Let dry.
More details in the video:
From salt dough
Image source
Salt dough is a favorite material for creativity among both children and mothers. The main thing is to start preparing the craft from it in advance so that it can dry well.
The dough recipe is simple: 2 tbsp. spoons of flour, 2 tbsp. spoons of salt, 2 tbsp. spoons of water. For this craft, in addition to the dough, you will need a stack, a brush and watercolor paints.
How to make a surprisingly simple and beautiful craft for Cosmonautics Day from salt dough:
- After standing in the refrigerator for at least 30 minutes, roll out the salted dough into a flat cake with your hands and cut out the desired shapes: for example, a rocket and a planet.
- You need to smooth the edges with water so that they are perfectly even.
- Stack along the edges to make a border, cut through the necessary parts until the dough dries.
- Using a brush and water, attach the rocket to the planet.
- Place it on the radiator to dry for 3 days.
- Using watercolors and a brush, paint the craft and decorate it (for example, with pasta in the shape of stars).
- Allow to dry thoroughly.
Furniture
A children's room in a space style is similar to a room in a minimalist style - the room needs a small amount of practical and comfortable furniture.
The style of all furniture is exclusively modern:
- a lot of glass;
- a lot of steel chrome fittings;
- interesting futurological forms;
- the color is light, steel-gray or bright, juicy.
The desktop can be equipped with LED lighting, as can the shelves of the rack. Such a table will become a captain’s cabin for a child.
In such a room, a wardrobe with a spacesuit or star clusters depicted on the doors would be appropriate. The space room is suitable for modular storage systems, which can also be used as seating.
A bed in the shape of a rocket or on the second floor, where you need to climb a ladder, unusually shaped comfortable hanging ball chairs or bean bags on the floor - all this creates a unique atmosphere of star travel and the conquest of new planets.
Wire solar system
This is an ideal craft for younger students. At the age of 6-8 years, children become more diligent and will be able to build such a craft without difficulty. While working, you can tell your child about space or fantasize about space adventures together.
You will need:
- foam balls;
- plasticine;
- wire;
- fishing line;
- scissors:
- gouache, brush;
Progress:
- Color the planets with paint of a suitable color.
- Small planets can be created using plasticine.
- Using flexible fishing line, make orbits and string planets on them.
- Connect the orbits together with fishing line, leaving the last free tip.
- Make a loop from the tip on which you can hang the solar system.
Corner "Space" in the preparatory group
Elena Kudryashova
Corner "Space" in the preparatory group
Starting from the senior group of kindergarten space with children .
corner was designed . For a more effective assimilation of the material, a model of the Moon was designed. Also in our corner we have selected illustrations on this topic, folders and books. We have collected a selection of photographs of scientists, astronauts and spaceships . We try to organize joint educational activities with children quite often, making classes interesting, developing and educational. In the preparatory group , as a result of joint activities with children, a model of the solar system was made. During the activity, special attention was paid to the correct determination of the sequence and distance of the planets from the Sun, and the identification of other cosmic bodies in the Universe . Children continue their educational activities in their free time.
Binary lesson with presentation in the preparatory group “Space” Lebedyan city, Lipetsk region MBDOU combined type kindergarten No. 2 Summary of a binary lesson in the preparatory speech therapy group.
Crafts from plasticine
We offer ideas for modeling that will not leave anyone indifferent.
Astronaut made of plasticine and foil
This astronaut can become either an independent craft or part of a larger composition on the theme of an expedition to the moon or the conquest of space.
You will need:
- plasticine;
- foil;
- toothpicks;
- hot glue;
- black paper.
Progress:
- Roll from plasticine:
- 8 balls of the same size (legs);
- 8 balls slightly smaller in size (hands);
- oval (torso);
- ball (head);
- square (knapsack);
- 2 small balls (headphones on the spacesuit);
- oval base for the body and head.
- Wrap each piece tightly with foil.
- Place balls in foil for arms and legs on a toothpick so that the tip on one side remains free.
- Using the free end of a toothpick and using hot glue, attach the legs and arms to the astronaut’s body. Glue the backpack and headphones.
- Twist a long hose from foil to supply oxygen and glue it with one end to the helmet and the other to the backpack.
- Cut an oval out of black paper and glue it to the front side of the helmet - this will be the viewing glass.
The astronaut is ready!
Expedition to the Moon
Image source
We recommend this craft for both 4-year-old children and 40-year-olds. After all, even an adult will be interested in making the surface of the Moon with craters with his own hands and installing the Russian tricolor on it!
You can sculpt anything you have enough imagination for - from humanoids to a lunar rover. Don’t forget to tell your children interesting facts about our planet’s satellite while sculpting. Kids will especially love the fact that the first living creature to orbit the moon was a turtle.
DIY rocket
A rocket made from a plastic bottle is more complicated than the one we offered for kindergarten crafts, and is more suitable for younger schoolchildren.
You will need:
- plastic bottle;
- cardboard;
- glue;
- scissors;
- foil;
- double sided tape;
- 2 toilet paper rolls/yogurt jars or something similar in shape.
To decorate the rocket: electrical tape in three colors: white, blue and red.
Progress:
- Cut off the bottom of the bottle.
- Cut a circle out of cardboard and build a “nose” for the rocket: cut a triangle out of the circle, fold it into a cone and secure it with glue.
- Wrap the body of the bottle, the cone and the bushings (or jars) with foil - the future jet engines of the rocket (see the master class at the link below).
- Attach the cone to the neck of the bottle.
- Use double-sided tape to secure the rocket parts together.
- Stick 3 strips of electrical tape of different colors on the rocket body in the form of a Russian flag.
- Cut out circles from cardboard - portholes. If you wish, you can paste on them pre-printed images of the first cosmonaut dogs Belka and Strelka.
- Attach the windows to the rocket using double-sided tape.
Flooring
A space-themed children's room should have appropriate flooring that will support the overall style of practical spaceship decoration.
The following are used as floor coverings in children's rooms:
- floorboards;
- parquet;
- laminate;
- multilayer linoleum.
To match the space design, the floor can be made either dark (dark brown, black, gray) or sandy white with a silver tint.
Important! When zoning the room, a comfortable soft carpet with low pile or velor covering is placed on the floor in the play area of the room.
The carpet can be either bright, with images of stars, planets, or a plain steel color.
A nuance: the puzzle carpet looks interesting, which the child can drag from place to place during the game.
Space helmet
The theme of space is relevant for children of any age, not only on the eve of Cosmonautics Day. UFOs, aliens, travel to distant galaxies are one of the main topics for games for both preschoolers and older children. A helmet, like that of an astronaut, can become a favorite accessory in the “space adventures” of young explorers.
You will need:
- balloon;
- paper, newspapers or napkins;
- bowl of water;
- PVA glue;
- foil;
- wide brush;
- scissors and a stationery knife.
Progress:
- Inflate the balloon.
- Cover it with several layers of paper over the entire surface.
- Allow to dry thoroughly (about 24 hours).
- Cut a hole for the head, cut a window for the eyes using a utility knife and scissors. Pull out the ball.
- Cover the inside with foil.
- Decorate if desired: with drawings, stickers.
This is just the beginning
Now the “Umnichki™” team, together with teachers and psychologists from the “Territory of Development” educational center, is working on a methodological basis for the space site. The goal is to provide our customers with user-friendly and relevant manuals. Such that will allow educators to use the playground equipment daily, fully and without additional training, for the comprehensive development of children in accordance with the Federal State Educational Standard for Education.
Buy a space playground for your kindergarten and be the first among preschool educational institutions in Russia!
Spaceship
If your young astronaut already has a helmet, it is quite expected that he will start dreaming of a real spaceship. Well, everything is doable. Such a large-scale craft will have to be done by all family members: adults assemble and connect parts of the ship, children take part in developing the layout and decor. What's not a reason to spend the evening together, without gadgets? In addition, a rocket or spaceship will be an excellent playground for children to play.
You will need:
- various large boxes;
- scissors and cutter;
- large size cardboard, for example A2;
- paints or colored paper;
- foil;
- hot glue, tape.
Progress:
- Assemble the future shuttle, secure the boxes together with glue.
- Cut through portholes, make an entrance.
- Cut out supports from cardboard and secure them into the slots on the sides of the spacecraft.
- Glue the top together from cardboard or a box.
- Paint the parts or cover them with wallpaper/paper.
- Decorate with decor: stick on stars, sparkles. You can add a battery-powered garland, securing it with tape.
Tip: Use foil to imitate a metallic sheen.
Send well-prepared young researchers into space: provide children with juice in boxes and purees in soft patches, like real astronauts.
Crafts based on one of children’s favorite themes for games can be made not only for Cosmonautics Day, but throughout the year. This is a great way to spend time with the whole family in the evening or on a weekend. Space crafts can spark a lot of interest in the topic among your children. And who knows, maybe a real future cosmonaut is growing up here!
Decoration and accessories
A space-style children's room cannot do without unusual accessories and decorative items that will maintain harmony in the interior:
- bedspreads and curtains - to match the wall coverings, with a repeating pattern;
- pillows - in the shape of stars;
- metalized horizontal blinds on the windows;
- Balls can hang from the ceiling, imitating planets or suns; such balls also serve as lamps;
- an excellent decoration on the wall - a wavy row of multi-colored night lights;
- to store toys, models of spaceships, lunar rovers or robots made of chipboard, cardboard or plywood are used;
- porthole mirror;
- near the table there is a black board for notes with magnetic reminders;
- telescopes, star maps.
Perhaps when he grows up, the baby will not become an astronaut, but the memory of having a real space room as a child will remain forever.
And that will make him happy.