GCD in the middle group on the topic: “Butterflies”, drawing.
05.28.18 Monday, 7-14.15
Lesson summary for the middle group
on the topic: “Butterflies”
artistic and aesthetic development, drawing.
Visual activities in kindergarten. Middle group T. S. Komarov p.38
Target:
to develop children’s ability to convey impressions of spring in drawings; develop the ability to successfully position an image on a sheet of paper; practice painting with paints (rinse the brush well, dry it, put paint on the brush as needed).
Tasks:
Educational:
to develop children’s ability to convey impressions of spring in drawings; develop the ability to successfully position an image on a sheet of paper; practice painting with paints (rinse the brush well, dry it, put paint on the brush as needed).
Developmental:
develop creative imagination, eye, sense of composition; develop children's constructive abilities; develop memory, logical thinking and attention; develop a sense of rhythm and a sense of color.
Educational:
cultivate self-confidence, accuracy, perseverance; evoke positive emotions in children, cultivate a sense of empathy; cultivate the ability to enjoy the overall result.
Preliminary work:
looking at illustrations in children's books; conversation about insects (butterflies); watching butterflies on walks.
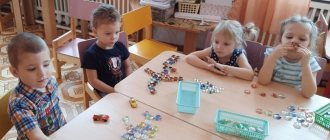
Materials for the lesson:
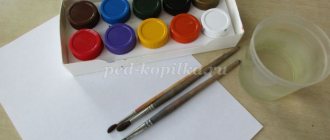
sheets of white paper, brushes, gouache (color yellow, blue, red, green, brown), jars of water, napkins, brush stands.
Equipment:
multimedia system, presentation.
Progress of the lesson:
Educator:
Guys, what time of year is it now?
Children.
(Spring)
Educator:
And after spring, what time of year will come?
Children.
(Summer).
Educator:
In winter it snows in bad weather, but in summer? Why?
Children.
Educator:
Which weather do you prefer: sunny or cloudy?
Children.
Educator:
Let's show a sunny mood (
children smile, raise their hands up
), and now a sad mood (
sad face, wrap their arms around themselves
).
Children repeat after the teacher.
Educator:
Let's imagine that we are on a green lawn. Close your eyes. You feel the breeze blowing, it gets warmer and warmer.
Children close their eyes.
Educator:
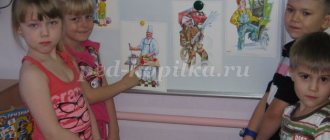
Now open your eyes. Look what a wonderful flower meadow is in front of us, what beautiful flowers there are on it! (Slide 1).
Educator:
Let's find out who lives in this clearing by guessing the riddle:
Moved by the flower
All four petals.
I wanted to rip it off -
He took off and flew away.
(Butterfly) (slide 2,3,4)
Children.
(Butterfly)
Educator:
That's right, well done! It's a butterfly of course! Butterflies are amazing insects; they have very bright, beautiful, elegant wings. Butterflies decorate nature, many of them are beneficial by pollinating plants.
Look at the butterfly and tell me what the butterfly has the largest (wings)?
Children
.
Educator:
How many wings does a butterfly have? (Slide 5,6)
Children.
Educator:
What can you say about the upper and lower wings? (How are the upper wings different from the lower wings?) What do they look like?
Children.
Educator:
Look at the left and right side of the butterfly, what can we say about them? (That they are the same).
Children.
Educator:
The right and left parts of the butterfly are the same. Today I will teach you how to draw a butterfly quickly, so that the right and left parts are the same.
Educator:
What else does a butterfly have (torso)? What shape is the body? What color is the body?
Children.
Educator:
Which body part did we not name? (Head)
Children. (Head)
Educator:
What shape is the head? And what is the smallest (antennae)? What do the antennae look like? What bright, colorful wings. Seeing a beautiful butterfly lifts our spirits. Why does a butterfly need wings?
Children.
Educator
: They also say that a butterfly flutters, that is, it flies from one flower to another. Now let's rest a little.
Physical school
The flower was sleeping and suddenly woke up
, (torso to the right, to the left.)
I didn't want to sleep anymore
(torso in front, back.)
He moved, stretched,
(hands up, stretch.)
Soared up and flew,
(hands up, right, left.)
The sun will just wake up in the morning,
The butterfly is spinning and curling
. (spin around)
Educator:
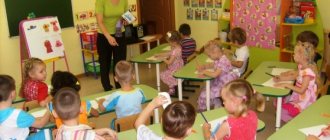
Now guys, come to our magic workshop and I’ll show you how to draw butterflies.
The guys go to their desks, the teacher tells and shows how to draw a butterfly:
1. Take a sheet of paper, fold it in half, and unfold it.
2. To the right of the fold line, draw two wings: the upper one is large and the lower one is small.
Take a brush. Apply paint to the brush. We will draw the wings from the fold line to the right.
First we draw the large upper wing, then the small lower one.
Let's paint the wings with bright paint.
3.Fold the sheet along the fold line and smooth it with your palm.
4.Unfold – and you get a beautiful butterfly!
5.Draw the body, head and antennae with brown paint.
The teacher then, together with the children, begins to draw a butterfly, while at the same time helping those who did not succeed.
Educator:
Well done! Everyone did very well! Wonderful butterflies! And for butterflies to fly, they need to dry their wings in the sun.
We have a lot of butterflies, but not one of them is the same! All butterflies have names, let's come up with names for your butterflies too.
Middle group. Junior preschool age. Children 4 - 5 years old
Summary of a lesson on drawing “Bees” with cotton swabs for preschool children
Goal: -To introduce children to a new technique of unconventional
drawing - “
drawing with cotton swabs ” . Objectives: -Learn to convey the image of a bee, its structure and shape using a cotton swab. -Learn to convey the color of a bee - yellow. -Develop thinking, memory, hand motor skills....
Summary of a lesson on drawing using the “monotype” technique in the middle group “Butterfly”.
Goal: Development of artistic creativity using an unconventional drawing technique - monotype . Objectives: Educational: To introduce the monotype technique. Learn to create an image of a butterfly in gouache, using graphic means of expression: spot, line. Educational:...
Pencil drawing
There are many miniature details in the structure of the insect's body. You need to determine how to draw a butterfly with a pencil, how large the image will be, and carefully work out every part of the butterfly. The drawing will turn out successful if you use the diagram on how to draw a butterfly step by step.
Using a pencil, draw a long oval body in the center of the album sheet. The open wings of the butterfly will take up all the free space. A small circle in proportion to the body represents the head. If you draw the limbs, 6 legs diverge in pairs in different directions from the chest.
The upper wings are triangular in shape. All corners must be rounded. The longest side is the top border on which the head rests. The lower wings consist of halves of an oval. There is a fringe along the edges of the wings; it is outlined with a wavy line.
A curved line is drawn across the butterfly's head, with the ends down. It runs down the center of the eyes. The eyes are made large and round in shape, painted over with a dark color, leaving small spaces empty. This is how glare of light is created.
Inside the upper part of the head, a zigzag of four strokes is depicted, which touches the upper borders of the eyes. Antennae emerge from the points of contact. Use thick lines. The butterfly's mouth is drawn in the shape of a spiral trunk.
A tick-shaped line separates the chest from the abdomen. The chest is wider in the middle than at the edges. At the junction with the chest, the abdomen has the smallest thickness. There are faint longitudinal stripes along the entire length of the abdomen.
On each wing, an oval-shaped cell extends from the chest. Uneven strips are drawn from them to the fringe of the wing. Each wing is covered with scales.
The common outer border of the upper and lower wings becomes smooth, without sharp transitions.
Materials and tools
For a future artist, first of all, it is necessary to organize a workplace:
- Be sure to have a wide table.
- Good lighting.
- Cups for pencils, paints and brushes.
Optimal organization allows you to focus on work and enjoy it. You should also prepare the following sets:
- Simple pencils of various sizes.
- Eraser.
- Colour pencils.
- Watercolor paints.
- Gouache.
- Brushes with different sizes and brushes.
Don’t also forget about sheets of thick paper and ready-made drawings from which you can find inspiration and ideas for creativity.
Drawing a butterfly with pastels
The main advantage of drawing with pastels is that the artist does not need a sketch. The drawing is applied to thick paper using multi-colored crayons and then retouched with your fingers.
Beginners and experienced artists alike have access to real collections with a rich range of shades: from natural pale creams to rich olive tones.
The drawing process will depend on the way the figure is depicted: on a sheet of paper from the front or in a composition.
Drawing a 3D butterfly step by step
A more complex way to draw a butterfly is to depict the figure in 3D format. A similar drawing may be needed for later cutting out a butterfly to create an original craft.
The whole process can be divided into several stages:
- Preparing the grid on paper.
- Figure drawing.
- Coloring.
Also, in the future, the figure can be cut out and used to create a greeting card, crafts or an original bookmark.
Butterfly for kids
Children like to draw summer, green meadows, flowers and, of course, colorful butterflies. It's easy to draw a butterfly for kids.
Draw a circle. Inside they put two large black dots, the eyes of a butterfly. She has no nose, and her mouth is depicted as a horseshoe, with the tips up. Horns with balls at the end are drawn on the head.
A rounded line draws the well-fed body of an insect. Cross it with two stripes.
The wings start from the outline of the head and extend in a wavy line to the bottom of the abdomen. Now you can color with colored pencils or paints.