Jug
Wikipedia defines still life as the depiction of inanimate objects in the visual arts. Most often they paint still lifes with a jug or vase. We will not deviate from traditions.
Indicate the volume of the jug using additional semicircular lines. See step-by-step instructions on how to draw a vase.
The lines in the background need to be erased.
Add a narrow spout and a long handle to the jug.
3
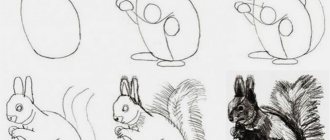
Pears
Using a compass, draw two circles on the sides or trace a round object.
Making the correct shape.
Draw a thin leaf and short branches.
We have special instructions on how to draw pears.
You can draw a still life with any fruit, such as apples.
4
"Bouquet of flowers. Phloxes"
Bouquet of flowers. Phloxes
Painting by Ivan Kramskoy. “A talented person won’t waste time on depicting, say, basins, fish, etc. This is good for people who already have everything, but we have a lot to do,” Kramskoy wrote to Vasnetsov. And yet, at the end of his life, the famous portrait painter did not ignore the genre of still life. A bouquet of phlox in a glass vase was presented at the XII traveling exhibition. The painting was bought before the opening day.
Lesson on drawing vegetables with colored pencils
If vegetables could talk, they would probably tell you incredible stories about how they appeared in the kitchen.
Europeans initially considered tomatoes brought from South America to be poisonous. That is why for a long time tomatoes decorated window sills, gazebos and greenhouses. Only when the Portuguese figured out how to use them as food, it turned out that tomatoes are not poison at all, but a storehouse of vitamins!
Crushed red peppers became the protagonist of the world's first gas attack. Guess which vegetable was considered a symbol of discord by the ancient Persians? You won't believe it - beets! The crimson-colored fruit with tops was often thrown into the house of enemies.
But garlic, on the contrary, was idolized in different parts of the world. Roman legionnaires wore it on their chests as a talisman, Afghans used garlic as a remedy for fatigue, the ancient Greek physician Hippocrates treated the lungs with it, and the “father of comedy,” the poet Aristophanes, wrote about garlic as a means to maintain courage.
How many interesting and exciting things are hidden in vegetables, modestly lying on the shelves of your refrigerator! So, let's gather up the courage and go ahead - draw a still life with vegetables.
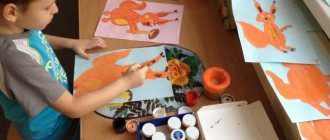
1. First draw the outlines of the vegetables. To make the composition complete and harmonious, try to hide one vegetable a little behind another.
2. Detail the image, giving each vegetable a characteristic shape. Draw the tails and leaves.
3. Trace the outline of the vegetables with a gel pen and erase the pencil.
4. The main thing in a still life is to paint it correctly.
Let's start with pepper. Color it with a yellow pencil, avoiding the highlight area. Fill in areas of depressions and irregularities with orange and brown pencils.
5. Make the color more saturated using different shades of orange. A little attentiveness and perseverance - and you will succeed!
6. Color the stem. The pepper drawing is ready.
7. Shade the radishes with a pink pencil. Deepen the color with burgundy and red pencils.
8. Use green, yellow and brown pencils to color the cucumbers.
9. The bulb can be colored with yellow, orange and shades of brown. Don't forget the glare!
If you want to draw garlic instead of an onion, it is better to paint it with shades of pink, purple and blue.
10. The handsome tomato will be a rich red color. Brown and burgundy pencils will help to enrich the color of the tomato.
11. And finally, shade the surface of the table on which the vegetables lie. A dark brown pencil will help to correctly depict shadows around vegetables.
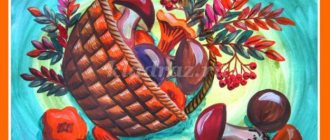
Drawing a fruit basket
A vitamin fruit basket will be a wonderful addition to your kitchen interior.
The vine, a symbol of fertility, wealth and prosperity, in combination with pears and sunny peaches, symbolizing youth and the rebirth of life, will effectively decorate a dacha or a school canteen. How do you like the idea of giving the school a picture you drew yourself from the whole class?
It is very simple to depict a fruit basket on whatman paper or in an album.
1. First make sketches of the basket and fruits: grapes, peach, plum and pear.
2. Draw a basket and fruits using smooth lines. Try to maintain symmetry.
3. Paint over the fruit as shown in the picture, with shadows and highlights.
4. After applying the shading, blend the pencil to achieve a smooth transition of colors. Draw weaving on the basket.
Ready!
Finally, catch a selection of vegetables and fruits that are easy to draw with paints, watercolors or wax pencils. Practice correctly depicting colors, the play of light and shadow on fruits, and surprise your loved ones with your artistic talents every day.
Transparency and mysticism of watercolor drawings
Until the 19th century, watercolor was not popular among artists. At first glance, it seems that the drawing process is complicated, but in fact the drawing technique is quite simple.
What a beginning artist will need:
- A sheet of white thick paper.
- Brushes of different thicknesses.
- A jar of water.
- Pencil and eraser.
- Palette.
Step-by-step instructions for children:
- Make a pencil sketch with barely noticeable lines. Now we need to determine which side the light is coming from.
- For convenience, you can sketch the sun on a piece of paper, and then remove it with an eraser.
- Select the first object to paint, after moistening it with water. For example, it will be a tomato. Take a brush with light red paint and apply it to the vegetable.
- Then leave light highlights in some places, and darken and saturate in others, as shown in the photo. To obtain the desired shades, mix paints on a palette.
- Let the tomato dry, you can start coloring the beets. They start with a light burgundy, thickening the tones in certain places.
- Note: each dimple on the object is a dark shade, a larger indentation is a darker color.
- Return to the “dried tomato” and refine the features of texture, shape, and color using shadows.
- The darkest places are under the vegetables, next to them it’s a little lighter, etc.
- Return to the beets, following the same procedure. Draw all the still life objects in the same way.
When talking about glare, it is important to understand how shiny the “nature” surface is. The brighter the color and smoother the vegetable, the clearer and brighter the sunlight is reflected. The size of the glare directly depends on the size of the vegetables.
The basic principle in working with watercolors is wet drawing. It is also important not to work with pure colors, but to experiment with paints to obtain the desired shade.
Juicy and beautiful apple
Apples appear on our tables in mid-summer and do not leave the diet until late autumn, so they can be drawn from life. For the creative process you will need a pencil, the apple itself and a sheet of paper. After preliminary preparation, you can begin the drawing process:
- the outline of the fruit is depicted in the form of an ordinary circle; after outlining it, it is necessary to make the image naturalistic; to do this, draw a concave line at the bottom and top of the figure;
- in the lower recess an inverted crown is drawn, this will be the middle of the flower from which the apple has developed, and its upper part should be decorated with a stem, a simple stick with a leaf at the end.
You can decorate an apple in any color you choose, because green and yellow, red and orange apples of different colors grow in gardens. In the process of drawing, a child can learn to use watercolors and gouache, paper crayons or colored pencils.
"Study with medals"
Study with medals
Still life in Soviet style. The 20th century artist Anatoly Nikich-Krilichevsky showed in one painting the entire life of the first Soviet world champion in speed skating, Maria Isakova. With cups, behind each of which are years of training; medals that were won in a bitter struggle; letters and huge bouquets. A beautiful picture for an artist and an artistic chronicle of sporting success. Still life story.
Plums and apricots
Identical in shape, these fruits are even easier to draw than apples, the only difference will be in the color chosen for coloring:
- you need to draw an oval on paper, this will be the outline of the fruit;
- the oval is divided by a longitudinal strip, and its edges need to be rounded;
- Using chiaroscuro you can convey the curves on the skin of the fruit.
It is better to paint plums in dark purple or blue, and for apricots choose pastel tones of beige or pale orange.
"Still life"
Still life
Kazimir Malevich on the way to the “Black Square” through impressionism and cubism, bypassing realism. A bowl of fruit is the fruit of creative research, even within the same painting: thick black lines of the French cloisonné technique, flat dishes and voluminous fruit. All components of the picture are united only by color. Characteristic of an artist - bright and rich. Like a challenge to the pastel colors of real life.
Green pear with a tail
It’s best to start drawing a teardrop-shaped pear with practice, and this is a good way to reinforce your child’s knowledge of different shapes:
- a circle is drawn in the center of the sheet, a thin semi-oval is drawn on top of it, at the junction of two figures it is necessary to draw concave lines;
- At the bottom of the finished figure, a concave line and an inverted crown are drawn, as on an apple, and the top of the figure can be decorated with a fairly thick stalk.
The pear is painted green or yellow; it is best to use the shading technique to convey chiaroscuro.
Orange cut in half
Citrus fruits are not difficult to draw, but most often it’s just a ball of a certain color, and a child will like the picture of a cut orange faster:
- With a pencil you need to draw a circle on the sheet and put a dot in its center, draw rays from it to the sides with thin lines;
- Having retreated 2-3 mm from the outer edge of the peel, it is necessary to connect all the rays with curved lines, these will be slices of fruit cut across;
- the outer contour can be drawn in orange using a thick felt-tip pen, this will be the orange zest, and leave the next layer white;
- the inner segments are also drawn using a felt-tip pen, but the segments themselves are best painted in light orange;
- If you use yellow as the main color, it is easy to depict a lemon using the same technique, and red is suitable for drawing a grapefruit.
By making several identical blanks and choosing different colors, you can easily turn them into a coloring game for your child, so he can learn the main types of citrus fruits.
"Forest violets and forget-me-nots"
Forest violets and forget-me-nots
Painting by Isaac Levitan is like a blue sky and a white cloud - from the singer of Russian nature. Only on the canvas is not native open spaces, but a bouquet of wildflowers. Dandelions, lilacs, cornflowers, immortelle, ferns and azaleas... After the forest, the artist’s workshop turned into “either a greenhouse or a flower shop.” Levitan loved flower still lifes and taught his students to see both color and inflorescences: “They should smell not of paint, but of flowers.”
Large plate with different fruits
Having learned to draw individual fruits, you can begin to arrange them, and a still life image would be an excellent solution. To make drawing easier, all objects can be placed on a large plate, which can be easily redrawn from a picture or used as a photo base:
- a plate is depicted on the piece of paper; to do this, you need to draw a semicircle; it doesn’t have to be closed, leaving space to place all the selected fruits and vegetables;
- in the foreground it is best to depict simple and quickly recognizable figures, these can be apples and pears, they can be placed horizontally and vertically;
- fruits such as plums will decorate the composition and add additional colors to the resulting picture, but it is best to complement the image with small details;
- A purple bunch of grapes will look beautiful on a plate; for this, a pile of small circles covered with an openwork green leaf is drawn behind the apples;
- all the berries must be carefully outlined and painted in a lighter shade than the outline, so the berries will not merge into one lump of color and will be clearly visible in the drawing;
- It’s very easy to draw a green grape leaf; a maple leaf template is suitable for this, only the edges of such a sketch need to be drawn with openwork lines;
- Place several cherries along the edge of the plate; to do this, two circles with a concave top are connected with a green L-shaped pin;
- It is also better to draw single cherries with petioles, this will make it possible to quickly recognize them in the picture and draw it with small details, which will emphasize the naturalism of the picture;
- The final stage of drawing will be coloring the picture; having saturated it with colors, you can begin to decorate the background; it is best to choose calm and shallow shades for it.
Using watercolor paints, it is easy to turn the resulting drawing into a real masterpiece and, after drying, place it in a frame and under glass. These paints help to paint individual fruits to imitate their real color with different shades and natural chiaroscuro reflecting the depth of color.
Simple master classes will help you learn fruit drawing techniques, which will be useful for creative activities with children of different ages. Even if children are not interested in creative lessons, they can be used to learn shapes and colors, the names of new fruits and even vegetables.
"Apples and Leaves"
Apples and leaves
The works of Ilya Repin organically set off the brilliant setting of the Russian Museum. The Itinerant artist composed a composition for his student, Valentin Serov. It turned out so picturesque that the teacher himself took up the brush. Six apples from an ordinary garden - bruised and with “barrels”, and a heap of leaves covered in autumn colors as a source of inspiration.
Preparing the composition
In order to learn how to draw a still life, you need to be able to correctly select and place objects that will serve as nature.
A few simple rules will help you cope with this task.
- Items for composition should be combined by theme.
- It is important to know how to place them correctly.
Location of items
When creating a composition, you need to decide on the layout, basis and format of the picture.
The image format can be horizontal, round or vertical, and accordingly the composition is formed according to this principle.
Horizontal helps to accommodate more objects for the image, but requires drapery in the background to create a harmonious design. The main emphasis must be placed in the very center of the composition.
The round format is not in great demand because it is not the most convenient option.
The vertical format involves a small number of objects in the picture. An example of such placement would be tall vases with flowers.
There are several ways to place composition elements.
With a triangular placement, the top of the supposed figure is formed by the tallest object, objects of smaller height form the base of the conditional triangle.
Objects that will serve as a model for a still life can be arranged in a circle or diagonally.
The main secret is not to line them up, in which case the drawing will come out boring.
Items may overlap each other slightly; gaps are allowed between them.
It is important not to overload the composition with unnecessary objects; for this you should not use more than three sizes.
Another component of success will be well-placed lighting, this will help to correctly place accents in the drawing.
Color ratio
Experienced artists consider another important rule for creating a still life to be the rule of three colors, which should form the basis of the drawing. You need to choose two or three primary colors and boldly use their shades.
A painting depicting a motley bouquet of flowers in any case has two dominant colors. You can focus on white daisies or red poppies, avoiding excessive variegation that tires the eye.
Select main part
The art of creating a still life begins with the ability to correctly place objects in a composition. It is necessary to start working from life or from memory by identifying the main element on which the viewer’s attention will linger.
If there is no such object in the created composition, then additional work needs to be done on it.
This main object should stand out in size, color or shape. One of the flowers in the bouquet or the fruit in the composition should stand out noticeably.
This rule applies not only to painting, but also to artistic embroidery, photography, and even the creation of interior compositions.
Drawing a still life with preschoolers; methodological development for drawing (preparatory group)
Stages of work in drawing a still life with preschool children.
Still life is the first genre of painting that preschoolers should be introduced to. It not only evokes the greatest emotional response in children from the age of 3-4, associations with their own life experience, but also attracts children’s attention to the means of expressiveness of painting, helps them look more closely at the beauty of the depicted objects and admire them.
At the first level, the lowest, the child rejoices at the depiction of familiar objects that he recognized in the picture. Children of three years of age stand at this level, but if pedagogical work is not carried out with them, then they remain at the same level at 6, 7, or more years of age.
At the second level, the child begins to realize the elementary aesthetic qualities of the work - they can evaluate both the color and color combinations of the depicted objects and phenomena in the picture as beautiful, and less often - the shape and composition.
At the third level, the child is able to grasp the internal characteristics of an artistic image. This is still a partial, not complete comprehension of the artistic image, but it allows a child of 6-7 years old to aesthetically experience at least part of the artist’s intention.
There are rules for composing a still life
1. Intent.
2. Arrangement of objects in the space of the object plane.
The moment of drawing up a still life by the students themselves is important.
3. One of the objects should become the compositional center of the production and stand out in size and tone.
4. To complete the composition, as well as to connect all objects into a single whole, draperies are added, emphasizing the difference between solid objects and the soft flowing texture of the fabric. The fabric should not distract attention from other, especially the main items.
5.Lighting plays an important role - artificial or natural. Light can be lateral, directional or diffused (from a window or with general lighting). When a still life is illuminated with directional light from the front or side, objects appear in contrasting light and shade.
Recommendations for drawing up a still life:
- consists of three objects (one large - the center of the composition and two or three smaller ones) and draperies;
- objects of different colors, but not intense colors;
- small objects can be active in color (color characteristics are compared using them);
- objects and draperies must have a pronounced tonal difference;
- placement of the production in direct daylight (large color relationships are easy to read and have decorative appeal).
So, today we will learn to draw a still life. We need to try to complete our work by the end of the lesson. We will need albums, simple pencils, paints and watercolor pencils.
1. Place the sheet vertically and draw lines as I show. These lines will be very important to us. They divide the sheet into parts: top-bottom, left-right. The top is our future background, the bottom is the surface on which we will place the objects. Let's see where on the sheet we will place our objects, where we will draw them. Show this place with your palm.
2. Now we will fix the place where we will draw so that we do not lose it. Let's draw the lines easily. But this is only an outline, and we need to draw objects.
3. Draw a pot. Let's show that it is voluminous.
4. Let's draw a pear in the foreground.
5. Next step. Carefully erase all the extra lines. Watercolor doesn't like an eraser. The basis of the still life is ready.
6. Stages 6 - 12 - work in color. Shade the background.
7. Apply tone to the pot. Let's show the brightest places - glare of light.
8. Apply the tone to the pear in the same way. We focus on the highlights.
9. Draw shadows and penumbra on the pot.
10. Now we draw shadows and penumbra on the pear.
11. We draw the background.
12. We draw, clarify the details.
Stages of working on a still life
1. First, you need to consider the still life from different points of view and choose the most successful one, paying attention to the lighting effects, that is, from which point of view the shapes of objects look more interesting. They usually look more interesting and expressive when lit from the side. Sitting against the light is not recommended.
2. You should think about what paper format to choose and how best to arrange the still life on a sheet - vertically or horizontally.
3.You should always start your drawing with the compositional placement of the image. It is very important to arrange the entire group of objects so that the sheet of paper is filled evenly. To do this, we mentally combine the entire group of objects into one whole and think about its placement in accordance with the format of the sheet of paper.
4. The teacher explain to the students that more space should be left above than below - then the viewer will get the impression that the objects are standing firmly on the plane. At the same time, it is necessary to ensure that the depicted objects do not rest against the edges of the sheet of paper and, conversely, that there is not a lot of empty space left.
5.The compositional problem is not always easy to solve. Sometimes children have to spend a lot of time and effort to succeed. And if the production is very complex, then you cannot do without the help of a teacher. This is explained by the fact that in addition to placing the image on a sheet of paper, it is also necessary to find the compositional center on the picture plane.
6. On the board, the teacher must demonstrate the sequence of linear construction of a still life drawing, paying special attention to determining the compositional arrangement of the entire group of still life objects on a sheet of paper.
7. The teacher should also show the correct and incorrect layout of the drawing on the sheet. Then the drawings should be erased from the chalkboard, and the children will get to work.
First, lightly touching the paper with a pencil, we outline the general nature of the shape of objects, their proportions, as well as their location in space.
Those children who are unable to determine in a drawing the general composition of a group of still life objects can be allowed to draw each object separately, starting, however, with an approximate estimate of the size of each of them. Next, you need to clarify the size of each item separately.
Thus, the figure looks like an image of wire models.
Particular attention should be paid to the perspective image of the bases of objects. In a drawing, the mark of one object should not be allowed to “step on” the mark of another, in other words, the student must clearly understand which object is in the foreground and which is in the background.
Then we draw in more detail all the objects of the still life, removing the construction lines.
When starting to identify the volume of objects, first of all you need to determine the lightest and darkest place in the still life.
When drawing a detailed form, you must carefully observe all the transitions of light and shade. “You should not work on a detail for a long time, since the acuity of perception disappears; it is better to move on to another, nearby part. When you go back to the work you did at the beginning, it’s easy to see the shortcomings.
After finishing the drawing, students, under the guidance of the teacher, carefully analyze the still life. To do this, you need to look at the drawing from a distance with narrowed eyes and compare it with nature.
The methods and techniques for applying a paint layer are different. You can paint in a thick or thin layer, with strokes or shade the paint with a brush, make mixtures with other paints, white or put it in its pure form, dilute the paints liquidly and apply transparent layers so that the lower layers are visible, and thereby create a new color tone. Bristle brushes are widely used in oil painting. Brushes made from polar bear hair are also of good quality. They are quite soft, elastic, resilient. A good brush should have a tuft of hair compactly gathered at the end and not stick out to the sides. After use, brushes must be washed with thinner and then with warm water and soap. When drying, a clean brush is wrapped in soft paper so that when it dries, it retains
The means of expression used by students are quite diverse: color, shape, composition, painting techniques. Nowadays, there are many techniques for working with painting materials; they vary in labor intensity and execution, depending on the goals and objectives set by the teacher for students. Various painting techniques allow you to work in different stylistic trends, filling and complicating the artistic image of the depicted objects.
STILL LIFE “Basic laws of composition”
The term “composition” comes from the Latin verb “to compose” and in the visual arts means approximately the same as in music - the composition of individual elements into a single whole, the selection of rhythms and dynamics, the selection of the main and the secondary, so that the output is solid. , harmonious and expressive image.
The first thing we should talk about here is the arrangement of objects in sheet format in such a way as to avoid outright compositional errors that “scratch the eye” and interfere with the perception of the work. It’s a shame if you’ve already worked on color, worked out the details, and because of an incorrect composition your painting “falls apart.” So:
1. Layout of the pictorial plane
1.1 The first requirement for a good layout is the correct relationship between objects and the empty space of the sheet. The image on the sheet should not be too large or too small. In the first case, the objects will be “cramped”, which will cause a feeling of tightness and unreadability of the image. In the second case, objects will “float” in the sheet format, which will reduce the expressiveness of the image:
1.2 The image should not be too low or too high in the sheet format. Visually we feel the “heaviness of the image”, for our consciousness the depicted objects have one or another mass. Therefore, the free space between the bottom of the image and the bottom edge of the sheet (bottom margin) should be wider than the top. This empty space below plays the role of a “pedestal” on which the weight of the depicted masses rests. If this “pedestal” is too low (that is, there is too little free space to the edge of the sheet), objects will begin to “fall” over the edge of the sheet.
At the same time, the image should not be exaggerated, i.e. There should also be enough space between the top edge of the items and the top edge of the sheet.
1.3 The image must be balanced. That is, its left and right halves must be equal in mass. This picture shows an apple (low mass) and a jug (large mass). If we place the apple approximately in the center and the jug on the right, then the mass equilibrium also shifts to the right. If the jug is closer to the center, and the apple is slightly to the left, then the overall balance falls precisely on the center of the composition, i.e. we see that this composition is correct.
2. Typical layout errors
2.1 The main subject of the composition should not coincide with the geometric center of the sheet or its central axis.
2.2 It is undesirable for objects or the edges of the depicted plane (for example, a table) to rest against the edge of the sheet. Firstly, it creates a feeling of crampedness and tension in the sheet, and secondly, it destroys the illusion of volume. Accordingly, the depicted object should either not reach the edge of the sheet, or slightly go beyond it.
2.3 The same unpleasant feeling is created if the lines of the drawing go straight into the corners of the sheet.
2.4 The contours of objects (located next to each other or on different planes of the drawing) should not be in close contact. This also destroys the illusion of space in the sheet, making the image appear flatter. Accordingly, objects should either be separated from each other at some distance, or slightly overlap each other.
IMPORTANT: To successfully arrange objects on a sheet, you need (as always) to go from the general to the specific. First, you should see and outline on the sheet the total mass that all objects create, and only then break this general shape into parts, outlining the contours of individual objects (with light lines, without drawing details). And only then, when you decide that the composition found is balanced and the proportions are conveyed correctly, you can proceed to further drawing (see illustration below):
Viewfinder
To make it easier for yourself to find a compositional solution (this also applies to home productions, but this is especially important in the open air, that is, when your nature is a large space with many objects), you can use such an achievement of mankind as a viewfinder. Essentially, it can be a window cut out of paper with an aspect ratio of approximately 2:3. You can stretch a thread in this window to imitate dividing lines, like in a camera. Alternatively, the viewfinder can consist of two corner frames, by moving them relative to each other, you can change the format of the visual plane.
“Never take up a pencil or a brush until you have thoroughly thought out what you have to do and how it should be done, for, truly, it is easier to correct mistakes in your mind than to scrape them out of a picture.”[1]
The viewfinder is a piece of cardboard or paper with a small rectangular hole cut into it. The student, looking through the viewfinder, sees, as it were, the frame of his future picture. The dimensions of the frame are set depending on the size of the main sheet of paper.
Having chosen the most successful option using the viewfinder, the student begins to work on a sheet of paper.
So, the drawing begins with the compositional placement of the image on a sheet of paper. At the second stage of work, the student must learn to see the basic shape of the object.
How to draw a still life step by step
Step-by-step instructions for beginning artists will help you draw a simple still life with pumpkins.
To work you need to stock up:
- album sheet,
- a simple pencil, an eraser and a sharpener,
- tassels,
- gouache 12 colors,
- water in a small container.
The order of work.
- The first line is to mark the edge of the table on which the composition is placed.
- After this, outline the outlines of both pumpkins.
- Draw the stalks of the vegetables, mark the grooves on the surface of the pumpkins.
- Below the outlines of the pumpkins, draw a couple of onions and a red pepper.
- Paint work should begin by filling in the background. The background can be decorated in light blue.
- Paint a large pumpkin orange, after marking yellow grooves on it. When painting a pumpkin, you should take care of smooth color transitions: the strokes should not be uniform in shade.
- A small pumpkin can be painted yellow and complemented with orange segmenting stripes.
- Glares of light are depicted using light strokes of white paint.
- Vegetable stalks are decorated in green, using different shades to create depth in the design.
- The onions will be light yellow with a slight brown tint; the peppers should be colored red.
- The surface of the table and the shadows on it falling from objects are painted in different shades of brown.
Still life with a simple pencil
You can learn the art of drawing by starting with pencil sketches. For the first lesson, you can take a vase as an object, placing it against the background of the drapery.
To work you need to prepare:
- album sheet,
- simple pencils,
- sharpener and eraser.
The order of work.
- First of all, the horizon line and the contours of the object are applied to the sheet. It is recommended to ensure that the image is placed in the center of the sheet. A little space should be left on top, it will be clear that the objects are on a flat surface.
- When transferring a visual image to paper, it is important to maintain proportions. This can be done simply with a pencil, measuring the dimensions of the elements of the composition with it.
- The outlines of objects are always based on a simple geometric shape. The bottom of the vase is an ellipse. It is important to correctly transfer the shape of objects and maintain all proportions.
- Having specified the proportions, the auxiliary lines can be removed and the contours of objects can be clearly drawn. Highlight the center of the composition more clearly.
- Volume is added to a still life using shading. Large spots can be outlined in advance; shadows and highlights of light must be highlighted very carefully. The folds of the drapery will require a lot of attention.
Highlighting shadows using shading with a simple pencil is a simple skill that can be developed simply with practice. To do this, it is recommended to devote several lessons to drawing folds of matter. Hatching skills will also be useful for depicting any elements of a still life.
Pencil drawings
How to draw a still life with pencil, charcoal or chalk. Here, at the last stage of work, shading is important. Still lifes often emphasize the shapes of individual elements, unlike other styles of painting, which, for example, use tracing.
To perform shading correctly, you must determine how light hits the objects being depicted.
A master class for beginners will help you understand how fruit shadows are distributed.
- Fruits with a smooth surface (grapes, apples, plums) will reflect light.
- Fruit or other textured objects (pineapple, wicker basket, orange) will eat them.
Using shading, you can highlight the most shaded areas, textures, and dark colors. An eraser or white chalk is used to mark highlights and the brightest elements of the composition.
Creating a pencil drawing step by step:
- Prepare a 2B pencil and a thick sheet of A3 paper.
- Create a captivating composition. A clear approach to creating wireframe sketches will help you create it from a group of objects.
- Draw a horizon line and select the center of the composition. It is better to start by marking the table plane with a horizontal line.
- Sketch the outlines without pressing the pencil and maintaining perspective. You can use auxiliary lines, which are then removed with an eraser.
- Erase the auxiliary lines if the shape, proportions and composition of the still life suit the author. Now you can work out the details of each element.
- Add details by drawing shadows and reflections. The more carefully this is done, the easier it is to move on to the next stage.
Tinting is carried out in two stages:
- Base tones are lightly applied to each piece to give it a three-dimensional shape.
- Shade the spaces between and around objects.
Important! Drawing light and shadow between objects should be the same as drawing the objects themselves. Shadows under and around objects will help determine shape and shadows on their surfaces.
Some beginners think: how easy it is to draw an apple! Others, on the contrary, are afraid to pick up a brush and pencil. This leads to many mistakes: first they draw the background, leaving gaps in the image where the objects will be located, then they paint all the objects one by one.
Conversely, the objects are painted first and then the background. This is not recommended because the finished image will look like objects cut out from magazines were glued to the sheet. There will be no successful composition.
Each picture needs to be painted gradually, but completely. Experienced artists return to one theme or another one by one, making several strokes at a time until the masterpiece is ready.