Elena Malyarova
Summary of a lesson on appliqué in the senior group “Funny Clown”
Lesson summary on application in the senior group
Lesson topic
:
«Funny clown
»
Goal: to teach children to use templates, to teach them to create the image of a cheerful person - a clown, through application.
. Improve skills in working with scissors. Know how to choose harmoniously matching colors. Cultivate accuracy in work. Develop fantasy and imagination when creating the intended image. Develop fine motor skills of the hands.
Handout: paper or cardboard (A4 format)
for each child, brushes, glue, napkins, oilcloths, templates, colored paper, pencils, brush stands, sample, pictures or illustrations depicting
funny people - clowns
.
Methodological techniques: teacher telling before or during class about clowns
What kind of people are they, what do they do.
Where they work, examination of the sample, questions from the teacher, explanation, individual work during the lesson
.
Vocabulary: clown
, funny, mischievous, funny,
cheerful
, unusual, colorful.
Clown made of geometric shapes
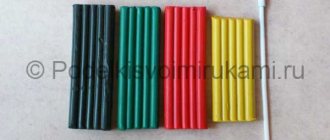
For work we will need:
- colored paper;
- cardboard (for the base);
- a simple pencil;
- markers;
- stencil ruler;
- scissors and glue.
We prepare the necessary preparations:
- circles (multi-colored) – 6 pieces (for the face and balls);
- triangles – 5 pcs. (for pants, sleeves and cap);
- asterisk (for collar);
- ovals - two (for boots and hands).
Let's get to work.
We make the main details of the application. Use a special ruler with geometric shapes for this:
Place it on the base of the required color and outline the shapes with a pencil. Cut out the blanks with scissors. Cut one oval in half - these will be the shoes. From the second half we will need, we will also cut it into two - hands. Lay out the parts on cardboard and secure with glue. Draw the face - eyes, nose and mouth. The picture is ready.
Fun clown
Necessary materials:
- colored napkins and paper;
- beautiful button;
- eyes from a creativity kit and glitter;
- paper for background;
- scissors;
- stapler;
- glue;
- threads;
- glitter pencils;
- red felt-tip pen;
- Double-sided tape.
Do all the basic details. For convenience, print out this template:
Glue all the parts of the costume step by step onto a separate white sheet. Cut out the clown outfit with scissors. Sew a button to the vest and stick a bow on top.
We glue double-sided tape to our hands, boots and hat. We secure the nose and eyes with tape. Draw a smile with a red felt-tip pen.
Making fluffy pompoms. To do this, fold the napkin in several layers (the thicker it is, the fluffier the workpiece will be). Then, using the template, draw a circle (2.5 - 3 cm). Cut it out and fasten the circles with a stapler.
Margarita Timoshchuk
Clown made of colored paper
To create an application you will need the following templates:
You can draw them or print them on a printer.
Also prepare:
- paper of different colors;
- black marker;
- PVA glue;
- scissors.
Technique: make applique details from the colored base. Glue the hair to the head:
We put on the clown's hat (using glue). We glue the elements of the face (eyes, nose, eyebrows, cheeks, mouth). Draw ears, eyes and a smile with a marker:
DIY clown from scrap materials
You can make a fun toy from anything - disposable paper cups, plastic bottles, buttons. The main thing is not to restrain your imagination, to involve your loved ones in creativity, regardless of their age.
Crafts from cups
If you have bright disposable plastic cups, forks or spoons left after the holiday, you can turn them into a cheerful circus performer.
In addition to the basic elements, you need to prepare double chenille wire, double-sided tape and scissors, and print out an image of the clown’s face.
We turn the glass upside down, make two holes opposite each other, thread the wire through them and form handles at its ends. We cut out the face, glue it onto a plastic fork (spoon), and insert it into the hole in the bottom of the glass. We make legs from wire and attach them. The cheerful clown is ready.
Volumetric applique with a clown
We will need the following tools and materials:
- paper (velvety and corrugated);
- scissors;
- pencil and ruler;
- office glue.
First, cut out a circle from yellow colored paper - the head of a clown. Create eyes from white and black. To make hair blanks, cut colored corrugated paper into strips (length – 12–14 cm, width – 6–8 cm). Then screw them onto a pencil. Squeeze like an accordion. Roll the resulting tube into a donut and secure the edge with glue. Your hair should look like this.
We make the bow in a similar way, but we cut the strips wider and longer. Glue together two multi-colored curls in the shape of a figure eight. Cut out a small star from paper and decorate the butterfly with it. We assemble a face from these parts, gluing them with glue. And we get this result:
Decorate the clown as you wish. They make different types of hair, for example, from a washcloth, from threads and paper bows, from accordion-folded paper or from puzzles.
Progress of the lesson:
Music from the movie "Circus" is playing.
Hello children. Today we are going to the circus.
Children make a circus tent out of geometric shapes. The teacher asks to name the shapes (circle, triangle, square, rectangle) and their color.
Let's put the elephant on a big stand. Put? Now let’s put the lion on a small pedestal. Walk the horse around in a circle. Place the monkey on the swing. Make a ladder out of counting sticks.
Children use scissors to cut tickets along the line.
A clown performs at the circus. He is cheerful and tries to cheer everyone up.
Look, it's a clown. Let's put makeup on him, make him beautiful. Glue on the clown's hair, hat and bow.
Now we will help decorate another clown. Let's make him a beautiful collar from clothespins.
A strongman performs in our circus. He is very strong and can lift enormous weights.
Experiment “Heavy-light”
Hold the bags in your hands and tell which ones are light and which are heavy. Children are offered bags with cotton wool and pebbles.
In this picture, a strongman in a circus lifts heavy weights and a barbell. Organize buttons by color and size.
Dynamic pause “Playing with weights”
Take the weight in your right hand. Lift it up, put it on your shoulder, lower it to the floor. Grab the kettlebell with your left hand. Lift it up, put it on your shoulder, hide it behind your back. Place a weight on the floor in front of you and jump over it.
In the circus, trainers always perform with their trained animals.
Didactic game “Animals in Cages”
After the performance, the animals return to their cages. Help put the animals in cages. Place a tall giraffe in a tall cage, then select suitable cages for the zebra and monkey.
Children arrange cardboard pictures of elephants from largest to smallest.
Didactic game “Find the shadow”
Children attach colored silhouette images of animals to their black silhouette shadows.
Exercise “Trained Animals”
Children, if desired, put on animal hats and follow the teacher-trainer’s commands: stand, sit, lie down, crawl, crawl into a fiery ring-hoop, walk along a bench, climb over an obstacle.
Construction of “Horse Fences” from building material
Children make fences from bars placed on the side edge: low - from one bar, medium - from two bars, high - from three bars laid on top of each other.
Game "Circus Horse"
A saddle is attached to the fly horse toy - a piece of thick fabric on the back and a decoration - a feather is stuck into a piece of plasticine attached to the horse's head. Then the horse jumps over the fences. To jump over a high fence, the horse must jump high.
Didactic exercise “Snake”
Open the box and take out the snake cord. How long is the snake? The snake is long. Pull the string and show how the snake crawls. Place the string snake back into the box and cover with the lid.
Dynamic pause “Performance with a snake”
Children lie down on the “snake” laid out on the floor with their chests and swing their arms and legs, then turn over, lie on their backs, and raise their arms and legs up. Walking on a snake, crawling, jumping over.
Magicians also perform at the circus.
Didactic exercise “What’s in the ball?”
Children are given balls and asked to determine by touch which ball has one pebble and which has many pebbles.
Didactic game “What disappeared?”
Three objects are laid out in front of the children, covered with a scarf, and one object is quietly removed. Children must name this missing item.
Didactic game “Colored water”
The teacher paints the lid of the water jar in advance. After the words “Hocus Pocus!” The jar is shaken and the water becomes colored. Children name the color the water is colored. Then, using a brush and paint, they paint the water in the non-pouring bottle according to the color of the sticker pasted on it.
Drawing “Fireworks in the circus arena”
Children draw fireworks with paints using toothbrushes, moving them up and to the sides from the image of the magician.
The little one and I did it!
Since our family has an ingrained tradition of remembering everything at the last moment, this case was no exception. My son Vadik told me about the assignment exactly one day before it was due. There was nowhere to go - I had to get to work!
How to make a city layout
We thought about it a little and decided that since time was running out, we would make a road + a couple of buildings + some kind of transport. We decided - we do it.
We took a piece of thick cardboard, cut out a 40 by 30 cm rectangle from it. Then we pasted it on one side with A4 office paper.
Having carefully trimmed the edges, we got a base for the layout, which is ready for painting.
They drew an impromptu road
The next step was to build a high-rise building. I don’t give explicit dimensions, since everything was done by eye...
Before gluing the building together I decorated it
This is what happened after gluing
We cut the back of the building to size, then glued it on and also painted it.
DIY applique for children 6-8 years old Elephant in the circus. Templates. Master class with photos
Application "Circus Elephant".
Templates. Master class with step-by-step photos. Author: Tatyana Anatolyevna Shilkina, teacher at the Meshchovsky Social Rehabilitation Center for Minors, Meshchovsk, Kaluga Region. Description: this master class is intended for children from 7 years old, teachers, parents. Purpose: interior design of a children's room, an original gift.
Goal: making an applique from colored paper using templates. Objectives: - improve the ability to cut in different directions; — develop practical skills in working with paper; - develop the eye, fantasy, imagination, thinking; — cultivate accuracy in work and patience. Materials and tools needed for work: colored paper for children's creativity, colored cardboard, PVA glue, scissors, a simple pencil, black felt-tip pen.
Safety precautions when working with scissors. 1. Scissors must be well adjusted and sharpened. 2. Store scissors in a specific place (box or stand). 3. When using scissors, you must not be distracted, be as attentive and disciplined as possible. 4. When passing the scissors, hold them by the closed blades. 5. Place scissors on the right with closed blades directed away from you. Rules for working with PVA glue. 1. Do not open the glue with your teeth. 2. When working with glue, use a brush. 3. Take the amount of glue that is required when performing the work at this stage. 4. Remove excess glue with a soft cloth or napkin, gently pressing it. 5. Wash your brush and hands well with soap after work. 6. Avoid getting glue on clothes, hands and face; In case of contact, rinse thoroughly with water. Templates
It is the largest on land.
He has a big ears. With a wonderful hose-nose, he can pluck coconuts from palm trees. He makes a trumpet sound. You have met him more than once at the circus or zoo. And he lives in hot countries and on the island of Ceylon. Did you guess it? This is an elephant). Our little elephant is very dexterous and performs in the circus.
Progress:
Take colored paper, trace the templates and cut out the applique details
Take a sheet of cardboard of any color and place it vertically
Glue a piece of grass onto the bottom of the cardboard
Glue on the blank body of the baby elephant and the sleeveless vest
Now glue on the head, legs, tail
Let's design the face
Let's stick colorful balls
Take a black felt-tip pen, outline the eyes, draw an ear, legs
Closer
Our application “Circus Elephant” is ready. Insert the work into a frame.
Thank you for your attention!
We recommend watching:
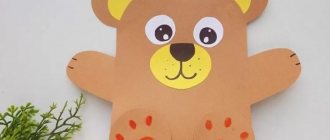
DIY Birch applique for children 6-7 years old. DIY application made of colored paper for children 6-7 years old. Templates. Parrot DIY applique from office paper for children 5-10 years old with templates. Chicken Do-it-yourself applique made of colored paper for children 5-7 years old Teddy bear with templates. Master class with phot
Similar articles:
Paper contour mosaic
Paper application for March 8th in the preparatory group
Application for children “Fruit Basket”. Master Class