Drawing with leaf prints is a non-traditional technique. The completed work always looks interesting and creative, whether the child is at least 2 years old, at least 7 years old. A creative activity brings a lot of fun and can interest even those kids who don’t like to draw in general. We will tell you in detail how to make beautiful drawings and what materials you need to use.
The benefits of learning different drawing techniques
Drawing is one of the simplest and most accessible ways to show your creativity and give free rein to your imagination.
Physiologists and psychologists have proven that creative activities are very beneficial for children. They have a positive effect on development:
- train hand motor skills;
- teach to fully perceive colors and shades;
- improve memory and creative thinking;
- promote independence in decision making;
- Increase concentration and perseverance.
Children who master several drawing techniques often use an unconventional creative approach in life and cope with complex tasks using extraordinary methods.
In preschool and primary school age, it is especially useful to study non-traditional types of fine art: drawing with prints of leaves, palms, plasticine printing, monotype, frottage, grottage, blotography and others. They do not require small movements, straight lines, or shading from the child, which are so difficult to achieve at a young age. Creative activities are always fun and interesting.
MAGAZINE Preschooler.RF
Summary of educational activities in the middle group on artistic and aesthetic development (drawing) using non-traditional drawing techniques “Printing with leaves” “Autumn leaf fall”Compiled by: Marina Mikhailovna Klembo, middle group teacher, GBOU School 2127, Moscow.
Goal: To introduce children to an unconventional method of drawing - “printing with leaves” .
Tasks:
- To develop children’s ability to apply gouache to the surface of a sheet, to mix paints directly on the leaves
- Expand children's knowledge about trees (birch, maple, oak, rowan)
- Develop children's creative imagination
- Cultivate accuracy in working with gouache.
Preliminary work:
- Looking at illustrations depicting autumn nature
- Tree watching on a walk
- Collecting fallen leaves and examining them
- conversation about autumn and autumn signs.
Materials:
- Illustrations on the theme of autumn
- Tinted paper A4
- Gouache (yellow, orange, green, red)
- Tassels; leaves from trees; napkins; jars of water; oilcloth.
Progress
Educator: - Hello guys. Today I dreamed that it was summer. The birds are singing, the sun is shining. And when I woke up, everything was confused and I couldn’t understand what time of year it was.
- Guys, do you know what time of year it is?
(Children's answers)
Vosp.: - How did you understand that it’s autumn now? The sun is shining and the birds are singing?
(Children's answers)
Vosp.: - Now I understand everything. What a great fellow you are. All your answers are correct.
Guys, winter will soon come and all the bright and colorful leaves will fall off, wither and hide under the snow. I really want to preserve this beauty. How do you think we can do this?
(Children's answers)
Vosp.: - I really liked your answer options. They are all very good. But I have another way. Today, from an ordinary leaf that we collected on our site, we will print bright and beautiful leaves.
To do this, I will take a maple leaf, place it on an oilcloth with the veins facing up, use a brush to apply gouache in two colors (red, yellow) and paint over the leaf. After this, we carefully take the painted leaf in our hands and turn it over, the painted side down, and place it on a sheet of paper. I gently press it with my fingertips. I remove the leaf by the stem and I get an imprint of the leaf. This technique is called "leaf printing" . In this way we will preserve autumn and depict autumn leaf fall.
Children begin to create independently to the music (A. Yakupov - Autumn mood)
After the children finish their independent activities, the work is laid out on a separate table.
Vosp.: - Guys, look at how beautiful your leaf fall turned out to be. Did you like the leaves you got?
(Children's answers)
Play: Let's look at our leaves together and choose which leaves turned out to be the brightest, the neatest, the most unusual in color.
(Children's answers)
Vosp.: - Well done! All the works turned out very beautiful, bright, colorful.
Used Books:
- program “From birth to school” edited by N.E. Veraksy, T.S. Komarova. M.: Mosaic - Synthesis 2021
- “Art activities in kindergarten. Middle group” by I. A. Lykova. M.: “Karapuz” 2009
| Next > |
Description of the technique of drawing leaves
To make a beautiful, bright picture with your children, you must first prepare the materials. You will need:
- leaves of different sizes and shapes;
- album paper;
- paints;
- brush;
- a glass of water;
- pencil;
- a draft on which paint will be applied to the leaves.
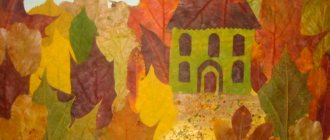
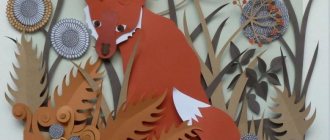
Next you need to come up with a composition. For example, make an autumn forest, a sun, a vase with a herbarium, or a large tree out of leaves. Example pictures:
Using a simple pencil, you should draw the outlines of the drawing, which will help you understand where to place each next print of the sheet. Now all that’s left to do is apply paint to the top of the leaf with a brush (several colors can be used at the same time) and apply it to a pre-designated place on the paper.
The secret to a beautiful print is thick ink. It is important to apply it to the entire leaf, paying special attention to the stem and vein areas. The seal must be placed evenly, without fidgeting with your hand, and removed in the same way - with a careful movement.
Method of applying paint around the leaves
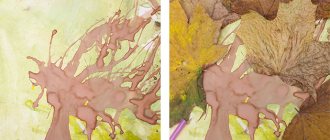
You can leave an imprint of a sheet in different ways. Drawings with white leaves on a colorful autumn background are very colorful and bright. Examples:
It is even easier to draw such pictures. Children of the youngest age can cope with the task. To do this, you need to place leaves of different shapes on a white A4 sheet, and holding them, carefully decorate the background. At the final stage, the leaves are removed.
By the way, it is more convenient to use leaves cut out of cardboard as stencils. They fit more tightly, and the prints are always smooth.
Leaf prints using frottage technique
Another unusual way to obtain a leaf imprint is to rub wax crayon on paper placed on top of a densely veined leaf. Frottage is literally translated as “to rub, to rub.” An undoubted advantage of the technique is the realistic transfer of the materiality of the sheet, its shape and relief. In order for the drawing to turn out beautiful, and the leaves not to fidget when rubbed, it is recommended to compose and glue the composition on a draft, and then put landscape paper on top and start drawing.
Examples of pictures:
Non-traditional drawing techniques can and are even very usefully combined with each other. This will allow the child to more fully express his idea. And how interesting it is to then look at the resulting masterpieces of little artists!
Drawing with plasticine stamps
You can start a creative activity of painting with leaf prints at any time of the year, even in winter. Only instead of living leaves from trees, stamps are prepared. The easiest and fastest way to make blanks is from plasticine. To do this, you first need to roll out a layer 0.5–1 cm thick, cut out a shaped sheet with a plastic knife, and then place it on a flat circle with a handle.
If desired, veins can be squeezed out on plasticine leaves. To prevent the stamp from becoming deformed during printing, it is recommended to keep it in the freezer for 20–30 minutes.
By the way, using a leaf stamp you can draw not only on paper, but also on fabric. It turns out something like this:
Each of the non-traditional drawing techniques for children looks like a small exciting game. The implementation of a creative plan in various ways fosters courage, spontaneity and gives complete freedom to express individuality. Such simple, at first glance, prints of autumn leaves under the guidance of a parent or kindergarten teacher can turn into real masterpieces. Try to master this technique too!
OD summary on non-traditional drawing with leaf prints “Autumn Palette” in the senior group
Nadezhda Bezrukova
OD summary on non-traditional drawing with leaf prints “Autumn Palette” in the senior group
Planning educational activities
Educational field: artistic and aesthetic development.
Section: Fine Arts.
Date: 22.1019
Theme: " Autumn Forest "
.
Goal: to teach children to see the beauty of nature through the means of visual activity, to continue to develop the ability to figuratively perceive the beauty of nature and convey it using the non-traditional drawing technique “ leaf ”
.
Objectives: clarify and generalize children’s knowledge about autumn ; continue to teach children to select the necessary color schemes ( autumn palette )
;
acquaintance with an unconventional way of drawing - imprint with autumn leaves ; cultivate a love of nature; interest and positive attitude towards unconventional drawing ;
desire to achieve results. Materials and equipment: album sheets , gouache, brushes, jars of water, napkins, oilcloths, autumn leaves from various trees,
— musical accompaniment by P. I. Tchaikovsky cycle “The Seasons”
“
Autumn ” Preliminary work: observing autumn nature during walks, reading poems about autumn , talking about the signs of autumn , guessing riddles about autumn , conducting entertainment “Golden Autumn ”
, looking at illustrations depicting
autumn nature , collecting autumn leaves .
Contents of OA
1.Introductory part:
The music of P. Tchaikovsky “The Seasons”
Educator: Guys, did you like the music that is playing now? (children's answers)
This is a fragment of music by P. Tchaikovsky
“The Seasons”
.
Educator: Did you guess what time of year was featured in the music? (children's answers)
Educator: That's right, children, autumn , but listen to the riddle:
There's already a smell of rain in the air,
It's getting colder every day.
The trees change their outfit,
The leaves are slowly losing their leaves.
It’s clear to everyone how twice makes two -
Has arrived ( autumn time )
Educator: Well done guys, it's autumn time .
“ Autumn ... the last warm days are the farewell gift of the passing summer. As if trying to keep the hot sun in their branches, the trees turned gold and purple. Thin, silvery cobwebs fly in the warm air; on them, postal bugs carry long-awaited news to someone.”
Educator: Children, what changes occur in nature with the onset of autumn ?
Children: answers (the sun shines less often, it rains more often, trees change their color to crimson, leaves , cold weather, first frosts, days get shorter, cloudy weather, birds fly away).
Educator: Well done, you know the autumn weather signs . This morning, while we were walking, we collected leaves , and I invite you to play with them.
Didactic game “Which tree is the leaf ”
Educator: Well done, you recognized all the leaves . All leaves are different . They differ from each other in shape, color, and size. In summer all the leaves are green , and in autumn they change their color to yellow and red. Soon all the leaves will fall from the trees , and we will only remember them. But I suggest you leave a mark with them on our leaves the autumn trees at any time .
2.Main part:
Drawing an autumn forest ( non-traditional technique – printing with leaves )
Educator: draw autumn leaves will help us with this - we will print with them.
Take any leaf , cover it with paint using a brush, leaving no empty spaces and not forgetting to paint the edges. Place the leaf on a clean landscape sheet with the stem down and press it tightly to the paper, trying not to move it out of place . Then take the leaf by the stem and carefully remove it from the surface of the landscape leaf . The leaf can be covered not with one color, but with different ones, then our forest will turn out to be multi-colored and fabulous.
When we print the leaves , we will paint the tree trunks with a brush; the imprinted leaf veins will resemble twigs in a colored crown (during the explanation, the teacher clearly demonstrates to the children how to complete the task).
Educator: Before we start work, we will warm up a little.
Physical school
One two three four five!
Let's jump and jump! (Jumping in place)
Right side bent. (Tilting the body left and right)
One two Three.
Left side bent. One two Three.
Now let's raise our hands (Hands up)
And we will reach the cloud.
Let's sit on the path, (Sit down on the floor)
Let's stretch our legs.
Let's bend the right leg, (Bend the legs at the knee)
One two Three!
Let's bend the left leg, One, two, three.
Legs raised high (Legs raised high)
And they held it for a while.
Shake your head (Head movements)
And everyone stood up together. (Stand up)
Educator: Well, now let's get to work, make our own fabulous autumn forest . Just be very careful and attentive.
3. Final part. Reflection.
Educator: Guys, let's see what we got? What beautiful trees!
— What time of year did you depict in your drawings? (children's answers)
— What paints did you use? (children's answers)
- How did you draw ? (children's answers)
You all made wonderful colorful autumn trees . I think your moms and dads will also like the autumn forest you created. (Exhibition of works by students)
Educator: Thank you everyone, you are great.