Making toys in class
In modern preschool education, it is necessary to take into account the complex thematic principle of constructing the educational process, which involves identifying the leading topic of the day, week or month. A cycle of classes subordinated to one topic allows the child to create a holistic perception of an object or phenomenon. The child “lives” the topic in different types of children’s activities (playing, drawing, designing, etc.).
The teachers of our preschool department have developed notes for thematic lessons on making toys
and crafts based on the theme of the week, implemented in direct educational activities in different sections of the program.
Summary of direct educational activities on manual labor in the preparatory school group.
Topic of the week
: “The most fun holiday.”
Topic of the lesson on artistic manual labor
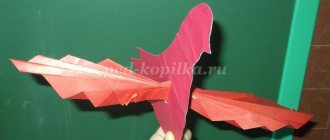
: “Lanterns for the Christmas tree.”
Target
: learn to cut paper along the contour, fasten and decorate crafts.
Handout
: blanks of colored paper 15X20 cm with vertical lines applied 1.5 cm apart, not reaching the edge of the blank by 2 cm, a strip of colored paper measuring 2X10 cm, scissors, glue, brushes, stands for brushes, napkins, oilcloths.
Progress of the lesson
The teacher reminds the children about the lesson where they talked about New Year traditions and decorating houses for the New Year. The symbol of the New Year holiday is the Christmas tree. It’s very nice when the tree hangs not only toys bought in the store, but also ones made by yourself.
The teacher invites the children to make New Year's lanterns from paper. Draws attention to the fact that even using such a simple material as paper, you can get original and beautiful decorations.
Stages of work
:
1. Fold a sheet of paper in half along the long side, with the colored side facing inward. 2. From the fold line, make cuts along the drawn contour. 3. Unfold the workpiece. 4. Decorate the edges of the craft sheet with applique. 5. Roll the sheet into a tube, glue the edges along the long side. 6. Squeeze the tube a little at the bottom and top at the same time - you’ll get a flashlight. 7. Decorate the strip with applique. 8. Glue the strip inside the flashlight to create a handle. The flashlight is ready.
The teacher reports that a flashlight can serve not only as a Christmas tree decoration, but also as a decoration for a small vase or glass; several lanterns suspended on a serpentine will turn into a multi-colored garland.
At the end of the lesson, the teacher offers to decorate the group room.
Nadezhda Golitsyna, senior teacher,
Lyudmila Rudneva, teacher of secondary school No. 1716 “Eureka-Ogonyok”, Moscow
Summary of the manual labor lesson “Motanka Doll” in the preparatory group
Summary of a manual labor lesson “Motanka doll” for children in the preparatory school group
Goal: to teach children how to make a rag motanka doll. Objectives: 1. Introduce the history of dolls. Activate children's cognitive activity; 2. Arouse interest in Russian folk dolls. Develop creativity and imagination; 3. Cultivate accuracy, perseverance, perseverance in achieving goals, respectful attitude towards each other, towards Russian culture. Vocabulary work: motanka doll, faceless, amulet. Material: modern dolls from the role-playing corner; motanka doll, three circles of different diameters made of fabric (preferably chintz), a triangular chintz (scarf), a rectangle of white chintz, thread No. 10 (white), cotton wool, scissors (only for the teacher). Educator: Guys, do you like to play with dolls? (Children's answers.)
In our group we see a lot of beautiful dolls.
Look, we have Barbies, we also have baby dolls, we have small dolls and big ones (Looking at them.)
Vika, what’s your doll’s name?
(Child’s answer.)
And you, Katya, what did you name your doll?
(Answer.)
Dima, what would you call this baby doll?
(Answer.)
When I was little, they also loved to play with dolls.
Our mothers and grandmothers also played with dolls. But they didn’t play with these dolls, but with what kind... we’ll find out when we do a little warm-up. Stand next to me and repeat the movements after me. Game exercise “We can do this” Children repeat the teacher’s movements, accompanying them with the words: “I can do this too.”
Who, tell me, can, children, repeat these movements?
I'll raise my hands up. I can do this too.
I'll move you left and right,
I can do that too.
And like a bird I will fly.
I can do this too.
I'll turn my head.
I can do this too.
And then I’ll sit down and stand up.
I can do this too.
And I won’t get tired at all.
I can do this too.
I'll jump around a little.
I can do this too.
And I'll go on foot.
I can do this too.
If necessary, I'll run.
I can do this too. I can do anything in the world! Educator: Well done! Savely, what were we talking about? (Child's answer.)
Correct. Now take your seats and listen to an interesting story. Look, I have a Motanka doll in my hands
an amazing and mysterious creature, the secrets of which were left to us by our ancestors.
Masha, who are our ancestors? Masha: These are our grandparents. Educator: Correct. A long time ago, when our grandmothers were little, they played with dolls like this. And they made these dolls for themselves. Look, my doll has no eyes, nose, or mouth. She is faceless. Repeat: faceless. Children: Faceless. Educator: What does this mean? (Children's answers.)
They were made faceless on purpose.
It was believed that such dolls could not be possessed by evil forces and cause harm. A faceless doll is always kind. It has a protective, protective power. This is a talisman doll. You can put it next to you when you go to bed or go play. Do you guys want to make such a doll? (Children's answers.) The teacher distributes prepared parts and materials for work.
Take a close look at what you have. You have three circles: a large one, a slightly smaller one and a small one. There is also cotton wool, strings - don’t lose them, a triangle and a piece of white fabric. Everything we need for our doll.
Are you probably tired?
Let `s have some rest. Get up and leave the table. Physical exercise “One, two, three, four, five” One, two, three, four, five, Let’s start to rest! (Stretch)
The back was cheerfully straightened, The arms were pulled up!
Once and twice, sit down and stand up to rest again. Bend forward once and twice, bend backward once and twice. (Movements of the rhyme)
So we have become stronger,
(Show “strength”)
Healthier and more cheerful!
(Smile at each other). Educator: Well, we’ve rested, and now let’s get to work. Take cotton wool and roll it into a tight ball. Take the largest circle. Place the ball in the center of the fabric circle on the wrong side. This will be the head of our motanka doll. Now clench it into a fist, forming a ball and wrap it with thread. We straighten the fabric - this will be the first layer of the rag doll's dress.
We take the second circle, which is slightly smaller than the first. Apply it to the surface of the head. We wrap it with thread again.
And the third circle - the smallest one - is also placed on the surface of our head. Now, guys, take a white fabric and place it on the surface of all the fabrics, wrap it with thread around the head. Now we will make the hands of our doll. To make handles, fold the fabric inward and secure with an elastic band. If the handles are too long, shorten them with scissors.
Now let’s take a triangle - this is a headscarf. We put it on and tie it. And now our doll is ready.
Educator: Guys, what do they call the doll? Which one did we make? Children: Motanka doll. Educator: Why is it called motanka? (Children’s assumptions and answers.)
What will you do with it?
Children's answers. Educator: And I’ll give my doll to our doll Masha. She's bored sitting alone on the couch. And now she has a friend. Now you can play with your dolls too. Children develop their play at the center of role-playing games.
We recommend watching:
Summary of GCD in the preparatory group on the topic “Paintings by artists” A fairy tale about friendship for children of the preparatory group. The Adventures of Star and Dragon Day of Heroes of the Fatherland. Conversation with children of the preparatory group Role-playing game in the preparatory group "Polyclinic"
Similar articles:
Summary of a lesson in the preparatory group of a kindergarten on the topic Vitamins
Summary of the direct educational activity “Music” in the preparatory group
Summary of a lesson in the preparatory group of a preschool educational institution on the topic: Heroes of the Russian Land
Summary of educational activities on cognitive and speech development in a speech therapy group preparatory to school
Summary of educational activities on cognitive and speech development for a speech therapy group preparatory to school
MAGAZINE Preschooler.RF
Lesson on the topic: “Brownie” Continue getting acquainted with a new type of work - making amulets. Introduce children to a new image in Slavic culture - the brownie. Create conditions for the implementation of imaginative thinking. Teach beautifully, create a composition from natural material, and reinforce it. To instill in children a caring attitude towards natural materials. Develop the ability to analyze your own work and the work of friends. Develop fine motor skills of fingers. Nurture love.Material: Tassels, burlap stuffed with padding polyester; ready-made bundles collected from a paint brush (mustache, hair), natural material (nuts, chestnuts, cereals, berries, dried flowers, medicinal herbs, pumpkin seeds, sunflower seeds, corn, beans, peas) brown eyes, ribbons, braid.
So, we will have a bag as the body for the brownie, why do you think? (children's answers) That's right - a bag is a symbol of wealth, so that there is a lot of grain, flour, cereals, etc. in the house. Now let’s make him a hairstyle and glue his hair. Lubricate it generously with glue and press it to the top of the bag. Next we glue the eyes. Now the face is coming out! For the nose we will take a chestnut or a walnut, choose for yourself what kind of brownie nose you will have. The red bean is a mouth. You can glue the antennae. Well, here's the brownie - look. Each has its own face and character. Well done. How great you are doing. Finger gymnastics “Brownie” Wonderful day - Brownie Holiday. We want you friends to be healthy. So that there is happiness in the house, miracles and smiles. So that the goldfish fulfills their wishes. And we also want money. And in general - prosperity. May your life, dear ones, be both warm and sweet! Let the homemade brownie bring joy. Forever in this world It will save you from problems.
And now. (Demonstrates the brownie) Meet me - this is my personal kind brownie Helps with the housework Without arrogance and deceit Guards, takes care of, the house properly, leads All in business, worries, he cooks, washes, cleans Yes, of course, I’m joking So I want to congratulate Joy I wish you a Brownie, I welcome you, So that there is order in the house And peace and harmony Congratulate the Brownie He will be terribly happy And I congratulate you And I advise you to be friends With the one who guards your house To live serenely in it Prepare him for the holiday A congratulatory cake So that the invisible prankster Brings more proc. Lives in our house Quietly somewhere Protects from troubles and gives peace Not the defeat of darkness, a messenger from the light Good and bright, dear brownie Let him protect your homes from adversity Invisibly let him do his job And let only goodness into your family May happiness and harmony be in keeps your world. First of all, let's glue bread onto the brownie - crafts made from salt dough, the ones we prepared in the last lesson. Bread is the head of everything. Prosperity in the house, guests were always greeted with bread and salt. Well, now we need to decorate and appease our brownies. First, let's dress him: to do this, we will glue a bright ribbon at the bottom - a shirt. Let's stick some money so that there will be success in all matters and wealth in the house. And we will feed him cereal. Come on, look at the different types of cereal on the table. Who knows what it's called? (Children's answers). Now let's make a circle with glue and sprinkle it with cereal. Well, now we have a lot of natural material, let’s decorate the brownie. Spikelets - for the harvest on the farm. Berries represent youth and beauty, so that the girls in the family are beautiful. Medicinal herbs - for good health. And now put the seeds in the free space. Pumpkin is fertility. Corn - so that there are many children in the house - this is wealth. Sunflower seeds – the health of children in the house. What beautiful brownies you have made, but they are all different. Here he is cunning, but Dasha is serious, and Nikita is so cheerful and bright. Well done boys.
Symbolism of amulets. Base material. 1. Burlap – abundance. The bag is a symbol of wealth. 2. Weaving - symbolizes acquaintance and friendship. 3. Bast shoes - symbolizes home comfort, family happiness. 4. A broom pointing downwards sweeps quarrels out of the hut. 5. The house is a symbol of family. 6. Braid, wreath - symbols of infinity and continuity of the family, increasing well-being.
Elements. 1. The sunflower is the main Slavic amulet, the Slavs are the children of the sun. 2. Towels and loaf - harmony and prosperity in the house, hospitality. Bread is the head of everything. 3. A bagel is a symbol of a strong family. 4. Braid, brownie shirt - happiness in the house. 5. Coin - success in business. 6. Ears of corn are the harvest on the farm. 7. The cone is a symbol of hard work and success. 8. Walnut is a symbol of mental strength and health. 9. Nest and egg – continuation of the family. 10. Medicinal herbs are a symbol of good health. 11. Immortelle - a symbol of longevity. 12. Dried flowers - comfort and beauty. 13. Berries are a symbol of female youth and beauty. 14. Red bitter pepper - the masculine principle in the house. 15. Cereals are good in the house. 16. Knot – protects against scandals in the house. 17. Pumpkin is a symbol of fertility. 18. Seed – the birth of a new life. 19. Beans, peas - peace and friendship. 20. Sunflower seeds - the health of children in the house. 21. Corn – children, procreation, family cohesion.
| Next > |
Manual labor club in the preparatory group “Chest of Ideas”
Municipal budgetary preschool educational institution "Kindergarten of a general developmental type with priority implementation of activities for the cognitive and speech development of children No. 9 "Yakutyanochka"
Manual labor club in the preparatory group “Chest of Ideas”
Educator: MBDOU No. 9 “Yakutyanochka” Klimovskaya Natalya Valerievna.
Explanatory note
Manual labor is a universal educational tool that can balance one-sided intellectual activity.
Physiologists have found that our fingers are organically connected to the brain, the speech center. Therefore, hand training stimulates the body’s self-regulation and increases the functional activity of other organs. The relationship between development and intelligence has long been known. Even the simplest manual works require constant attention and make a child think. Skillful use of hands further enhances the development of the brain. Making crafts is not only about certain movements. This allows you to work on the development of practical intelligence: it teaches children to analyze a task and plan its progress.
One of the main tasks of teaching and raising children in applied arts classes is to enrich the student’s worldview, i.e. development of the child’s creative culture (development of a creative non-standard approach to the implementation of a task, nurturing hard work, interest in practical activities, the joy of creating and discovering something new).
A child learns the world through manipulation, that is, actions with various objects that allow him to recognize and study their properties, while learning his creative abilities and changing what he touches. One of the child’s assistants in this most important task for his development is working with paper. Being the most accessible for children, applied creativity has the necessary emotionality, attractiveness, and effectiveness.
The purpose of the circle: the development of manual skills in children through strengthening fine motor skills of the fingers and organizing joint visual creativity of children and adults.
Objectives: - To introduce children to the basic concepts and basic forms of various techniques; — Teach children various techniques for transforming paper, natural and waste materials. — To develop the ability to take into account the properties of materials when making crafts from them. — Enrich the child’s vocabulary with special terms; — Create compositions with products made using various techniques of working with paper; -Develop attention, memory, logical and spatial imagination; — Develop fine motor skills of the hands and eye; — Develop artistic taste, creativity and imagination of children; — Form a work culture and improve work skills; -Improve communication skills. — To develop neatness, the ability to use materials carefully and economically, to keep the workplace in order.
The circle is attended by 11 children. Time for this activity is allocated outside of class: in the afternoon. The duration of productive activities with children varied depending on the situation and the desires of the children. A flexible form of organizing child labor in leisure activities made it possible to take into account the individual characteristics of children, desires, health status, level of mastery of skills, being at a certain stage of the implementation of the plan and other possible factors. Each child worked at his own level of difficulty and begins work from where he left off.
The classes were held in the form of a game; to play out a certain plot, poetic forms, fairy tales, moving and finger games, characters (toys and dolls from various theaters, images of a particular character who is played out) are used.
The implementation period for the circle is 9 months. The number of classes per month is three. There are 27 lessons in total. Also, the works were sent to an international Internet competition, where my students were awarded diplomas of participation. Thus, at the International Children’s Creative Drawing Competition “Space Travel” in the international educational portal “MAAM”, a participant’s diploma was given to Harbin Dayaan, Natasha Nikolaeva.
At the International Children's Creative Competition of Autumn Crafts "Autumn Fantasies" and New Year's Crafts in the International Educational Portal "MAAM" Diploma of Participant - Borisov Gleb, Rozhin Kolya, Makarova Milena, Kalitina Naori, Ivanova Zhenya, Efremova Polina, Sleptsova Polina, Petukhova Dayaana, Equipment: Paper of different formats, colors, quality, colored cardboard; Watercolor paints, glue, scissors, plasticine, buttons, cotton wool, felt-tip pens, pencils, brushes, natural and waste materials.
Notes on manual labor in the preparatory group. Doll made of threads
Notes on manual labor in the preparatory group.
Abstract. Author: Olga Vasilievna Mikhailovskaya, teacher Place of work: MKDOU No. 3, Barabinsk, Novosibirsk region
Summary of the educational instruction on manual labor in the preparatory group “Thread Doll”
Goal: expanding knowledge and skills in the field of arts and crafts Objectives: - continue to introduce children to Russian folk crafts and Russian traditions;
- introduce children to a folk craft - making dolls from threads; — teach techniques for making dolls from fibrous materials in accordance with folk traditions; - develop fine motor skills of the hands; - arouse interest and cultivate a love for Russian folk art and handicrafts; — to form children’s aesthetic taste, develop imagination, and the ability to fantasize. Materials: sample of a finished doll, illustrations of folk dolls, balls of woolen thread, boxes for winding threads when making blanks for the body and arms, scissors. GCD move:
Educator: - Guys, today I want to tell you one very interesting story. In ancient times, when children did not have toys like yours, craftsmen and wizards made toys with their own hands. The children's favorite toy was a doll, and it was a little different than the dolls you play with now. A doll is not born on its own: it is created by a person. Being a part of culture, the doll retains in its image the features of the people who created it. Dolls were made according to certain rules. There was a belief that when making ritual dolls it was forbidden to use piercing or cutting objects that could injure a person. Therefore, the fabric and threads for the dolls only had to be torn by hand. And another indispensable condition for making a doll was its facelessness. The doll had no... face. Since she played the role of a talisman, they were afraid to completely liken her to a person. According to popular beliefs, a doll “with a face” seemed to acquire a soul and thereby become dangerous for the child. It was believed that she could jinx the child and bring misfortune. Such dolls were made until the 18th century. But this was not the only reason for her facelessness. Playing with such a faceless doll encouraged the child to imagine, fantasize, invent its mood and character, and imagine it in different play situations. “You and I will become craftsmen from an ancient Russian village and we will make a doll from threads.” This work is not so simple, so we will help each other. We will make dolls from threads, but using the same techniques as the ancient masters. Please note: the colored thread for tying the bunches will also be a decoration. It depicts a necklace, belt and cuffs, which also had a protective meaning in the clothing of ancient people; The master did not make any other decorations. Materials and tools that we will need next: In front of each of you on the table are: yarn (colored threads), auxiliary cardboard or small books, scissors. Safety briefing Before starting work, we will follow the safety rules. Today we will use scissors very little, but still. Don’t joke with scissors, don’t twist them in your hands in vain And, holding them by the sharp edge, pass them on to a friend. As soon as the work is finished, the scissors need care: Don’t forget to close them and put them back in place. To begin with, I suggest you stretch your hands and fingers to make it easier for you to work. Finger gymnastics “Shadow shadow sweat.” Shadow, shadow, shadow, (hits with both hands on the knees in turn and 2 claps) There is a wattle fence in the garden (palms with outstretched fingers are crossed) In the hut the stove is lit (show the roof with two palms, and then connect the thumbs of both hands, depicting fire ) Grandma is in a hurry (depicting with her index and middle fingers how grandma is walking) She bakes turnips (depicting how pies are made) Places them on plates (alternately hit the right and then the left palm with your fingertips) Cat to the plate - hop! (make claws and clap once) I burned my nose! (cover your nose with your hands). Practical work - and now, I suggest you get to work. (All work takes place with musical accompaniment: Russian folk melodies sound). First stage: blanks for the torso and arms - winding threads on the box. Next, the blank is removed from the box, pulled together in the middle with a thread, and the head of the future doll is fixed. At the bottom, the threads are cut along the fold, the body is formed, and tied with thread.
— Now we drag the colored thread along the imaginary waist line of the doll. Then, the doll’s palms are tied with colored threads. The doll (boy) also has legs that are pulled over.
Today we made a doll based on folk images. In the old days, the doll was made from straw, since straw was an accessible and cheap material; the most ancient meaning of the doll is magical; later it was a toy for children; In modern life, the meaning of this product has partly changed; other materials are used.
We have created wonderful dolls that will bring you health, kindness, and a happy life. Result of the work: - What did you like about our lesson?
We recommend watching:
Summary of GCD in the preparatory group on the topic “Getting to know emotions” Summary of GCD in the preparatory group “Meeting with letters” Open lesson in the preparatory group on the topic: Waltz Do-it-yourself yarn doll. Master class with step-by-step photos
Similar articles:
Abstract of GCD in mathematics in the preparatory group. Count to 18
Summary of GCD in the preparatory group. Topic: Etiquette
Summary of GCD in the preparatory group on the topic: Kindergarten
Lesson notes for the preparatory group. Cultured man
Summary of a lesson on labor education in the preparatory group. Inventions and achievements of man