Step by step crafts for kids for kids of all ages. The works are grouped based on popular techniques and materials used.
For crafts, you can use a variety of materials (from familiar and popular to unusual). In addition to paper, plasticine, chenille wire, you can create from foam plastic, cocktail tubes, beads and even pasta. In this case, they use their own fantasies, modern techniques, and the best practices of teachers.
At the bottom of each photo there is a link to step-by-step work. All master classes are located within the site and do not lead to third-party resources.
Crafts for children: Top 200 ideas step by step
For successful work, use the following tips:
- Study the list of materials required for making crafts so that before you start work, prepare everything you need;
- Be careful with sharp objects. It is important to use only children's scissors with rounded tips. If holes need to be made, blunt punches should be used and always under adult supervision.
- Care is important when working with materials. Paints and plasticine can stain the surface, and hard objects can scratch it. Therefore, you need to protect the work surface, cover it with oilcloth or put special plastic or wooden planks;
- When using paints, you should change the water often, and then wash your hands and hands thoroughly. To prevent the paint from drying out, the jar must be closed tightly, just like a box of paints.
- After working with clay and plasticine, they are stored wrapped to prevent them from drying out. It is better to wrap the clay in a piece of damp cloth, and the plasticine in plain paper.
- Pencils should always be well sharpened. You cannot use a knife or blade for this. Sharpening should be done with a special sharpener.
- Felt-tip pens need to be capped so that they are always ready for further work.
Light plasticine
Relatively recently, parents and children became acquainted with such a creative material as lightweight plasticine. It has bright colors, is very flexible, and does not stain clothes or surfaces.
And its most important advantage is that it freezes perfectly in the air and the figures retain their shape forever. Such toys can be kept as souvenirs, used to make refrigerator magnets, or create Christmas decorations.
Paper crafts for children
Paper is one of the simplest, most accessible and easily processed materials. You can make many different crafts from it, which, moreover, can find practical application. Working with paper imperceptibly affects the overall development of the child: his fingers become stronger, sensory impressions increase - at the level of sensations he recognizes the texture, density and color of paper.
A pencil, ruler, glue, scissors and, of course, colored paper or cardboard - everything you need for exciting creativity. A little skill and patience - and you will get a wonderful character from a cartoon, fairy tales, or your own fantasies. It can be:
rat craft
paper horse
Paper crocodile
Various cardboard crafts
Paper birds
Paper animals
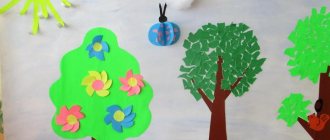
Trees by season
Volumetric paper tree
Paper flower - narcissus
Paper steamer
Paper reed
Rainbow made of colored paper
Paper turtle
Paper ladybug for any preference.
Paper dogs
Paper cone
Paper umbrella
An apple made of paper, as well as a pear and a cherry using the same three-dimensional technique. Popular autumn-themed crafts for children.
Moving paper fish.
Original fly agaric made of paper.
Paper clown
Paper basket
paper doll
Paper mice
Insect crafts
Crafts from strips of paper
Crafts made from strips refer to three-dimensional modeling and paper construction. For crafts, strips of double-sided colored paper, 1 cm wide, are most often used, especially when creating paper balls, the basis of the body for animals and birds. Also, stripes can immediately be folded into a specific character, and small strips glued together into a droplet make beautiful voluminous appliqués.
Crafts from paper strips
Beneficial effect
When a child works on a craft, he is not only busy, interested and determined to achieve results. There is an imperceptible influence on his subconscious in a positive way. The child develops the necessary skills.
Children's DIY paper crafts help fingers become stronger and hold objects more confidently. Feeling the density, texture, color of the paper, his subconscious sensations remember them.
Crafts for children made from accordion paper
There are two ways to create a paper accordion. Both of them are successfully used in children's creativity to make various paper toys and other interesting products.
- The method is simple. Small folds are created on the surface of the paper. Fold part of the paper forward, then turn it over and fold a fold of exactly the same size forward again. For convenience, young children can draw parallel stripes on paper in advance.
- Way. They cut two long strips of paper, glue their ends perpendicularly, and then by interlacing they create a small accordion, from which wonderful bodies of animals and birds are obtained.
Paper crafts with accordion
Accordion paper fruits
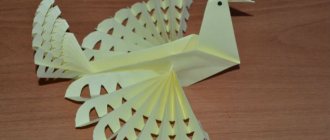
Bunny and sheep made of accordion paper
Crow made of accordion paper
Corrugated paper aster
Buying laminate wholesale in MoscowDIY New Year's crafts - 9 best options
- DIY crafts from scrap materials
You will need: corrugated paper of purple, yellow, green and light green, scissors, wire, glue gun, pencil, ruler, watercolor paints, brush.
Master Class
- Prepare a strip of purple corrugated paper 4 cm wide.
- Tint one edge of the strip with purple paint and set aside to dry.
- Fold the strip several times.
- Make cuts along the unpainted edge. The first blank is ready.
- Make the second blank in the same way, only take a purple strip 6 cm wide.
- Prepare a strip of yellow paper 3 cm wide.
- Fold the yellow strip several times and make cuts.
- Wrap the wire with a light green piece of corrugated paper and secure with glue. This will be the stem.
- Wrap a yellow blank around the end of the stem - these will be the stamens.
- Twist the ends inside the purple piece, which is 4 cm wide, using a pencil.
- Step back from the base of the stamens and glue the petals.
- Take a 6cm wide purple blank and wrap it around the bud as shown in the photo.
- Twist the ends of the petals and straighten the middle.
- Cut out 6 sepals from green paper, then glue them on.
- Cut 6 long leaves of different sizes from light green paper and glue them to the stem.
The corrugated paper aster is ready! You will find even more flowers HERE.
I recommend watching this video!
Note! DIY snake craft
Crafts for children from cones
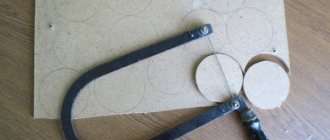
Another great base for crafts is a cone. It is easy to make from paper or cardboard. To do this, draw a circle and divide it into sectors. For example, into 4 parts. If you cut off one part, the cone will be wide, two – medium, three – narrow. Depending on a particular craft, they make the required cone, and then, with the help of small parts, they complete their work.
Crafts from cones
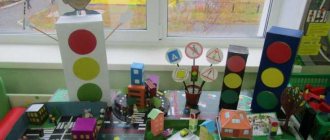
Props for decoration
Among the templates for decorating holiday locations you can always see a lot of props. The first thing that catches your eye in the school theme is the autumn color scheme in all elements. However, there are a large number of types of jewelry; let’s look at the most popular ones.
Pompoms
Both children and adults can make pompoms.
They do not require special material: threads or paper. They are easy to hang on the walls of the hall or windows. They look original in the photo report, and they can be stored for a long time for another holiday. To make a pompom, you need to expand the paper blank to its full width, fold it in half and make a cut. Next, unravel one part and fold it in half twice in a row. All sides of the fold line must be cut. Apply the next layer like an accordion and fold in half. In this case, it is necessary to cut not with a solid line, but to form a semicircle. On the other hand, cut the oblique sheets from the side, narrowing them in the middle. We make all sheets in the same way.
When all the elements are ready, stack them on top of each other and tie them with a thread in the middle. The next thing to do is to form a ball.
Paper bell
To diversify the decor from balloons, streamers and garlands, you can make interesting paper bells. Preschoolers will be happy to help you create such a craft.
The children need to cut out a pre-drawn bell (you can use a stencil), as well as a chamomile and leaves. Next we glue the parts to each other. You can choose other flowers if you want.
As a result, the guys get funny bells that will not just be pictures, but beautiful decorative elements for the photo zone.
Balloon decor
Balloons save any holiday and entertainment, creating a festive atmosphere and mood. To hold a school event, you need to prepare balloon figures and giant numbers and letters.
You can also make arches from balls that will stand at the entrance to an educational institution. There are never enough balls, so dozens of balls are prepared for decoration. And if you inflate them with helium, then at a holiday dedicated to the beginning of the school year, you can symbolically launch them into the sky.
Banners
Today, banners are an integral part of events. They are a great option that can be used for both decorative and educational purposes. You can use huge stands, or you can make small posters. You can depict schoolchildren on banners or create a corner for congratulations.
Cool banner options can be found on the Internet and designed to suit your situation. Among them: children's caricatures and drawings, musical lines for karaoke, funny photos from childhood, etc.
Cardboard mockups
Cardboard mockups will be put into active use when the photo shoot begins. Regardless of age, children love to be photographed, and if they have an interesting frame or model of an idol, the process becomes unforgettable for preschoolers.
We invite you to look at cardboard mockups that can be quickly made during joint parental work.
Fairy lights
Paper and satin garlands are a beautiful option for decorating a room, in particular a school board. No preparatory steps are required to make them. The main thing is to find original training on the Internet and repeat steps one by two, etc.
By the way, beautiful garlands can be neatly stacked on top of each other in a folder and left for celebrating the last call.
Crafts from autumn materials
Best decorating idea: DIY! Both younger and older children can take part in the craft activity. And to be more precise, hand-made. From natural autumn materials (leaves, cones, sticks, etc.) you can make a beautiful wall panel in the classroom or kindergarten as a whole. The organic nature of the materials marks their naturalness and makes the crafts unique.
Origami technique
Paper toys, animals, plants, vehicles, birds, and various objects made using the Japanese origami technique will delight anyone to whom they are presented - parents, close friends.
Origami differs from appliqués, cutting out silhouettes and many other types of art in that it is the art of the whole. There is no need to cut or glue anything, you just need to use one whole sheet of paper. It is possible to add expressiveness to the craft and individuality by adding some details. For example, eyes, animal faces, patterns on the body, clothes.
Recently popular modular origami, which is more difficult for children, consists of several pieces of paper.
Animals using origami technique
Origami trees
Origami steamer
Origami girl
Origami pelican
Origami bee
Origami ice cream
And various other ideas that can be found in the origami for kids section.
Crafts for children from bushings
The core is the remaining roll of thick recycled paper. It is also called a cylinder or tube. Thanks to the ready-made base shape, durable and stable on the surface, the sleeve can be an excellent base for creating three-dimensional crafts for children. The work also uses colored paper or cardboard, which is used to wrap the sleeve, and additional parts are cut out of them. In some crafts, the sleeve is painted with paints and felt-tip pens. In addition to toilet paper rolls, paper towel bases, parchment paper and foil will all work.
Crafts from toilet paper rolls
Crafts for children made from chenille wire
Making and inventing models from wires is no less exciting than folding origami, sculpting from plasticine, and creating from paper. You can make many interesting and funny crafts from chenille wire for friends, parents, and useful things for yourself. As a result of the work, imagination develops, children learn patience and perseverance.
It is not necessary to make crafts exactly in the presented color scheme. You can take any wire according to your own idea, mood and preference.
Fluffy wire butterfly
Chenille wire hare
Chenille wire flower
Chenille wire octopus
Fly agaric made of chenille wire
Chenille wire spider
Crafts for children from cocktail straws
There's nothing you can't do with cocktail straws. You can weave them, the tubes are glued during the process, strung, cut lengthwise to make beautiful flowers, across to make a mosaic and even beads.
Flowers from cocktail tubes
Mosaic of tubes
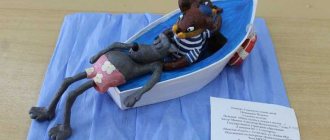
Crafts for children made from plasticine
Plasticine is an excellent material for a beginning sculptor! You can use it to make real masterpieces that will decorate your home or be used as a toy. From plasticine you can mold many funny things, animals, birds, people, whatever your imagination suggests. Plasticine has bright, saturated colors and an easy-to-process shape. The very name of this material speaks of its excellent plastic properties.
Modeling classes cultivate the child’s artistic taste, the ability to observe, and highlight the main and characteristic things. They teach us not only to look, but also to see, because heroes, objects and plots are literally next to us, they live in books and cartoons. You just need to help your child find them - find the wonderful, original and interesting in everyday life. And any creative work fosters perseverance, develops skills and abilities.
Plasticine bunny
Rules for modeling from plasticine:
- Before starting work, you should prepare your workplace and knead the plasticine so that it becomes soft, obedient and elastic.
- It is recommended to start making crafts with the main part, the largest one, then smaller ones are molded and connected to each other. Small details are created as the character is designed.
- It is most convenient to attach small parts in a stack. It can also be used to easily and accurately make various indentations.
- When constructing plasticine crafts from individual large parts, you need to press the parts tightly and cover the fastening area to increase the strength of the product.
- At the end of work, you need to clean the workplace and wash your hands thoroughly with soap.
Penguin made of plasticine
Plasticine frog
Hedgehog made of plasticine and seeds
Crafts from plastic and paper plates
You can make a variety of crafts from this material - simple and more complex. In the process of work, creative and spatial thinking, imagination, eye, and fine motor skills develop. Children also learn new artistic techniques, learn about the properties of materials and how to use them in creative work. All crafts made from plates can become a wonderful interior decoration, a fun toy, or even a painting.
Owl from a plastic plate
Hippopotamus from a plastic plate
Crafts made from natural materials
Natural material is a storehouse of ideas and opportunities for the development of children's creativity. Working with it has a great impact on the child's thinking and imagination. Here, novelty, creative search, and the opportunity to achieve ever more perfect and original results are always possible. When walking in a park or forest, you can collect leaves from different trees, acorns, chestnuts, pine cones, herbs, and interesting twigs for further creativity.
Chestnut spider
Lion made of leaves
Crafts “Gifts of Golden Autumn” for an exhibition or competition
In my previous note, we have already considered many options for what you can make with your own hands from various types of materials, it can be natural, fruits, vegetables, and even waste. This time I will show you a few more options, which are also no less beautiful and attractive.
And perhaps I’ll start with a non-traditional, but a paper-plasticine miracle. Take cardboard and make blanks of maple and oak leaves. You will also need glue for ceiling tiles and a CD for the job.
Take plasticine of different colors in your hand and roll it into a ball.
Advice! You can use modeling dough instead of plasticine.
Roll out with your hands, as if painting the surface of the leaves.
Glue the finished blanks onto the disk using glue.
Mask the middle with oak leaves and roll up the red rowan berries. This is such a cool masterpiece with an autumn theme.
Do you want to create something extraordinarily cool from real rowan berries? I propose to make a picture of rowan in the form of a squirrel. You need to draw the image of a squirrel on cardboard (from under a box, thick) and then cut it out.
Use decorative tape to connect the edges of two cardboards. Or glue with regular PVA. And then fill the image of the animal with berries. It looks original and beautiful! She's a charmer, isn't she?
The next craft is a flower vase, you can make it yourself. Take any glass container and wrap it with woolen thread or twine. When doing this, first paint the jar with glue. You can see the stages of work below in this figure:
Now prepare the bouquet and place it in a vase. And a gift or souvenir for the exhibition will be ready. Good luck!
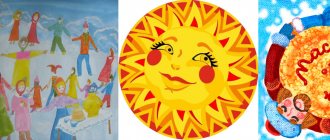
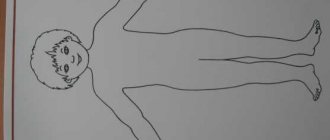
Now make a funny little guy in the shape of a sun. Cut out a circle from colored paper, glue eyes, mouth, and nose onto it. Or you can draw all these details with a marker.
Then cover the diameter of the circle with dry leaves.
Also, in order to comfortably hold the sun with your hands, glue a stick. Or then stick it in a glass, which you can also build yourself.
With preschool children in the park, collect dry leaves and then invite them to decorate them with felt-tip pens, or better yet, with acrylic paints.
It turns out to be quite wonderful and cool, you won’t be able to take your eyes off it!
You can go the other way and make a cool bouquet. I remember that I haven’t shown you anything like this before. But, I repeat.
You can give this to your mother, grandmother, or your favorite teacher.