Preparing for sculpting
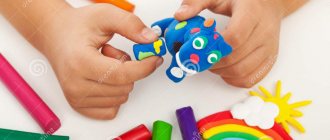
Before you start learning how to make animals from plasticine, you should take care of preparing your workplace. The surface of the table at which modeling will be done should be well lit. In addition, you should protect your workplace from plasticine. It is for such purposes that special boards are used. But if you don’t have one, you can simply cover the table with a piece of oilcloth so as not to get it dirty. For kids, you can stock up on various shaped molds, and then sculpting animals from plasticine will become an even more exciting activity. You can also purchase special gloves for handles so that the plasticine does not rub into the skin during work.
Plasticine pets
In order to start sculpting animals, you must first decide what kind of animal you want to depict.
Try to clearly imagine the image that will be embodied using plasticine. Children, as a rule, choose pets to sculpt. This is due to the fact that they see them quite often, unlike wild ones. Usually, any animal begins to be sculpted from the head. To create it, you need one large ball for the base and two smaller ones for the ears. Next, the required shape is created from these balls.
Eye placement is also important. They should be positioned so that the animal is looking directly at you. Balls are also prepared for the body, paws and tail, if, of course, there is one. An important point will be the connection of all elements into one whole. You can use matches or toothpicks for this. If you use medium-soft plasticine for modeling, you can subsequently play with these animals, creating various storylines involving pets.
GCD move:
Educator: Guys! Do you know who came to visit us today?
The teacher pulls out a large hedgehog . The children gather in the middle of the room.
Educator: Hedgehog !
Children look at a hedgehog .
Educator: Guys, a hedgehog came to us from the forest. He lives in the forest.
Educator: He is friends with bears, bunnies, and squirrels. And he is afraid of the wolf and the fox. When he sees danger, the hedgehog curls up into a prickly ball and no one can touch him.
Educator: What does he like to eat? The children answer.
Educator: The hedgehog loves mushrooms , apples, pears and milk
Educator: At home, the hedgehog drinks milk. In winter, the hedgehog sleeps in his hole. That is, in your house.
Educator: Guys, you can’t offend animals. We must love them and treat them with reverence. Look how sad the hedgehog is . Let's cheer him up. Children's answers The teacher reads a poem, and the children repeat after him
The hedgehog stomped along the path
And he carried mushrooms on his back (walking in place)
The hedgehog stomped slowly , quietly rustling the leaves (rustling his palms)
And a bunny gallops towards me,
Something clever in the garden
I got hold of a sideways carrot (jumping in place)
.
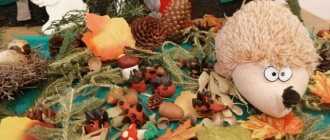
Educator: Guys, I invite you to the table. Children sit at tables where there are blanks with the image of a hedgehog without needles . –
Educator: These are the pictures with the image of a hedgehog in front of you . Consider the hedgehog. Oh! He's kind of weird! The hedgehog is missing something . Children's answers.
Educator: That's right, there are no needles! Let's quickly give the hedgehog some needles ! Like this! The teacher shows how to make hedgehog needles. The teacher invites the children to make plasticine balls for needles: pinch off small pieces of plasticine with the thumb and forefinger of their right hand and roll them into balls. Children roll 2-4 balls each (the rest of the balls are prepared in advance)
.
Then invite the children to place a plasticine ball over the outline of the hedgehog's , press it with their finger and pull their finger down.
Educator: It turned out to be a needle! Let's give the hedgehog a lot of needles ! on a hedgehog . Children and teacher make needles. The teacher helps those who are not doing well. When the work is ready, everyone admires their pictures and the pictures of their comrades.
Educator: Now I suggest you turn into hedgehogs. The teacher shows the kids how to portray a hedgehog by clasping their fingers together. The teacher reads a poem, and while reading, the children repeat the teacher’s movements.
The little hedgehog is frozen (press your fingers - the hedgehog removes the needles )
And curled up into a ball.
The sun warmed the hedgehog (Straighten your fingers - the hedgehog showed the spines )
The hedgehog turned around.
The teacher praises the children for their work and says that we will place our hedgehogs at the exhibition so that they will please us and their parents.
Educator: And now it’s time to say goodbye to our hedgehog , he goes back to his forest. Children say goodbye to the hedgehog .
Educator: Guys, did we help make the hedgehog ?
How did we help him?
Notes on sculpting in the second junior group “Who visited us in our garden?” Integration of educational areas: “Cognition”, “Reading fiction”, “Artistic creativity”, “Communication”, “Socialization”.
Abstract of GCD in the second junior group for modeling "Owl" Educational area: Artistic and aesthetic development Integration of educational areas: Artistic, aesthetic, cognitive,.
Abstract of the GCD for modeling in the second junior group “A willow sprig for the chicken’s mother” Tasks. Develop plot-game concept and imagination. Make chicken figures from individual lumps. Using pulling and pinching techniques.
Making an octopus: step-by-step instructions
The octopus is one of the most unusual inhabitants of the seas
. Naturally, the process of sculpting it has its own characteristics, but it does not cause any difficulties. Following step-by-step instructions, even a small child can cope with this task.
The octopus is one of the most unusual inhabitants of the seas
Progress:
- Make a small circle and eight long sausages - you get a head and paws.
- Place bright circles on each paw.
- Connect the head with the paws.
- Bend each limb.
- Use a toothpick to squeeze out the mouth.
- Blind the eyes and glue them to the head.
Place a small object into the tentacles.
Notes on sculpting "Sparrows and the Cat" in the second junior group
Natalia Yadykina
Notes on sculpting "Sparrows and the Cat" in the second junior group
Program content: Learn to convey the shape of an object (sparrow, divide plasticine into two unequal parts, teach how to fasten two parts to make one object (sparrow, reinforce the technique of rolling plasticine between your palms in a circular motion. Form children's ideas about the life of sparrows, their appearance, place habitat, behavior, nutrition. Develop fine motor skills of the hands. Form an interest in modeling , curiosity, cultivate a caring attitude towards birds.
Materials and equipment: One piece of plasticine for each child, boards for plasticine, stacks, maple seeds, they will replace wings for our sparrow , ash seeds, a picture or toy sparrow , a cat mask.
Preliminary work: Conversation with children: “Wintering birds.” Outdoor game “ Sparrows and the cat ”. Reading S. Marshak “Where the sparrow .” sparrows on a walk .
Pets: how to make a dachshund, cat, cow, pig
Plasticine animals can be very funny and bright. The process of making them is always accompanied by positive emotions. Even pet animals made from this material become an excellent decoration for a child’s room.
Plasticine dachshund
In order to make such a dog, you just need to follow the diagram exactly:
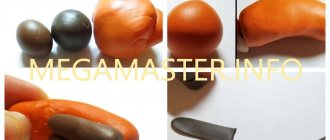
- Roll the black mass into a ball and stretch it out into a long, narrow droplet shape. This part will later become the body of the dog.
- From the wide side, lift the part up.
- Apply the brown mass to the abdomen in an even layer.
- Form a small protrusion - you get a neck.
- To make a head, you need to roll a black and brown ball.
- Extend the black element into the shape of a drop, then stick the brown part to its lower part and extend it a little.
- Using your finger, pull the black material a little onto the nose and highlight the eyes with a stack.
- Now add the pupils and form the ears.
- Attach the head to the neck using a match.
- Make the upper parts of the paws from black material and attach brown elements to the bottom.
- Attach the legs to the body.
- Roll up a thin tube and stick to the abrasions, lifting them up a little.
How to blind a cat
If you follow simple instructions, you will be able to quickly and easily make a funny cat - one of the most beloved pets.
If you follow simple instructions, you can quickly and easily make a funny cat
Progress:
- Using a stack, divide the block of plasticine into three equal parts.
- Roll two parts into balls, and divide the third into six more parts.
- Roll four small pieces into sausages for future legs.
- Roll another small piece a little thinner to make a tail.
- Divide the remaining small part into a couple more identical pieces and make ears from them.
- Form the head and body, then connect these two elements with a match.
- Attach the tail and legs to the body.
Blind the eyes and tongue.
Cow: how to make it with your own hands
The cow sculpting scheme is quite simple and comes down to the following steps:
:
- Roll the brown and orange material into balls and connect them together.
- Attach the eyes, make slits in the form of nostrils, and make a smile with stacks.
- Make horns and attach them to the head.
- Attach ears to the future cow.
- Make an oval out of the brown mass and squeeze it a lot, stretching the neck.
- Make legs and attach hooves made of gray material to them.
- Make an udder from the beige mass.
- Make a tail and then connect all the parts.
Piggy: modeling in stages
This funny pig is easy and quick to make. You just need to strictly follow the instructions:
- Shape the body into a barrel shape.
- Roll four balls and attach them to the body.
- Roll another, but larger ball and also attach it to the body.
- Form a snout and ears.
- Use a match to draw the nostrils and eyes.
Plasticine animals can be very funny and bright
Attach a ponytail wrapped with a crochet hook.
How to choose the right plasticine
Plasticine is different from plasticine. In order for the work process to bring only pleasure, you need to choose the right plasticine. If you will be modeling with children, it is better to choose a plasticine substitute. This is a special mass for modeling that does not need to be kneaded before use. It also has pleasant fruity scents. This mass is completely incapable of harming a child, even if he decides to chew it.
Its only drawback is that it dries quickly when exposed to air. For older children, you can completely use regular plasticine. It comes in soft, hard and medium soft. Soft plasticine does not hold its shape for long and collapses under the influence of its own weight, while hard plasticine is practically impossible for a child to knead. It follows from this that medium-soft plasticine is best suited for modeling. It is better not to use hard plasticine when working with children.
We sculpt wild animals step by step
Wild animals are of particular interest to children, since not everyone gets to meet them in real life. We have to be content with their depiction in the pictures. That is why sculpting a lion cub from plasticine will not only be exciting, but also educational.
Wild animals are of particular interest to children, since not everyone gets to meet them in real life.
Work progress step by step:
- Make a circle from the yellow mass and attach a couple of small parts to it, forming the cheeks of the animal.
- Make a nose out of brown material and secure it between the cheeks.
- Attach eyes a little above the cheeks.
- Make a teardrop-shaped body and slightly extend the tip of this piece.
- Using a match, connect the head to the body.
- Form a lot of brown circles from brown material and fix them on the animal’s head - you get a mane.
- Now mold the paws and stick three small orange circles on each of them.
- Attach these parts to the body.
Make a yellow ponytail with an orange tassel at the tip and stick it to the craft.
Funny animals from the zoo: monkey, snake, sloth
You can create your own zoo from ordinary plasticine. A variety of forest, wild and domestic animals will happily settle in it. Modeling will bring a lot of fun, and the made figures will be excellent toys for kids.
How to make a monkey: step-by-step instructions
An unusual monkey is made from brown and yellow plasticine mass.
It is molded according to the following scheme:
- Prepare a part for the head from a brown mass and a couple of small yellow elements to form the face.
- Attach yellow cakes to the head, placing them as closely as possible to each other.
- Draw eyes, mouth, nose and wrinkles in a stack.
- Make ears.
- Make a body in the shape of an egg and stick a yellow cake to it.
- Using a match, connect the body to the head.
- Make four long tubes from the brown mass.
- Attach yellow circles to each of the tubes and make cuts on them in a stack.
- Attach the monkey's limbs to the main part.
Monkeys come in different colors
Finally, attach a long tail to the animal.
Snake: sculpting in stages
A very realistic snake is made according to the following instructions:
- Roll the plasticine mass into a sausage of the required length.
- Select the head, giving more volume in this place.
- Draw the eyes and nostrils.
- Make slits along the entire back in a stack - you get scales.
- Attach a long red tongue to the front of the head.
- Bend the snake's body.
You can apply an additional pattern to the snake's body
Tip: to make the snake's body flexible, you need to lay wire inside.
How to make a sloth from plasticine
Sculpting a sloth comes down to the following steps:
- Form the head and body of the animal.
- Sculpt the paws and claws.
- For the future face and tummy, roll into balls and flatten them into flat cakes.
- Make eyebrows in the shape of droplets.
- Make eyes and a nose from small pieces.
- Assemble all the design details together.
- Draw a mouth in a stack.
Wild animals made of plasticine
The wildlife world is beautiful. It is filled with secrets and riddles. Children are drawn to the mysterious and unknown, which means they will probably be interested in how to mold animals from the wild world from plasticine.
Using modeling from plasticine, the child learns about the world and does it easily and with passion. For a more fruitful process, you can use a photo of an animal as an example or watch a video about its life in natural conditions. The process of sculpting representatives of wildlife is, in fact, no different from that when creating pets. Wild animals made from plasticine do not have to be an exact copy of their prototypes.
By showing your imagination and using different types of plasticine, for example, with glitter, you can create truly fabulous creatures. You can also add natural materials to the process. Thus, the process of studying wild animals is quite exciting. And from the resulting inhabitants of forests, deserts and mountains, you can assemble a whole zoo for the game.