MAGAZINE Preschooler.RF
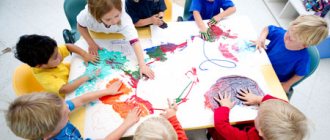
Summary of an integrated lesson in the middle group on artistic and aesthetic development “Scissors came to visit us”Prepared by Oksana Aleksandrovna Malyutina
Goal: To introduce children to scissors as a tool used for cutting.
Educational objectives:
- Teach children to hold scissors correctly.
- Teach safety rules when working with scissors.
- Carry out “simple” movements with them;
Developmental tasks:
- Develop fine motor skills.
Educational tasks:
- Cultivate endurance, perseverance, and attentiveness.
- Reinforce in children the techniques of careful gluing.
Materials:
- Scissors of different types and sizes. Colored paper, glue, glue brush, poetry, finger gymnastics.
Preliminary work:
- Considering scissors of different types and sizes
- Reading poems about scissors
Progress of the lesson
The teacher asks a riddle
Made of iron, able to shear and cut. When they meet, the parts are separated.
Children: Scissors
Educator: That's right, these scissors show the box, open it, and there are different types of scissors. (Slide No. 2)
“There are different scissors in the world. All of them benefit a person: they use scissors to cut hair, fingernails and toenails, cut fabric when sewing clothes, cut out fins for fish when preparing food. (slide number 3). And children use scissors to cut out different figures from paper, from which they then make beautiful pictures. But if you play with scissors - swing them, twirl them in front of your eyes, they can get angry and prick or scratch. In general, the scissors are good. If handled correctly, they can help in many ways.
Educator: Now we will get to know the scissors better, I will hand them out to you.
TEACHER: Now look carefully at your scissors. How many rings does the scissors have?
Children: two.
TEACHER: What else are they like?
CHILDREN: On the oval, on the windows, on the sun, on the bagels, on the saucer (slide number 4).
TEACHER: How many knives do scissors have?
CHILDREN: two.
TEACHER: What do the knives look like?
CHILDREN: Like a bird with a beak, like a crocodile. (slide number 5)
TEACHER: Look how I open and close the “mouth” of the scissors.
TEACHER: We will insert our fingers into the ring. Here's a look at how (demonstration). How many fingers did I put in?
CHILDREN: two.
TEACHER: And the scissors also have an important detail - a nail. Look at him, he is connecting the scissors.
Today we will learn how to use scissors and cut paper.
TEACHER: But first I want to tell you that scissors are not a toy, you can get hurt with them. Therefore, I want to tell you about the rules for working with scissors:
- You can only take and cut with scissors with the permission of an adult.
- Do not play with scissors or swing them.
- Hold the scissors straight away from you in a horizontal position.
- Pass scissors to each other rings first
- When finished, put the scissors into the scissors box. (slide number 6)
The teacher invites the children to play with their fingers
Scissors
Initial position. Press the thumb, ring finger and little finger into the palm. Extend your index and middle fingers forward.
They either diverge or converge, imitating the movements of scissors. The palm is parallel to the table. Perform the exercise slowly at first, then speed up the pace. Make sure your fingers are straight.
I cut, I cut, I twist the fabric,
I want to learn to sew!
Educator: Now let's work with scissors. Show me how to hold scissors correctly in your hands, what movements did I show you? Try snapping scissors.
Children try to work with scissors; if they fail, the teacher takes their hand in theirs and performs the movements together with the child.
Educator: “Our scissors are tired and want to rest here. Let’s carefully collect all the scissors and put them back in the box, we will meet with them more than once.”
The children say goodbye to them. The lesson is over.
| Next > |
Fine motor problem: proprioception
Proprioception is a sensation in muscles, joints and ligaments, so it directly affects the development of fine motor skills in a child. This type of problem is called proprioceptive dysfunction, causing poor handwriting, confusion about the direction of letters and numbers, and problems forming sentences.
A child with a proprioception disorder holds the scissors too tightly and cuts out of line because he does not know where to start and where to end. If your child has weak muscle tone and fine motor skills, it may be worth checking to see if your child has a delayed grasp reflex (Palmer reflex) before trying fun games to develop fine motor skills. If the suspicion is confirmed, the child may always have difficulty writing, lettering, cutting with scissors, and using fine motor skills unless steps are taken to transform the Palmer reflex into full grasping.
If your child has difficulty using scissors or has a hard time understanding how to use them, problems with vision and hand-eye coordination may also be the cause. He may appear clumsy, have difficulty handling objects in his hands, constantly change hands and switch scissors, and lack spatial awareness (not understanding which direction to cut). This point is worth discussing with your pediatrician.
If the only problem is that the child does not have the skill of how to use scissors, we offer several games to develop it.
Honing your carving skills
To hone your children's paper cutting skills, use these simple cutouts. It is better if you print them on colored paper and first cut them along the dotted lines into strips yourself.
The main software tasks for appliqué in this group are aimed at teaching children the ability to correctly cut out shapes, use scissors, squeezing and unclenching levers to get an even cut along a straight or oblique line, and round the corners of quadrangular-shaped blanks when depicting round and oval-shaped objects.In connection with the expansion of the child’s knowledge about such properties of objects as shape, structure, size, and their spatial arrangement on paper, application tasks become more complicated. This concerns the design of objects, solving more complex compositional and coloristic problems in the design of works. The teacher teaches children to more accurately cut and paste simple shapes, based on a square, rectangle, or triangle. They can be used when composing ornamental compositions to decorate a scarf, plate, rug, path, and also display objects such as cubes, scarves, scarves, etc. Then the children are taught to cut out individual parts and assemble more complex objects from them (house, birdhouse, gate), and also combine them with each other in size (the house is large, and next to it is a gate, they are lower than the house).
In applications, children should be able to combine compositions by color, by methods of spatial arrangement on the surface of a sheet of paper of a certain format, which makes it possible to perform tasks of a different nature (subject, thematic and ornamental), differentiate specific tasks for each of them in the process of thinking about the future image, its cutting and pasting.
Before teaching preschoolers how to cut with scissors, it is necessary to strengthen their ability to lay out and paste ready-made shapes using the example of creating patterns from geometric or plant elements (one or two lessons at the beginning of the school year). So, you can invite the children to decorate a scarf or an apron for a doll with patterns, giving them the opportunity to independently choose a blank according to shape, color, select elements for decoration, and arrange them in their own way by color and location. If the baby has chosen a white square to decorate it in the form of a scarf, then he can take small colored squares and place them in the corners of the main workpiece. Alternating red and blue shapes will look good between the squares. When a child takes a stripe - a red scarf - for decoration, the teacher helps him rhythmically repeat the squares placed on the corner along the entire length, combining green and yellow tones (white and black; black and green).
To make such a choice, you must have in advance options for blanks and individual elements of different colors and sizes to compare them when creating an ornament. The teacher helps children in choosing a background, a pattern, varying figures in number, shape, color, and rhythm. The figure shows options for applications of varying degrees of difficulty. Children independently combine squares of various sizes and colors, as well as triangles and circles, based on the proposed motives.
Decoration with patterns of scarves, scarves, plates
At the beginning of the lesson, the teacher gives verbal instructions. For example, if a child has chosen a scarf (square base) for the exercise, then he is asked to use a combination of large and small elements (squares of a different color) or complement the pattern with triangles. To decorate a scarf (triangle), it is better to take circles and attach triangles between them. And children can decorate round plates and trays with an ornament of small circles, alternating them by color, or build another patterned composition from them.
When children master the techniques of laying out and gluing forms, their attention is focused on the techniques of using scissors when cutting out elements for appliqué. This process requires significant effort, attention and will. To make it easier, the teacher initially trains the child in cutting narrow strips across with uniform movements of scissors, performing a game task: cutting out tickets for playing “theater”, “circus”, checks for playing “shop”, coupons for playing “hospital”, travel tickets for playing “bus”, etc. The game form of cutting results increases the child’s interest in this process; in a relaxed play environment, he more easily learns how to use a new tool, adapts his movements to learn how to operate scissors. Children should definitely be given well-designed scissors so that their arms move easily and do not create additional difficulties.
The teacher observes the work of each child, provides him with timely assistance, encourages his efforts, supports the desire to learn how to correctly, beautifully cut out shapes (so that their contours are smooth and not frayed).
As an exercise for the hands, it is necessary to give the children tasks that require the completion of several identical cuttings. In this case, the movements are consolidated and improved. For this purpose, you can use ornamental structures, as well as object images consisting of several homogeneous parts. For example, when cutting out windows of a two- or three-story house, take a strip of paper of a certain length and width and cut it crosswise into several parts at an equal distance from each other. They are glued onto a rectangle, observing the rhythm of the arrangement: at designated intervals in one, two or three rows (corresponding to the number of floors of the house).
In the same way, appliqués are made for bus or trolleybus windows, as well as for a festive garland of flags. Here you need to alternate the shapes by color and create a bright sound for the decoration. Therefore, the teacher prepares multi-colored stripes in advance, and the children choose the brightest ones that they like and learn to alternate them when gluing them onto a background like a garland or on a stand using flagpoles of different heights, or on sticks, etc. The possibility of interpreting the content of the application is emphasized when the wording of the task: “Holiday flags”, “The flags that we saw in the square”, “A festive garland of multi-colored flags”.
Different types of flags
In subsequent appliqué classes, children are taught to cut out a rectangular shape more accurately and differentiate between a rectangle, a square, and a strip. The basis for cutting out these shapes is a strip of paper of different lengths and widths. Thus, a rectangle is obtained by cutting a strip of 3x12 cm into two parts, and dividing each of them in half again allows you to get two squares, which are then glued to decorate the end of a towel or scarf.
You can change the size of the elements or give them different positions, for example, place large and small squares placed on the corner in a row, alternating them also by color (red and green figures on a white towel background; blue and orange; red and yellow). This task requires the child to comply with the following conditions: cut out several identical shapes, independently adjust their number depending on the construction of the pattern, combine elements by size and color. Providing independence in choosing the background color and blanks for parts of the decoration allows children to take a creative approach to creating an ornament and use different options for its interpretation.
To consolidate the ability to depict squares and make various combinations out of them, appliqués are grouped from individual parts like a mosaic. Each child is given multi-colored strips of the same size, from which he receives squares, and combines them in the form of patterns or object images on backgrounds of different shapes and colors. Children complete such mosaics independently in their free time. To do this, a separate corner is organized in the group room - an area where the materials necessary for work are placed. Their color and diversity encourage the child to create a panel for a doll’s corner, decorate an apron or dress with a pattern, prepare a greeting card for a holiday, etc.
Mosaic applique of multi-colored squares
From a square, by cutting it in half diagonally with a continuous movement of scissors, two triangles are obtained. Typically, children learn this technique quite easily and quickly. But, despite this, it must be reinforced in several lessons, maintaining the preschooler’s interest in the image process and its result. This is achieved by selecting interesting tasks: “Kerchiefs for nesting dolls”, “Huts in the forest”, “Christmas tree”.
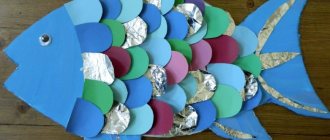
Along with homogeneous parts, combinations of rectangular, square, and triangular shapes are also used in applications. This is how fish are cut out and pasted, combining a square (body) placed on a corner and a triangle (tail) or two triangles - a large one and a smaller one. To achieve greater resemblance to the image of a fish, additionally glue on large eyes, stripes or scales of colored paper. You can make an especially elegant applique on the theme “Aquarium”, where on a blue or blue plane children place large and small fish with a triangular or square body in yellow, red, orange, gray in combination with green algae, pebbles at the bottom, etc. To obtain such a composition, the teacher prepares a background with pasted silhouettes of algae, stones, shells, and the children glue fish of different colors and sizes between them. Here, each child can show his creative activity: change the direction of movement of the fish in his own way, make them larger, smaller, use decorative stickers (stripes, circles-scales).
Techniques for cutting triangles and fish variants from squares and triangles
Fishes in an aquarium
How to teach a child to use scissors: games and exercises
Below are exercises that will help develop fine motor skills and teach your child how to use scissors. Later, you can simply give your child unnecessary postcards, booklets or magazines so that he can cut everything out.
Cutting out zigzags
Pages with wide and dotted lines are designed for younger children who are just learning to use scissors. Simply use a marker to draw various zigzags, waves and lines on strips of colored paper. The younger the child, the larger the figures should be. Invite your child to cut strictly along the line with scissors.
Source www.funwithmama.com
Game with scissors "What's hiding in the grass"
To find out what or who is hiding in the grass, the child needs to cut off all the “blades of grass.” Making such a game couldn’t be easier: cut green colored paper into strips and glue it to any picture.