How to draw an owl
Since ancient times, the owl was considered the wisest bird in the world. Its plumage attracted the attention of both professional artists and amateurs. You can draw an owl in a few steps. You will need a pencil, a sketchbook and some markers.
The sheet should be in a vertical position. Start with two large circles, because... The owl's eyes are big. There should also be smaller circles inside them.
Then draw a triangular beak and draw a line from both sides of it.
Now move to the crown. From the lines drawn from the beak, draw the ears and connect them in the center with an arc.
The next item is the wings. It is necessary to draw a line from the bottom of the eyes, rounding it at the bottom. Repeat the same on the other side.
From the wings you need to draw a line for the future body. It needs to be narrowed downwards. Draw arcs in the center of the abdomen, round them at the bottom and connect them to the outer lines. The line below is necessary to connect the torso.
All that remains is to draw the paws. There are 3 small ovals per paw. Everything is ready, all that remains is to outline with a felt-tip pen and color the drawing.
How to draw a parrot
Who doesn't love budgies and other parrots? That is why step-by-step instructions for beginners were made.
Let's start with 2 ovals: a small upper one and a large lower one. The first will serve as the basis for the head, the second - for the body.
From the future body, 3 long stripes and 1 short stripe are drawn - a kind of “base” for the tail.
Next, teardrop-shaped wings are drawn: one on top of the large oval, the other on the other side. Then it comes to the beak, which should be crooked.
Now we move on to the contours of the parrot, bringing the head and body to mind.
To give the parrot something to sit on, you need to draw a wavy branch. The parrot's legs are drawn in the form of long ovals. And don't forget about the claws!
To give the branch a beautiful look, draw leaves on it, preferably of different shapes.
Next, you have to decide where to draw the parrot’s future eye. Draw a circle there, and inside it there are already several circles. The last one should show highlights.
At the very bottom of the belly, draw ovals with sharp ends - they act here as the feathers of the future tail.
The last stage is coloring. Use bright colors for it. The body should be painted red, the beak should be yellow, and the wings should be orange. Also color a few feathers orange, and the rest blue.
Of course, the branch should be brown, the leaves should be green, and the pupil should be black.
All that remains is to outline the drawing with a black felt-tip pen.
Forms of organizing drawing on an animalistic theme in the middle group
In long-term planning for visual activities for the middle group, the animalistic theme is presented in close connection with modeling. So, in the second semester, children sculpt a baby goat and then draw it. The same procedure applies to the “Homeless Hare” theme.
In addition, the work plan includes drawing on the following topics:
- “Bear” - can be in the form of a drawing of a character from your favorite cartoon “Masha and the Bear”;
- “Teddy Bear” - drawing from life (using a toy as a model);
- “Three Bears” - creating illustrations for a fairy tale;
- “Hedgehog” - based on the fairy tale by V. Suteev “The Magic Wand”;
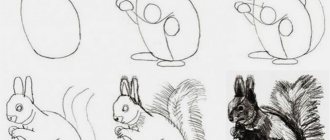
- “Squirrel”, “Fox” - drawing according to plan (children remember the characteristic features of the animal’s appearance and depict it from memory);
- “Squirrel with a mushroom” - plot composition;
- “Cheerful Puppy” - based on S. Mikhalkov’s poem “My Puppy”;
- “Dog in a booth” - plot drawing;
- “Sister Fox and the Gray Wolf” - based on a Russian fairy tale;
- “The Three Little Pigs” - illustration for a fairy tale;
- “Wolf” - drawing characters from the fairy tale about Little Red Riding Hood;
- “Giraffe”, “Porcupine” - consolidation of material on familiarization with the environment on the topic “Exotic animals”.
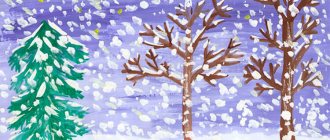
In addition to individual work, the teacher can organize group drawing. Children are divided into groups of 4-5 people, each receives the task of depicting one animal, for example, a cow for the composition “Farm” or “Summer in the Country” on a silhouette of an animal cut out by an adult. After the teacher explains the algorithm of work, the children color the template and glue it onto an A3 size substrate. The teacher controls the correct arrangement of the elements. Children who have good drawing skills complete the elements of the environment: a fence, lawn, houses, etc. Alternatively, kids can draw animals as illustrations. For example, to the fairy tale “Wintermovie”.
Photo gallery: examples of collective work
Collective compositions can be created using non-traditional techniques, for example, drawing elephants and giraffes with palms
An option for designing a collective composition with polar bears could be tracing the contours and coloring the templates with semolina
An option for collective drawing could be a composition template with exotic animals, which children color
How to draw a dove
Draw a small circle and a large oval for the head and torso, respectively. The top of the oval should intersect with the circle, and the oval itself should be inclined.
At the bottom of the oval you need to draw two lines forming a branch. Then draw an elongated rectangle as a tail.
Let's move on to the wings. If one wing can be drawn on top of the body, then the second will have to be placed in the background.
Next, an eye is drawn in the upper part of the head and a pupil to it, then a triangular beak, feathers in the form of dots and wavy stripes and paws (3 stripes per 1 paw). All that remains is to outline the drawing with a felt-tip pen and color the beak and branch brown, the rest gray.
How to draw a sparrow
Want to learn how to draw a bird with a pencil? Another simple option is the sparrow.
To begin, draw the outlines of the torso in the shape of an oval, head (circle) and tail (triangle).
A triangle line needs to be drawn for the tail, followed by the contours of the legs. For the front part, draw a circle (the head), then the body and tail.
The dividing line will be needed for the wing.
Now let's move on to the paws. Once they are drawn, return to the head. Start with the eye, then draw the beak, and for coloring, start with the markings.
We recommend reading:
How to draw a fox with a pencil? Detailed instructions with photos and descriptions. Step-by-step lesson for children + master class- How to draw a girl - make a portrait and general drawing correctly and beautifully (150 photos and videos)
How to draw a child - stages of creating drawings and recommendations for their design (video + 125 photos)
The next step is to feather the sparrow and give the drawing a realistic look (there are many pictures and videos on the Internet showing how easy it is to draw a bird).