Compositions for modeling with children in kindergarten on the theme of winter, autumn, spring
Modeling from plasticine for children 5-6 years old should contain compositions from different seasons. This allows children to learn, understand and remember the characteristics and differences of natural seasons.
Below are examples of autumn and winter compositions.
Composition “Autumn”
This master class will show you how to convey the mood and colors of late autumn:
- To depict a leaden sky, you need to mix dark and bright colors. To do this, we combine the following colors of plasticine: gray with black, yellow with purple, blue with black. You will also need a blue piece.
- Using our fingers, we begin to spread yellow-violet plasticine on the paper from the upper corner, and draw a blue stripe below.
- Above the blue color, smear a dirty yellow spot with your finger, stretching it in all directions like the meager rays of the sun.
- Fill the sky completely with a gray-black and blue-black mixture to represent looming clouds.
- Along the bottom of the sky, extend the blue stripe for contrast.
- For the ground, a mixture of brown, white and yellow plasticine is used. This mass must first be kneaded in your hands, then spread on the bottom of the cardboard.
- Completely fill the empty space with this mixture until the blue stripe appears.
- Sculpt dark brown branches and a flat tree trunk, as well as yellow and orange foliage.
- Stick branches and trunk as a tree on the left and a bush on the right. The branches should be inclined to the right, as if they were being bent by a strong wind.
- Stick yellow leaves on the branches and under the tree.
- Press down each leaf with a stack so that a stripe remains in the form of a vein.
- We add orange leaves to the bush, and also go over them in a stack.
- We sculpt additional details: brown stump, beige honey mushrooms, black birds.
- All of them are attached to the picture.
- Add rose hips to the bush.
The autumn composition is ready.
Composition “Bullfinch”
This master class on sculpting a bright three-dimensional composition of a bullfinch on a branch:
- Cover the cardboard with a thin layer of a mixture of white and blue or blue plasticine. Blue and white plasticine should not be mixed until completely homogeneous; it is necessary that marble stains and inclusions remain visible.
- Roll out a long sausage from a brown block, tapering towards one end and widening towards the other end.
- Prepare a lot of thin green threads from plasticine as spruce branch needles.
- Stick a brown branch approximately in the center of the picture, approximately diagonally.
- Next, fragments are torn off from the green threads, bent in half and attached to a branch as Christmas tree needles. This is the only long process in creating a composition.
- The entire branch must be filled with needles.
- You can add more branches below and above the main one, keeping in mind that the central part of the picture should be left for the bullfinch.
- To make a bird, you need to fashion 2 thick cakes: black for the body and red for the breast. Give them the desired shape.
- You will also need one gray wing with 4 thin white stripes.
- Fasten the torso to the chest and attach the wing to it.
- Attach a white eye circle with a black pupil and a triangular yellow beak to the head.
- Attach the bullfinch to the background above the branch.
- Make a brown foot and attach it to the bird and a spruce branch.
The winter composition is ready.
Modeling from plasticine is a good way for preschool children to usefully spend part of their free time.
Article design: Natalie Podolskaya
DOMOSTROYPlumbing and construction
Galina Avdeeva
Modeling “Flowers” (“bas-relief”)
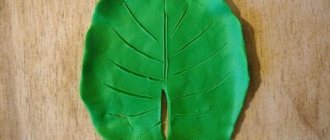
Spring! Finally, spring is coming to us, primroses ! “Dandelions” and “mother and stepmother” bloomed on our site. In the older group, we had a conversation about flowers and their beauty. We looked at the structure of a flower and its color . I suggested that the children use plasticine to make a three-dimensional molded image of a flower on a plane . I reminded you that relief modeling always begins with making a base and this modeling “ bas-relief ”.
The children first made the base.
and then they put on the stem, leaves, flowers .
The results turned out to be such good pictures.
Children really love artistic creativity using non-traditional forms. Children develop fine motor skills in their hands.
Presentation for children “Spring Flowers” Hurray! Spring has finally arrived! Dear colleagues, if you decide to introduce your children to spring flowers (primroses), then I hope you will find mine useful.
Crafts made from plastic cutlery on the theme: “Flowers grew in my garden.” Spring is the most joyful time of the year; it is the long-awaited time of the awakening of nature. Over the long winter, our eyes have missed bright colors, that’s why.
Natalya Turishcheva
Decorative relief molding. Tiles “Flowers-hearts”
Decorative relief modeling - tiles " Flowers-hearts "
master class from student Margarita
Tasks:
1) Teach children to sculpt relief paintings as gifts for loved ones - mothers and grandmothers.
2) Learn to sculpt hearts in different ways: a) model with your fingers: roll out the planks, flatten into a disk, pull out and smooth on one side; b) cut with a mold or a stack.
3) Develop a sense of form and rhythm;
4) Cultivate aesthetic taste.
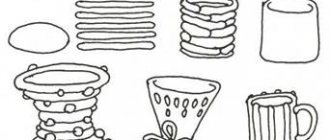
We decided to try stack cutting. For this we will need: plasticine, a modeling , cardboard size 9*9, stacks, and a blank of cardboard hearts.
Now we need to do the following:
1) Take plasticine, knead it, and roll the ball, as in the photo:
Tasks. Encourage children to want to make sculpted paintings. Introduce the technique of relief modeling. Offer a choice of techniques for decorating a stucco image: relief moldings, cutting or scratching with stacks, brush painting. Develop a sense of form and composition.Preliminary work. Preparation of the base plate for relief compositions (2 methods).
1). Take clay or softened plasticine, roll it out with a rolling pin (bottle) into a layer 0.5-1 cm thick and cut into squares of the desired size, for example, 10×10; 15x15; 20x20 cm. For convenience, we recommend cutting out a square of paper and using it as a stencil - placing it on the rolled out layer and tracing it with a stick (match, toothpick).
2). Choose some solid base in the shape of a square, rectangle, circle or oval: ceramic tile, board, cardboard or plate. Cover with a thin layer of clay or plasticine and spread evenly over the surface, smoothing with a damp cloth (this work can be done in free time; this exercise develops fine motor skills of both hands well).
Materials, tools, equipment. Plasticine (or clay, salt dough), cardboard or ceramic forms for future molded compositions, stacks, napkins.
Demonstration material: calendars, more artistic postcards with images of autumn leaves and trees.
Contents of the lesson.
The teacher shows the children images of leaves, evokes an emotional response and suggests that such beautiful leaves should not be drawn, but... molded.
— Autumn leaves are so different! (Repeated examination of the images.) Let's try to make the same ones or come up with others. You can make a piece of paper like this: roll a small ball, flatten it into a flat cake, sharpen it, pinch the sides, place it on the background and press lightly with your whole palm. Look, it turned out to be a leaf. Let's compare it with a real leaf. It’s similar, only slightly different in color and so far without veins. But this can be fixed. First, add colored spots, take small pieces of yellow, orange, green plasticine and carefully apply them to the leaf. And then we’ll take the stack and scratch out the veins - first the thickest one from top to bottom, and then thinner ones to the sides. Admire it! Beautiful? Now get ready: miraculous transformations will happen with this picture right before your eyes. Here is the picture before your eyes (the teacher places a plate with a piece of paper on an easel or on a board).
I take a piece of brown plasticine, roll it out into a cone—a long carrot—and apply it to the leaf, pressing it tightly. What do you think the leaf turned into? Yes, he turned into a tree! Have you noticed: the shape of the leaf resembles the crown of a tree, and the veins resemble the trunk and branches? Now I’m making twigs from flagella. Beautiful! Look: the trunk and branches are bent as if the tree is dancing in the wind.
Now you will mold your leaves and turn them into trees. As the lesson progresses, the teacher invites children who quickly complete the task to complete the picture - make small leaves for the tree, make a pattern of berries and leaves in the corners.
At the end of the lesson, the teacher invites all children to admire each other’s stucco paintings and think about how and what they can decorate with them (a playroom or bedroom in kindergarten, their own room at home, etc.).
How to make animals from plasticine. Master Class
Modeling from plasticine for children 5-6 years old is no longer difficult, since most of the techniques have already been mastered. With the help of step-by-step instructions, a child of this age can easily sculpt a cute figurine of this tiger, consisting of simple parts.
The sequence for creating a tiger is as follows:
- 1/3 of a block of bright orange plasticine is cut off. Both resulting pieces are rolled into balls.
- The small ball will be the tiger's head. From the second ball, part of the plasticine is pulled out into an oblong body.
- Using a toothpick or match, connect the head and body together.
- From the second block of orange plasticine, 1/3 of the part from which the hind legs are made is also cut off. This part must be kneaded and divided into 2 equal pieces, which should be shaped like a cone. Form feet on the wide side of the cone.
- For the front paws, a piece of plasticine is rolled into a sausage, then cut into 2 parts. Paws with thickened feet are made from them.
- Stick the paws to the tiger's body.
- Roll up and stick to the body a long tail made of thin sausage.
- Make small round ears with indentations and attach them to the head.
- Use white cakes and a nose from pink plasticine to create an animal's face.
- The tiger's eyes are made from round cakes of white, green and black, stuck on top of each other. You can add highlights around the edges of the eye.
- Attach a white chest made from a strip of plasticine on which wool is drawn in a stack to the neck.
- White cakes are glued to the hind legs as pads and toes.
- Now you need to create black stripes. A very thin sausage is rolled out of black plasticine, short sections of which are stuck all over the tiger's body. Also, claws on the hind legs are made from them and glued into the indentations of the toe pads made by the stack.
- Using a stack, make cuts to mark the toes of the front paws. 15 Use a toothpick to make dots on the white part of the tiger cub’s face.
The plasticine tiger is ready.