These educational materials will help your child quickly learn and remember the names of the seasons and months. Download and print the calendar picture; you will need to hang it in a visible place so that the child often sees the calendar with his eyes during the day. He will involuntarily scroll through his memory the names of the seasons, winter, spring, summer and autumn months.
Naturally, before this it is necessary to familiarize the child with these seasons. Start your story with winter. Be sure to tell the signs of what is happening in nature at this time of year, what the weather is like, so that the child can feel and vividly imagine the full picture of the season.
In winter the days are short. The sun is low and warms weakly. Snow falls. Cold. People wear winter clothes. In winter we celebrate everyone's favorite holiday - New Year.
In spring, the days become longer. The sun is warming better. It is getting warmer. Snow is melting. Streams are flowing. Leaves appear on the trees. Grass begins to grow. Flowers are blooming. Migratory birds arrive. People wear demi-season clothes. The most famous spring holidays are March 8 and May Day.
In summer the sun is high, shines brightly, and warms well. The weather is hot. Flowers bloom and berries appear. People wear summer clothes. You can swim in natural reservoirs and sunbathe.
In autumn, the days become shorter and shorter. The sun is lower. It's getting colder. The harvest of vegetables and fruits is ripe. Leaves are falling from the trees. Migratory birds fly south. It rains often. People wear warm clothes. The most famous autumn holiday is the Day of Knowledge.
And winter comes again...
Don’t forget to discuss the very concept of “seasons” and what a year is. Children often confuse “season”, “time of day”, “week”, “month” and simply “time”, immediately distinguish between these concepts. Riddles will help with this:
There is a tree in the royal garden. On one side the flowers bloom, on the other the leaves fall, on the third the fruits ripen, on the fourth the branches are pruned. What kind of tree is this? (year)
These birds fly in a line, And never come back. There are seven birds in every flock, you all know them! (Days of the week.)
Twelve brothers wander after each other, but do not overtake each other. (Months.)
The bridge stretches for seven miles, and at the end of the bridge is the Golden Mile. (A week.)
Every year they come to visit us: One is gray-haired, Another is young, The third is jumping, And the fourth is crying. (Seasons.)
Invite your child to come up with his own story about the seasons.
Don't forget to tell your child that a year consists of 12 months , and each season has 3 months.
Calendar seasons
Further knowledge can be deepened by dividing what happens in nature into months, as shown in the pictures. Ask your child questions: “When do the leaves fall from the trees?”, “When will we go swimming in the river?” and the like in order to retain the material well in memory.
There are calendars on sale with a moving hand for studying the seasons and months of the year. You can make such a calendar with your own hands by simply printing out a drawing and attaching a cardboard arrow.
Cards, coloring pages and riddles will help children consolidate their knowledge about the seasons.
Cardboard tree with seasons
A layout of such an unusual shape can be used not only as a theme for classes in school or kindergarten, but also as teaching material.
For this craft you will need:
- corrugated cardboard (containers for goods from the store);
- scissors, pencil, ruler;
- PVA glue and water, napkins;
- acrylic paints and brushes for them;
- felt decor.
You can make decorative elements with your own hands or buy ready-made animal figurines, flowers, and foliage at a craft store.
Let's start creating the base of the tree. We first cut out the template from newspaper, then transfer it to cardboard and cut it out again.
On the parts we make cuts up to the marks - on one from the bottom to the middle, on the second from the top to the middle. We “put” the elements on top of each other.
Now you need to install the tree on a round base. To do this, we bend the “legs”, remove the corrugated part of the cardboard, and glue the bent part to the round blank, the base of the “Seasons” craft.
You can start finishing the wood. To do this you will need napkins, water and PVA glue. We dilute the glue in a large container with water at the rate of 1*1, moisten napkins in the solution and use them to cover the base with your own hands on all sides, including the stand.
Using acrylic paints we paint the seasons on each side of the craft - winter, spring, summer and autumn.
The last step is decor. As we decorate, we explain to the child what changes are happening in nature, how animals behave, for example, a bear sleeps in winter, birds that have flown south return in the spring, etc.
Step-by-step video tutorial for making the “Seasons” tree:
Cards
You need to cut along the lines.
Next, invite your child to look at the pictures and think about when this happens.
In kindergarten or at home, you can make an applique from colored paper on the theme of the seasons. Sample:
Cube
To make an educational cube with the seasons, you need to prepare four applications with thematic pictures and the base - a cube template.
It is better to make applications together with the children, so that as you work, you can talk about each season in detail. We also draw and cut out the details of the appliqués together with the kids.
The base of the cube must be made strong. The best option is a corrugated cardboard box from a store. The size of the appliqués must correspond to the dimensions of one side of the geometric figure.
We paste the finished pictures onto the cube template, assemble it and fix it with glue.
All seasons on one application
Older children can themselves, without the help of adults, but under their guidance, make one voluminous applique, which will reflect all the seasons at once.
Before starting work you need to prepare:
- colored cardboard and paper;
- ruler, pencil;
- eraser and scissors;
- glue for paper.
The base will be a leaf of blue color, symbolizing the sky. The first thing we will stick on it is a trunk with branches cut out of brown paper.
We will start decorating in the fall. In autumn, yellow leaves fall from the trees. We cut them from paper of the appropriate color and paste them in the lower right part of the applique.
Summer means bright green foliage, ripe apples and bright sunshine. We place them above the autumn, also on the right side.
Spring is next. This season will require flowers. We will make them from red paper - we will cut the squares and bend them twice diagonally, straighten them a little and glue the voluminous buds to the tree in its upper left part. Let's add yellow bees with brown stripes on their bodies.
The last stage is winter. We cut out snowdrifts from white paper, “lay” them on the branches and the ground, and white round snowflakes will fill the space between them.
This master class can be used both at home and in a lesson in the lower grades or in classes in a kindergarten group.
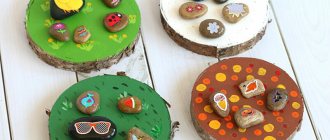
Tactile and didactic panel for kindergarten “Seasons”
Children acquire most skills after the words “I myself.” A panel with pockets, each of which contains hidden signs of a particular season, will help them study and remember the seasons. And you can make it from felt.
The panel will consist of two main parts - a felt tree sewn onto the canvas and 4 pockets at the bottom with images of the seasons. Winter will be symbolized by a snowflake, autumn by a yellow leaf, spring by a flower, summer by a red apple.
We cut out the tree from brown felt and sew it on a machine (it is better to use a zigzag stitch) onto a thick fabric that retains its shape well. As a basis for the panel, you can use several layers of dense fabric, quilted with each other.
Then we prepare the pockets and sew them to the bottom of the panel. It is recommended to treat the edges of the felt pockets with a satin ribbon - if actively used without such “protection” they will stretch very quickly and become ugly. We sew Velcro and small buttons onto the branches - we will attach decor corresponding to the chosen season to them.
We put yellow and burgundy felt leaves in the “autumn” pocket. Winter will be symbolized by snowflakes made from cotton pads and bullfinches made by hand. Summer means lush green foliage and ripe red apples, and spring means flowers.
All decorative elements must have a part with which they can be attached to the panel - Velcro or a loop to put on a button.
To make the parts voluminous, we make them from two layers of felt, laying between them a thin layer of filler - padding polyester, cotton wool or holofiber.
All that remains is to place the figures in the appropriate pockets and invite the children to play an exciting game - “Seasons”.