"Traditional and non-traditional modeling techniques"
Traditional and non-traditional modeling techniques.
Compiled by: teacher of MBDOU "DSOV No. 39"
According to the Federal State Educational Standards program for the educational field "Artistic and Aesthetic Development", the main task is aimed at developing in children an aesthetic attitude to the world, the accumulation of aesthetic ideas and images, the development of aesthetic taste, artistic abilities, and the development of various types of artistic activities. One of the directions of this educational field is “artistic creativity”. The main goal is to teach children to create creative works through various types of artistic and productive activities.
The more diverse children's activities are, the more successful the child's diversified development is, his potential capabilities and first manifestations of creativity are realized. In traditional pedagogy, drawing, modeling, and design are called productive activities; children create a “product” - a drawing, an appliqué, a mini-sculpture. Let's focus our attention on this type of activity as modeling.
Modeling is the most tangible form of artistic creativity. The child not only sees what he created, but also touches it, picks it up and changes it as necessary. In modeling, the scale of crafts is not determined by the format of the sheet, as in drawing and appliqué, or the size of the cubes, as in construction. It depends each time only on the child’s plan, on his skill and individual characteristics. In modeling, creative tendencies and abilities are realized even with a minimum of materials. From one lump of plasticine you can create an infinite number of images, each time finding new options and methods, even without the participation of a teacher and parent.
Modeling is a type of artistic activity that has many aspects. Based on content and theme, they distinguish between plot, subject, decorative and complex modeling.
In story modeling, children convey story compositions in which individual images are connected in one way or another: by meaning, by placement in space, by proportions, by dynamics, etc. In object modeling, children sculpt individual specific images. In decorative modeling, children create decorative items. In complex modeling, children arbitrarily or to solve a given artistic problem combine different methods of modeling.
According to the method of creating an image, the following types of modeling are distinguished: from memory, from idea, from design, from life, from a diagram, from a drawing, from a verbal description.
According to the way children are organized and the nature of their activities, modeling can be: individual, collective - in co-creation with adults or peers, complex (integrated), when modeling is combined with other types of artistic and cognitive activities, as well as with various games.
You can sculpt from carved plastic, environmentally friendly materials that are easy to handle, acquire the intended shape during the sculpting process and retain it for at least some time. These are clay, plasticine, dough, snow, wet sand, paper pulp.
Clay is the most plastic natural material suitable for modeling. It is elastic, neutral in color, which is important for the perception of shape. Old clay crafts can be reused. To do this, they need to be crushed, filled with water, etc. The suitability of clay for modeling is checked as follows: a small piece of clay is kneaded, rolled into a “sausage” and rolled into a ring. If the ring is cracked, it means the clay is dry and needs to be sprinkled with water or a little vegetable oil added. If the clay is too wet, you can leave it in the air for a while to allow some of the water to evaporate. The fashioned crafts are dried, fired, and then primed and decorated with paints.
Plasticine is an artificial material specially created for modeling and modeling. Plasticine is not as flexible as clay, but it has its advantages. A large selection of colors makes it possible to create multi-colored crafts and compositions.
Dough is another accessible material that is easy and enjoyable to sculpt with. And the dough is easy to wash off by hand. Crafts made from salt dough look like real masterpieces. But crafts made from salt dough need to be dried for a very long time and well. They can be varnished and stored for many, many years.
Children's creative work largely depends on the chosen modeling method. With the constructive sculpting method, the image is created from separate parts, like parts of a construction set (hence the name).
The sculptural method is sometimes also called plastic or sculpting from a whole piece. Sculptural is a more complex method of sculpting compared to constructive. Children usually need some explanation and demonstration of the technique.
The combined method combines two methods: constructive and sculptural. It allows you to combine the features of modeling from a whole piece and from individual parts.
Crafts made using the relief method represent a three-dimensional molded image on a plane. There are the following types of relief: bas-relief, high relief, counter-relief.
Work done in a modular manner is reminiscent of putting together a three-dimensional mosaic or constructing from identical parts. Another original way of sculpting is sculpting from rings. This method was used by folk craftsmen - potters.
Modeling from plates. Using this rarely used method, you can rationally, economically and fairly quickly create voluminous, hollow crafts. And modeling on the form. When, for example, plasticine is rolled out in an even layer, it is wrapped around the mold, the excess is cut off, the edges are joined and the seam is smoothed. Decorate with moldings or cut-out patterns.
The use of additional materials and tools depends on the material from which the work will be performed. This is a modeling board; stacks – wooden or plastic; napkins – paper and fabric; a bowl of water for wetting your fingers and napkins when sculpting with clay. Natural materials: shells, pebbles of different shapes and colors, leaves, fruits, branches, seeds, feathers. Factory produced stamps. Household items that give an imprint or imprint (corks, felt-tip pen caps, etc.). Cardboard, boxes, jars, lids, straws (cocktail), beads, buttons. Molds for dough or for playing with sand.
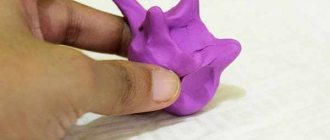
The most popular material used by teachers when working with children is plasticine. Modeling with plasticine is a type of art that is available for classes in kindergarten and school, as well as in club work and in the family. This material also arouses great interest among children. Using an unconventional technique for working with plasticine - plasticineography.
The concept of “plasticineography” has two semantic roots: “graphite” means to create, draw, and the first half of the word “plasticine” implies the material with which the plan is executed.
Plasticineography is a new type of decorative and applied art. It is the creation of stucco paintings depicting more or less convex, semi-volume objects on a horizontal surface. The main material is plasticine. It is possible to use combined techniques. For example, decorating the surface with beads, plant seeds, and natural materials. In some cases, using the plasticineography technique, a product is modified, which leads to the creation of original works. For example, a landscape is graphically depicted on a flat surface, and foreground details are depicted using plasticineography.
By doing plasticineography, general and fine motor skills of the hands develop, which in turn is one of the main stimulators of a child’s brain activity. The better the baby works with his fingers, the better he develops, the better he speaks and thinks.
Plasticineography makes it possible to solve not only practical problems, but also educational ones, which in general allows for the comprehensive development of a child’s personality. Children not only gain knowledge, skills, and abilities, but also at the same time consolidate the information received in direct educational activities in all educational areas of the “From Birth to School” program.
During plasticineography classes, children develop mental processes: attention, memory, imagination, thinking, perception, spatial orientation, sensorimotor coordination, that is, those significant functions that are necessary for successful learning at school, as well as creativity. Children learn to plan their work and complete it. Children are taught a culture of communication, norms of behavior, cognitive interest, independence, self-confidence, individuality, initiative, and the ability to work in co-creation.
“Plasticine” painting can rightfully be considered as a unique technique in modeling. Children are delighted to discover and create new colors and shades on their own. This enriches and diversifies the palette of plasticine, bringing modeling closer to painting. Conventionally, two methods can be distinguished: incomplete and complete mixing of pieces of plasticine of different colors in one lump. When different colors are not completely mixed, the result is a “marbled” color. When different colors are completely mixed, new colors or shades are obtained. It is necessary to show children a rational mixing technique: pinch off or cut pieces of the desired color, roll a piece of each color into a roller, connect the rollers and roll into one roller, fold this roller in half and roll out again, fold and roll out again. This operation must be continued until a uniform color is obtained. But first you can experiment with watercolor paints. This will help you learn that when mixed, yellow and red produce orange, blue and yellow produce green, and red and blue produce violet. Experience with gouache clearly shows that white helps create a whole range of shades of any color. You just have to change the proportions. The more white, the softer and lighter the color.
The advantage of plasticineography over sculpting three-dimensional figures is that a very beautiful and vivid plot can be created on a plane, and much less material will be needed.
When working with plasticine, a number of difficulties may arise:
plasticine that sits for a long time becomes hard, it is difficult to knead it and prepare it for work, especially with children’s fingers;
Plasticine contains fatty components, so greasy stains appear on paper or other bases over time.
All these troubles can be avoided if you follow the following recommendations;
Warm up hard plasticine before direct educational activities.
When working with plasticine, you should use thick cardboard as a base, not thin sheets of paper, so that it does not deform when performing techniques of pressing, smearing, smoothing,
flattening while securing an object to a horizontal surface. It is better to use varnished cardboard.
To ensure that the picture does not lose its attractiveness over time, the base with or without a pre-drawn outline should be covered with tape. This will help avoid the appearance of greasy stains. It is easier to work on a slippery surface and using a stack it is easier to remove excess plasticine without leaving marks. The contours in this case are made with a regular felt-tip pen, which can also be easily erased with a damp cloth if the child suddenly makes a mistake in depicting the object. If it is not possible to cover the base with tape, the outline is drawn with a simple pencil.
If the work is performed as a gift or to decorate a group room, it is recommended to cover the surface of the composition made of plasticine with colorless varnish. The plasticine under the varnish film hardens over time, the product becomes more durable and retains its brightness, and it is easier to remove dust from the varnished surface.
There must be a cloth wet napkin for hands on the child’s desk so that he can use it at any time, and after completing the work, first wipe his hands with a napkin and then wash them with soap and water.
Working with plasticine requires physical effort, so in the process of doing it, children need rest in the form of physical education and warm-ups. When carrying out direct educational activities, it is important that it contains not only educational information, but is also full of games, physical education, finger gymnastics, game situations,
Plasticineography should be taught in order of increasing complexity: it is better to start with simple, small-sized images and gradually move on to creating more complex ones. By making plasticine images, children gradually master the techniques of “drawing” with plasticine, namely: pinching, rolling, unrolling, flattening, sticking, pressing, smearing, pressing, smearing, smearing. All types of plasticine printing are successfully used: direct, stained glass, contour, multilayer, modular, mosaic, textured. Children will gradually learn to create interesting thematic pictures with their own hands, which they can give to their loved ones and friends. If you successfully master the technique of drawing with plasticine, you can perform group work.
You can store children's masterpieces made on cardboard in regular files, stapled in a folder. Can be beautifully framed.
Bibliography
From birth to school. Approximate general education program
preschool education framework /
Edited by N.E. Veraksy, T.S. Komarova, M.A. Vasilyeva. – M.: MOZAYKA-SYNTHESIS, 2014. – 368 p.
Lykova I.A. We sculpt, we fantasize, we play. – OOOTC “Sfera”, 2000.
Davydova G.N. Plasticineography. Animal painting. LLC Publishing House "Scriptorium 2003", 2008.
Smirnova T.V. Artistic and aesthetic development of children 5-6 years old. Plasticineography classes. Publishing house "Teacher", Volgograd, 2014,
Types of modeling
When the children mastered the basic techniques of working with plasticine, I moved on to frontal classes with the whole group.
During classes, I actively introduced children to the shapes of objects. Children held a ball, a ball, an orange in their hands, and felt their size.
At the beginning of the lesson, I showed the children techniques, picked up plasticine and performed the necessary movements. Then the children repeated these movements with plasticine for reinforcement. Only then did they begin to sculpt the desired object. All the children's work was accompanied by my showing and telling.
When working with children, I used play techniques. She played on the theme of the lesson, suggested playing with the resulting figures and adding details to them. For example, when sculpting chickens, you can place the figures on a green sheet of paper representing a meadow. These techniques will help children not only create objects, but also put imaginative content into their work.
When working with children, she resorted to reading fiction, in particular fairy tales. For example, while reading the fairy tale “Kolobok,” children imagined the path, the bun, and its structure. I finished the classes with the help of nursery rhymes and songs that helped deepen the figurative image of the subject.
I have developed a system of modeling classes for children in the younger group. In the younger group, children use traditional modeling techniques, mainly object modeling.
At the end of the year, I began to introduce unconventional methods of modeling - plasticineography. But for this I used simple techniques and simple pictures. The initial techniques for learning how to draw with plasticine are: rolling plasticine balls of very small sizes (no more than 3), pressing them, smearing them on the surface of a base (thick cardboard) to create a flat or semi-relief image.
While developing the skills of pressing and smearing, I taught the children to apply force with their fingers. She showed techniques, and if necessary, she took the child’s index finger and helped draw a plasticine line, turning the finger in the right direction.
I conducted conversations and consultations for parents, so that they, too, could help their children master modeling techniques, introduce them to modeling materials, and help children consolidate and master the shapes of objects. I spoke at parent meetings on this topic.
I also carried out monitoring on the development of modeling skills in the younger group.
Conclusion.
In this work, it was found that artistic and aesthetic development is an important educational area in the life of a preschooler. Sculpture, in particular modeling, is an integral part of it.
A small child has a special acuity of perception. What is emotionally perceived in childhood is remembered for a lifetime. The perception of beauty forms in children an aesthetic sense, respect and respect for art. Works of art broaden a child’s horizons by conveying certain information. They also influence the formation of moral feelings.
Consultation for parents
Plasticine is used in modeling classes as the most popular material. It is a soft and plastic material. It is usually used to depict small shapes made from colored parts. Color adds variety to the work and is an additional means of expression.
There are several techniques for working with plasticine:
- traditional creation of volumetric forms;
- non-traditional technique - creating plasticine paintings (scratching, surface imprints, plasticine molding (bas-relief), drawing with plasticine, working with a template, etc.
Plasticineography is an unconventional modeling technique, which is expressed in “drawing” with plasticine more or less convex in volume (bas-relief) images on a horizontal surface.
Drawing with plasticine is a remarkable type of visual activity in its capabilities. It allows the child to master the volume, make the picture in relief and, due to this, more expressive and lively. You need to start by drawing a sketch on a sheet of cardboard, think over the color scheme, and only then start applying plasticine. The plasticine needs to be heated so that it can be easily spread over the surface of the cardboard. We start making a plasticine picture by applying the background, using the techniques of “pressing”, “smearing”, “smoothing”. After applying the background, we begin to work directly with the main image. While working on a painting, it is important to take into account combinations and rules for mixing colors, achieving the desired shades. After completing the painting, you need to cover it with hairspray.
Scratching. To perform this technique, you will need a piece of cardboard, multi-colored plasticine, and stacks with a sharp end for scratching the plasticine. First, take several bright colors of plasticine and smear them on the surface of the cardboard (the entire surface should be covered). Now we take a stick or a stick and with the sharp end we begin to scratch the image.
Surface prints. Using plastic materials, you can obtain and save prints of any object. To do this, you need to prepare a base of plasticine and apply imprints with any relief object, forming some kind of pattern.
Working with the template. To do this, we need a sheet of cardboard on which a drawing has been previously applied, divided into cells of different colors. After which the child fills each cell with plasticine of the corresponding color. The result should be the intended image.
Bas-relief is the sculpting of a figure protruding less than half above the surface of the base. To make it, a preliminary drawing is applied to a sheet of cardboard. Then we take a piece of plasticine of the desired color, knead it in our hands and apply it to the drawing so that the plasticine gives the required volume. As necessary, the plasticine is covered with gouache and then varnished.
Circuit. To perform this technique, you must first apply a simple design to a sheet of cardboard. Roll out a thin flagellum from a piece of plasticine of the desired color. Then lay it out along the outline of the drawing. Complete the background and missing elements with watercolors.
Mosaic. We first apply a drawing to a sheet of cardboard. Then we roll out thick ropes of different colors from plasticine. Next, cut the bundles into small pieces resembling flat pebbles. We use them to lay out the drawing. It is advisable to varnish the finished work. This way it will last longer and look better.
So, we see that there are a huge number of techniques and methods for working with plasticine. Each of them brings great pleasure to the child and also has great practical significance.