Design of thematic zones and corners in kindergarten
Contained in sections:
- Group design 3753
Includes sections:
- Safety, life safety. Safety Corners and Centers 283
- Book corner, center. Design examples 252
- Musical corners and centers in kindergarten 183
- Patriotic corner. Local History Corner 550
- Speech corner. Speech development corner 80
- Sensory room. Corners and sensory development centers 357
- Theater corners and centers in group 322
- Corners of mood, emotions, solitude 405
- Nature corner and observation calendar 1544
- Corner of creativity and ISO 203
- Physical education and sports corners in groups 346
By groups:
- Senior group
- Preparatory group
- Middle group
- Junior group
Showing publications 1-10 of 5968. All sections | Corners and centers in groups
New
Photo
The best
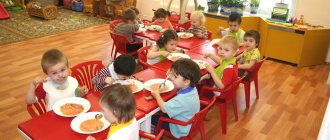
Retreat and Relaxation Center
Center for solitude and relaxation in senior group No. 6 “Pochemuchki”
The corner of solitude in group No. 6 “Pochemuchki”
is organized so that the child has his own personal space, where he can stay with his thoughts, relieve excitement, calm down, tune in emotionally, relax and ...
Decorating the duty officers' corner in the preparatory group
Hello colleagues!
I would like to share with you my ideas for decorating corner in the preparatory group . As you know, in the preparatory group , children actively participate in dining room duties, help the junior teacher set the table after meals...
Volumetric umbrella made of cones.
Prepare colored paper, glue, scissors, pencil and maple leaf templates.
Trace a circle on colored paper according to the template and cut it out. Divide the circle into six segments. For the umbrella we only need four.
Roll the segments into little balls and glue them together.
Glue the bags onto the base, bringing the sharp ends of the bags together at one point. We mask the top of the bags with a triangle. Cut out and glue the umbrella handle. Decorate the umbrella as desired.
Using the template, trace and cut out the maple leaves.
We decorate the umbrella with leaves, gluing only part of the leaf. This helps create volume and liveliness to the leaves. Our autumn umbrella is ready.
Basic properties of paper for children
Corners and centers in groups - Ecological corner “Eco-children - preschool children”
Publication “Ecological corner “Ecolyata -...” “Love for one’s native country begins with love for nature.” K. G. Paustovsky. Fostering a love for nature, its flora and fauna must be carried out constantly, because the formation of an attitude towards the country and state where a person lives begins in childhood. Our…
Image library "MAAM-pictures"
Traffic rules corner
Each group should have a traffic safety corner, because children should know the rules of road safety. Purpose: Training in game modeling, formation of safe behavior on the roadway. Goal: To introduce children to the rules of the road, the purpose and...
Book corner in early childhood group
In the Rainbow early childhood group, we have created a book corner in which children can independently choose books and calmly look at them. The book corner turned out to be cozy and attractive. It is located away from where children play, so that noisy games do not distract the child, good…
Subject development environment in the pre-school educational institution “Traffic Code Corner” in the junior group
When creating any developmental zone in a group, including a traffic rules center, the teacher must be guided by the requirements of the Federal State Educational Standard. According to the provisions of the Federal State Educational Standard for preschool education, teachers are required to improve the quality of educational work with children through the organization...
Craft Volume Umbrella
You will need three A4 sheets of any color, a disk, scissors, glue, a piece of wire.
1. Place the disk on the sheet and trace it. One sheet will make three circles. And the umbrella will take 9 circles. Cut it out.
2. Bend the circle in half and in half again. It turns out to be a quarter circle. Apply glue from the center of the circle to the outer edge and glue it together. One piece is ready.
We do the same with all the circles.
3. Glue the quarters together. We also apply glue only to the strip of the center of the circle towards the outside.
4. We connect the first and ninth parts of the ball, we get a hemisphere.
5. Attach a wire leg to the center. Our umbrella is ready.
Paper techniques
Origami umbrellas
Folding origami develops not only children's mental activity, but also fine motor skills. To work you will need:
- rectangle measuring 10 by 20 cm;
- square 20 by 20 cm;
- glue and scissors.
First you need to take a square and bend it from one corner to the other diagonally. The fold must be carefully smoothed. It won't be difficult for a child to do this. Next, you need to return the square to its “body” and similarly bend the second corner diagonally. It needs to be straightened out again. Now fold the square in half to make a rectangle.
You can see three triangles on the workpiece; the side ones should be bent inward.
The result should be something like this:
By connecting the edges of the triangle, you need to find the middle. Fold the side edges towards it. This must be done with all four corners. Immediately straighten each triangle. The part that protrudes must be bent first outward and then inward.
We get an umbrella hat.
Now you need to take the prepared rectangle, it is needed for the umbrella handle. It will turn out more beautiful if you take colors that go well together, for example, blue with pink, green with yellow, red with black or white, etc.
The picture shows which shades look best together (they are opposite each other on the Itten color wheel).
Roll a tube out of a rectangle (you can glue it if it falls apart) and fold the bottom edge. At the tip of the umbrella, you need to cut off the top to place the handle there.
Craft from napkins
Crafts in the form of umbrellas are easy to make with your own hands.
An umbrella can be made from napkins in origami style and made with applique. If desired, you can add lace ribbon and other decorations to them.
In order to make a three-dimensional umbrella, you will need colored craft wire and just one napkin. It should be folded into a cone and glued. Thread the wire in the center and bend it from the bottom. Additionally, you can decorate the base of the umbrella with drawings, rhinestones or colored ribbons.
Decorative umbrella made of fabric and knitting needles
An umbrella for little fashionistas can be made from scrap materials.
To do this, you need to take thin knitting needles (6 pieces), fabric, plasticine and glue.
Place the metal sticks together and tie them with twine at the bottom. Bend them at the top to form a base.
After this, make a handle from plasticine and secure the end of the knitting needles. If you want something more reliable, you should resort to using plastic (baked polymer clay). It is a little more difficult to knead and work with than with plasticine, but after baking it will harden and will not lose its shape.
Cut a piece of round fabric of a size that fits the individual workpiece. If desired, it is possible to treat the edges or the entire fabric with paints, lace, rhinestones or artificial flowers.
The entire length of the handle can be decorated with decorative beads and ribbons.
After the fabric is glued, it is recommended to remove excess glue with a napkin from the inside of the umbrella so that there are no stains left on it.
In the final version, the umbrella craft should look something like this:
Plasticine umbrella
Plasticine is the easiest and fastest way to make an umbrella. Such a craft also requires a minimum of materials.
You can make a three-dimensional umbrella using only plasticine, or you can resort to plasticine printing and take an additional white sheet of paper.
For the first method, use plasticine of the same color and roll up a strip. Bend it towards the bottom. Attach a tube to the top of the stick and cut to the desired length. For the hat, take a material of a different shade (a contrasting umbrella will look beautiful, so you can take the opposite color to the first). Make a circle and make a small hole in the center. Pass the handle through it. All that remains is to bend the cap down a little and the craft is ready! If desired, you can add patches, drops or other decorative elements to it.
Children are often interested in how to make an umbrella so that the kindergarten can show off their creations. The next method of making a plasticine accessory involves using a thick white sheet of paper.
On it you need to draw a sketch of an umbrella, and only then use plasticine.
After the drawing is ready, you can begin to sculpt the hat with one or more colors of plasticine, smearing it on the paper. If you want to get a beautiful result, you should not go beyond the edges of the picture. Do the same with the handle and background.
Where to begin?
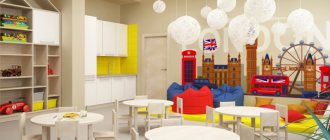
Before you start decorating a group in a kindergarten and creating various thematic corners in a kindergarten, you should definitely take care of the general decoration inside the group . When painting, you should not use a lot of bright colors. It is better if the tone of the main paint is light and “warm”:
- beige,
- peach,
- pearl and so on.
Photo wallpapers with characters from fairy tales and cartoons, as well as stickers with children's themes, look good in children's groups.
It is better to decorate all the group’s rooms in the same style and think in advance about a theme that will tie together the bedroom, reception area, study area and play corners in the kindergarten. Before you start designing specific corners, you should consult with your parents, discuss together and get acquainted with possible options for children of different ages. Here are some corners that can be organized in a kindergarten; for an example, see the photo.
Developmental environment
Play space
Traditionally, each group has a separate room for a bedroom, and the common group room is divided into an activity area and a play area. Play corners for kindergarten are designed differently depending on the age of the children in the group, free space and the creative scope of the organizer. For example, in the play area, a separate place is often allocated for a mummering corner in a kindergarten.
The location for it must be chosen with special care, it must be easily accessible and constantly open to children. The purpose of its design is to create conditions in the group for the creative activity of children, the development of imagination, the formation of gaming skills, the implementation of gaming plans, and the cultivation of friendly relationships between children. You can decorate such a place in the form of a model house, a stylist’s office, or a small screen with a variety of outfits:
- professions,
- animals,
- artists,
- fairy tale heroes and so on.
Once the location has been determined and the design option has been selected, you can begin the practical part. The boundaries of the corner are formed using furniture. This could be: a low rack with shelves, drawers and a crossbar for clothes hangers. For convenience, a table and chairs can be located in the corner. A mandatory attribute in the mummers' corner should be a mirror where children can examine and evaluate their appearance. You can paste pictures of various suits, hats and other items of clothing on the wall.
Design options
Sometimes a hairdresser’s corner in a kindergarten fits harmoniously into such a corner. Here everything is ready to equip the hairdresser’s workplace - a table, a chair for the client, a mirror. On the table you can put bottles, combs, hair decorations, etc. You can glue pictures of scissors and combs on the wall. The apron for the master can be located on one of the hangers on the crossbar.
If space allows, the hairdressing salon corner in the kindergarten is designed separately, as an independent area for the role-playing game “Barbershop”. First, the necessary furniture and shelves are also installed. Instead of a rack with outfits, you can place a bedside table or mini-wardrobe with hairdressing supplies. You can also sew wall pockets for them. Then game items are added. Usually such a place is made as a children's corner for a girl, based on an interest in hairstyles, jewelry, and so on.
Umbrella made of leaves - step-by-step production
To make a beautiful decorative umbrella from leaves, you must have:
- old umbrella;
- leg-split;
- dry leaves;
- PVA glue;
- decorative elements of autumn (optional).
First you need to remove the cover from the old umbrella, leaving only the frame. Anything removed from the old item can be thrown away or used in addition to decorative items on the new item.
Wrap the base generously with twine. Now you need to take a lot of dry leaves and plant them on glue, and add decorative elements like cones, acorns, pumpkins, etc. around the entire perimeter.
After drying, the leaf umbrella is ready. The method is simple, does not take much time, and every child can definitely repeat it.