Autumn painting made of plasticine
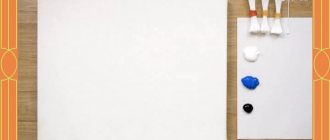
Let's start with the most difficult, and at the same time, the most exciting task - sculpting an autumn landscape. To do this you need to prepare in advance:
- a thick sheet of cardboard, preferably blue, which in the picture will depict a blue autumn sky and the same blue autumn distances;
- plasticine of various colors;
- stack (this, if anyone doesn’t know, is a special knife for cutting plasticine, which is usually sold along with a package of plasticine);
- a smooth board without roughness or burrs for rolling out plasticine;
- paints and brush (optional).
Let's start creating.
- From plasticine of all autumn colors (yellow, brown, red) we roll out sticks of different thicknesses and lengths.
- Having prepared plasticine sticks, we begin to make autumn leaves from them. Of course, fashioning a piece of wood from plasticine is a difficult task, but in this case it is not necessary. We make spirals from plasticine sticks (aka “snails”). To do this, the stick needs to be rolled into a spiral - a task that any child can easily cope with.
- Having made a sufficient number of spirals, we begin to stick them to the cardboard, forming the crown of the tree. What exactly the crown should look like in terms of size, contours and color palette depends entirely on the child’s imagination.
- Having finished with the crown, we begin to make the trunk and branches of the tree. We roll out sticks of different lengths and thicknesses from black or brown plasticine. These are fragments of tree trunks.
- By the way, about the color scheme. It is not at all necessary that the trunk be exclusively black or brown. Maybe the child is an impressionist or abstract artist at heart, and sees the autumn forest in his own way - in some other colors. Well, so much the better, and there is no need to convince him of anything.
- We begin to form a tree trunk from the bundles. Of course, it should be below, under the crown. We stick several flagella to this place from top to bottom. We try to keep them parallel to each other. Several flagella under the crown are already a full-fledged trunk.
- We make many more flagella of different colors. Roll them into spirals. These are fallen autumn leaves. We place them below under the tree.
- In this way you can sculpt one tree. Or maybe several at once. You will get a full-fledged plasticine grove.
- We make a circle and thin sticks from yellow plasticine. This is the autumn sun and rays. We stick them on top of the picture.
- If you have the desire and ability, we paint the space between the trees or around the tree in autumn colors. It will turn out great - both plasticine and paint.
- Finally, we prepare a frame for the picture (what is a picture without a frame?). To do this, we make long plasticine strips of any color and paste the picture along the contour. You can do this using simple plasticine strips, or you can weave several strips in the shape of a braid - it will be even more beautiful.
The result will definitely be a highly artistic product - a real autumn plasticine landscape. For example, like the one in these photos.
This video will tell you how best to make a picture from plasticine.
This video will teach you how to sculpt a beautiful autumn tree from plasticine.
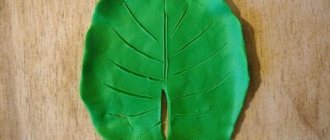
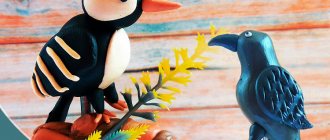
Each tree consists of fragments: trunk, crown, individual branches, berries and leaves. They also need to be able to sculpt beautifully. How to do this better, look at another video.
notes node modeling senior group “A fairytale tree grew in the forest”
Abstract GCD modeling
Theme: “A fairytale tree grew in the forest”
Teacher of the first category: Belkina Olga Viktorovna
Goals:
develop the ability to perform different methods of modeling; learn to use natural materials to create an expressive image, convey the shape of the main part of the product and additional details; develop compositional skills; cultivate interest in creativity; instill respect for nature.
Equipment:
pictures of trees, plasticine, stacks, cardboard, napkin, cereal grains (rice, wheat, etc.), product sample.
Preliminary preparation:
determining during a walk what the shape of the trees growing on the territory of the kindergarten is (round, oval, triangular).
Progress of the lesson
Creating gaming motivation.
Educator
. Once upon a time there lived a one-year-old old man in the forest. He lived, did not grieve. He protected the forest so that no one would needlessly break branches or cut down trees. And our little one-year-old loved to plant trees. The trees grew very different: with a round crown, and pyramidal, and with foliage, and with needles. And he loved, cared for, cherished each one. And then one day a small seed flew onto his porch. The yearling had never seen such seeds before. He decided to plant the seed near his home. He dug a hole, put in a seed, watered it well with spring water and went to bed. And in the morning, the one-year old man came out onto his porch and was very surprised. An amazingly beautiful, simply fabulous tree grew up next to his house overnight. This is how the forest thanked the one-year-old for taking care of him. And this fabulous tree still grows in the forest, but only those who love and protect the forest see it.
And you and I can imagine this fabulous tree and sculpt it.
Demonstration of working methods.
Educator:
Since the tree is fabulous, we will sculpt it in an unusual way.
First, we will apply a fairly thick layer of plasticine onto the cardboard. Why do you think I took dark green plasticine for this? (children's answers)
Yes, because our tree grows in a green forest.
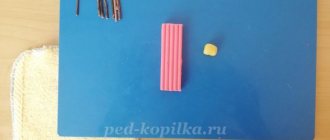
Then I rolled out ropes (rollers) from brown plasticine. I made a tree trunk from the thicker one, and branches from the thinner one. How can we make leaves? (children's answers)
I thought and thought for a long time and came up with an idea.
Look, I have grains of rice, if you look at them carefully, you can see that they look like leaves. Is not it? (children's answers)
These grains will become the leaves of a fairy-tale tree.
I will carefully press them into the plasticine next to the branches. Look, does my tree look like a fairy-tale tree? ( children’s answers)
How do you imagine a fairy-tale tree?
Making mushrooms
The autumn forest is so rich in mushrooms! That’s why I really want to sculpt them from plasticine! They are beautiful both on their own and as part of a plasticine autumn landscape. Once sculpted, they can be placed in the above-mentioned painting, and as a result it will turn out even more beautiful.
This miracle of nature is very easy to put together:
- First, we sculpt a mushroom stem from plasticine of any color;
- then we make a hat. It is clear that its production also requires plasticine of all colors. Real fungi, as you know, have caps of all kinds of colors;
- connect the stem and the cap.
It is clear that if fungi are supposed to be placed in the picture, then they should be flat.
You can also sculpt three-dimensional fungi – in their natural form. Making them is no more difficult than mushrooms for application.
By the way, about the volume
Plasticine is a fertile material for creativity. They can be used to sculpt full-fledged three-dimensional figures. Mushrooms have already been mentioned. And, besides them, the child will happily make other gifts of autumn nature: a variety of vegetables, fruits, a whole bunch of grapes, and even a head of cabbage. In general, whatever he wants and can do. Moreover, sculpting all this beauty is not at all difficult. Here, look at the photo.
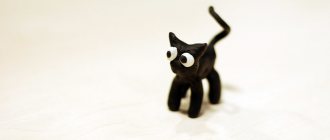
How to sculpt different animals
Children love animals very much, and willingly draw them and sculpt them from plasticine. Well, that's great. We'll show you how to do it better.
Let's start with the snail. It's not difficult to make.
- We sculpt the body of evidence. It should resemble a carrot: one end is thicker, the other is thinner.
- Bend the carrot at a right angle.
- From the thick part we make the head of the snail. At the very top we stick two plasticine sticks with spirals at the end - snail horns. A little lower – we make the eyes. They can be sculpted from plasticine, or you can stick store-bought ones. Below the eyes we stick a plasticine mouth.
- A snail's house can be made from different materials. First of all, of course, from plasticine. To do this, roll the plasticine into a thin strip, twist it into a spiral and place it on the snail’s back. In addition to plasticine, chestnut or walnut look great as a house.
Now let’s sculpt a beautiful caterpillar.
The good thing about this craft is that even a very small child can do it. As a matter of fact, children's “plasticine” creativity in most cases begins with the creation of a caterpillar.
- We make balls of any color from plasticine. It is better if each subsequent ball is smaller than the previous one.
- We place the balls in a row, starting with the largest (this is the caterpillar's head) and ending with the smallest (this is its tail).
- We connect them with thin soft wire or fishing line. A very young child will probably not be able to cope with this operation, so he needs help.
- We place horns on the caterpillar's head. They can be made from ordinary matches or from plasticine.
- We give the caterpillar a face: eyes, nose, mouth. It’s better to stick on store-bought ones, and everything else is made from plasticine.
- If desired, make plasticine legs for the caterpillar (two for each ball on both sides). And, of course, the handles: they are attached to the ball that follows immediately behind the head.
The cheerful, mischievous, cute caterpillar is ready!
And if you also attach wings to it, you will get a wonderful dragonfly or butterfly.
Of course, it is impossible to talk about all their plasticine products in one article. Yes, this is not necessary. Another thing is more important - to introduce a child to creativity from a very young age. And the easiest way to do this is with plasticine. In general, we create, we dare, we comprehend the world! And plasticine helps us!