Hi all! Lately we have been interested in reading autumn poems, making wreaths and, of course, going for walks and walks. Enjoying the last warm days. And besides this, we draw, try a variety of unconventional drawing methods, in particular, we draw an autumn tree in 9 different ways:
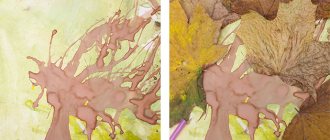
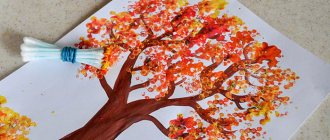
Drawing an autumn tree. Blowing
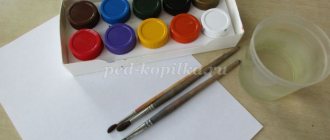
Materials:
- sheet A4
- tassels;
- cocktail straw;
- freshly picked tree leaves;
- paints: yellow, green, red and brown.
In our case, we prepared the background in advance. When the background dried, a huge brown blot was dropped in the center of the sheet. And they began to take turns blowing out the trunk and branches of the trees with a cocktail straw. The branches turn out thin and unusual. By the way, it also turned out to be an excellent breathing exercise. And the dried tree was additionally decorated with tree leaves.
Drawing birches with gouache, an unusual technique
First, you need to know that landscape is a genre of fine art in which the main subject of the image is nature, where special importance is attached to the construction of the composition, as well as the conveyance of the atmosphere, the state of the air and light.
Get ready, we will learn to draw a beautiful landscape with birches. Now we will introduce you to one interesting way of painting with gouache.
For this work you will need very unusual materials:
- a circle cut out of a white sheet of paper;
- used plastic payment card;
- adhesive masking tape 1 cm wide;
- set of gouache paints;
- paint brushes;
- a sippy cup with plain water;
- scissors.
We draw a landscape step by step:
- We place the paper circle on the surface of the desktop on the backing. We cut the masking tape with scissors into five strips, approximately equal in length to the diameter of the circle. Cut one strip in half lengthwise.
- We glue the stripes as indicated in the diagram, first the wider ones, and then in the center of the composition, at an angle, thin strips of tape. Using the sticky edges of the strips protruding beyond the circle, we secure the circle to the work surface. Now is it clear that the areas covered with tape are the trunks of the birch trees in our picture?
- Next we work with gouache. Taking a medium-sized brush, paint the sky with blue gouache, using light strokes to paint the upper part of the circle with a smooth increase in the intensity of the blue color towards the very top edge of the sky.
- To the middle of the circle, paint the space between the trees with strokes using gouache paint in green tones: from light green to light green. In the middle part of the composition we diversify the palette of colors with orange highlights.
- And now we work in the same manner to the very bottom, applying dark green gouache to the very bottom of our drawing, smoothly creating transitions from one shade of green to another. The background forbs are ready. Now let’s add red and yellow colors with a few strokes. Look at the resulting picture from above, did you really see blooming summer grasses?
- And now, let's return to our birches.
- Carefully remove the tape. Inside the circle, the slender outlines of trees remained.
- Let's apply a characteristic black pattern to the white bark in an unusual way. Attention! Apply a little black paint to the edge of the used plastic card.
- We apply the painted edge to either side of the selected trunk and, pressing tightly, stretch the card to the other side. If you did everything correctly, you will get the effect of birch bark on the trunk. Great?
- We will do a similar procedure with other birches, changing the direction of action on some of them, for example, from right to left and vice versa.
- At the top of the birches we will draw branches.
- Paint them with black paint using a thin brush.
- Finally, we casually paint the branches with green paint to create foliage.
The result was a picturesque landscape. Through the whitish trunks of birches one can see the blooming, juicy May herbs, and the expanse of heaven soars upward! The work is really worth the result, but very little time is spent on it.
Let's move on to the next master class. We will learn to draw a winter birch grove.
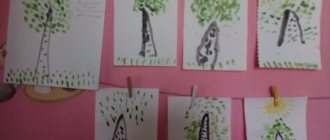
Drawing an autumn tree. Dry leaves and hole punch
Materials:
- sheet A4;
- tassels:
- hole puncher;
- dry tree leaves;
- PVA glue;
- paint: black, brown
I painted birch trees in watercolors. While the birch trees were drying out, my daughter and I used a hole punch to stamp circles from dry tree leaves. Then came the work of the little artist. She herself applied PVA glue to the desired areas of the trees, and then generously sprinkled them with our prepared mini-foliage. The result, in my opinion, came out very nice.
Progress of the lesson:
Listening to the song “Spring”
(Children listen carefully to the music and answer the teacher’s questions.)
-What season of the year does this melody reflect?
-What is happening at this time?
— What are the very first flowers to appear in spring?
(Nature wakes up, birds chirp, the sun shines brightly, drops drop loudly.)
And in the spring, the buds on the trees bloom and the first leaves appear.
Guys, please listen to the riddle and tell me what tree it is about:
Without caring about the weather,
He walks around in a white sundress,
One of the warm days
May gives her earrings.
Today I invite you to talk about Russian birch . Birch is a symbol of the beauty of Russian nature , a symbol of Russia.
— Where can you meet and see a birch tree? (In the forest, in a clearing, near a house, in a park)
.
— What is the name of the forest where only birches grow? (Birch grove, birch forest)
.
Birch can be admired at any time of the year. Poets praised the Russian birch in their poems. People come up with proverbs and sayings, riddles, because they love our Russian beauty birch .
Since ancient times, people have woven bast shoes, baskets and baskets for berries and mushrooms from birch, and made birch bark spoons. Brooms and brooms are made from branches, plywood, furniture, and durable skis are made from wood. Medical activated carbon and tar are obtained from its wood.
Birch brooms charge you with vigor, add strength and health. Birch has treated and continues to treat people for many diseases. Birch buds, leaves and sap are used in medicine. If you cut the trunk, a clear, sweetish liquid will flow out of it - birch sap. In the spring she feeds animals and birds with birch sap.
It’s nice and joyful to walk in a birch forest during mushroom season. Birch is a very beautiful, valuable tree, so we must protect and care for it.
— How can we help save our beautiful birch?
(Do not break branches, take part in planting trees)
Children, look how beautiful the birch tree is. Pay attention to the appearance of the tree.
— What color is the trunk? (white)
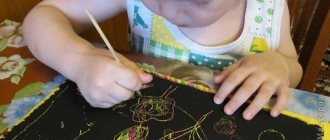
-Guys, do you want to draw a birch tree ? We can paint with paints , but let’s paint with salt , how do you think we’ll succeed? (experiment with salt )
One child on the sheet is trying
to draw with salt . Children draw a conclusion.
Drawing an autumn tree. Sponge
Materials:
- sheet A4;
- sponge;
- paints: yellow, green, red, brown, black.
Here I again drew a tree trunk. I used a clothespin (for convenience) to hook a round piece of sponge and we began stamping the foliage. True, in this drawing we used all the paints that we had in our arsenal. The artist's desire is the law! Why shouldn't the foliage be black and purple?!
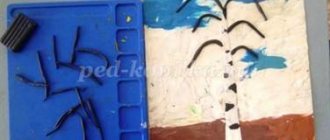
Drawing an autumn tree. Plasticine stamps
Materials:
- sheet A4;
- plasticine;
- bottle cap;
- paints: yellow, green, red, brown, black.
Maybe you remember my article about modeling, where I described many of our plasticine games?! There I already mentioned a simple way to make a plasticine stamp. You just need to mold the desired shape (in this case, a leaf) and press it into an unnecessary bottle cap. Now we dip the stamp in paint and decorate a pre-prepared tree branch with leaves.
How to draw a winter birch tree
Stage 1 – draw the trunk and branches of the birch
Using an HB pencil we outline the line of the ground, making it uneven. Then, we outline the trunk of our birch tree. The trunk slopes slightly to the right, we make it plastic, not very even, with bends.
After this, we outline the bulk of the birch branches. We try to show the thickness of the branches.
Stage 2 – do shading and darkening
Using a 4B pencil we draw stripes on our birch tree. First we do a little shading on the right side of the birch, where we have the shadow part, and then we outline the stripes. Try to do them at different distances from each other. Somewhere you can place 2 together, somewhere separately one with a large distance, somewhere in the middle you can, on the left, on the right, of different shapes.
In the same way, we darken our branches a little. Try to draw the branches with different pencil pressure so that some branches, for example, those that are closer to us, are brighter. And those located further away looked less bright and more faded, and went into the distance.
Also, you can slightly outline a light falling shadow from the birch tree - it falls on our right.
Stage 3 – draw branches
Using a 4B pencil, we first outline the light branches hanging down, and then the more rigid and clear branches that are located closer to us.
Drawing an autumn tree. Marbles
Materials:
- sheet A4;
- wax candle;
- cotton swab;
- marbles;
- paints: yellow, green, red, brown, black.
I drew a tree trunk with a wax candle and a cotton swab (to be on the safe side, so that when the balls were rolling, the tree trunk would not be completely painted over). When the drawing had dried, my daughter dipped the balls in paint, threw them on our sheet of paper, and then carefully shook the plastic box with the balls and the drawing.
Stages of drawing a birch tree for beginners
For the lesson, it is enough to prepare a landscape sheet, a simple medium-hard pencil and an eraser.
It is recommended to draw a lonely birch tree on a sheet located vertically. Then it is not difficult to place it entirely. If several trees are depicted, then the leaf can lie both vertically and horizontally.
For children, before drawing a birch tree, the lesson begins with determining its place on the sheet. So that the tree does not look torn from the ground, the same distance is removed from the upper and lower edges of the leaf. The same should be done with the side borders.
For a beginning artist, step-by-step progression will make the task easy.
1. Work begins with drawing a birch trunk.
It does not prevent children and adults from remembering that a birch tree is always compared to a slender girl. Therefore, the table cannot be too thick. But still it is thicker at the bottom and tapers towards the top. Moreover, the peculiarity of birch is the bifurcation of the top of the birch.
2. Any tree has longer lower branches. They are thicker than the top ones. From the middle of the trunk to the crown, the branches are drawn evenly. Then the birch will be harmonious.
The trunk with the main branches is depicted first. Thin branches are already being drawn onto them. The top ones are directed towards the sun. And the lower they are, the more the branches smoothly fall down. They are said to have a weeping shape. The more small branches, the fluffier the birch will be.
3. The stains characteristic of birch are applied directly to the trunk. The lower first three main branches are decorated with small dash stripes.
It is also important for an artist to be observant. This quality will tell you how to correctly draw birch bark on the branches and trunk. If its trunk is white, then its branches are dark. To color them, a dark brown color is chosen. On the tree, the branches are not located strictly on the sides. Their image around the trunk will make the drawing more realistic.
Drawing an autumn tree. Window
Materials:
- window;
- tassel:
- paints: yellow, green, red.
A slightly hooligan way of unconventional drawing. Of course, not everyone will agree to dirty the windows. Although... you just have to see the happy eyes of your child, and even the strictest mother will give in and give all the windows in the house to be torn to pieces. In addition, you won’t believe that at 1.9, the child spent about an hour doing this activity. I think many mothers of babies will agree that keeping a child occupied for such a long time is very, very difficult. All you need is a brush and three types of paint. And then, together, draw the trunk and branches of the tree.
How to draw a birch tree in spring with earrings
Stage 1 – outline the drawing
In previous master classes we have already shown how to draw a birch, so in this master class we will tell you how to draw a branch with an earring so that you can add them to your drawing of a spring birch.
At the first stage, with an HB pencil we outline our branch, on which the earrings and several leaves will be located. We draw the twig as plastic, more rounded and smooth.
At the same stage, we outline the earrings. They have the shape of thin, elongated ovals. But some earrings need to be drawn slightly curved so that they don't look exactly the same. We draw earrings of different sizes, lengths and thicknesses.
Then, draw the leaves. In the same way, of different sizes, placing them in different directions - some grow from above, some from below.
Stage 2 – using shading to create a tone
Using a 4B pencil, using shading, we cover, first, the twig. We make it in different tones - in some places we apply a little more pressure, in others less. We emphasize it in the same way. On some sides we apply more intense pressure so that the branch is more voluminous. We also cover the leaves and earrings with a light tone. We try to make the leaves of different colors. Somewhere on one leaf you can show that it has both a shadow and a light side. Some leaves can simply be toned down so that they are in the background, in the shadows.
Stage 3 – apply shadows, draw details
In the same way, we draw leaves with a 4B pencil. Veins and darkening should be shown on the leaves. The darkening occurs along the edges, where the leaves should be sharp and uneven.
On the earrings we show small strokes and pencil strokes to show the texture of the earrings. And they should be darker than the leaves.
Thus, using this and the previous master class, you will get a birch tree drawn in spring with a simple pencil.