How to make a bird craft yourself?
To remove bird crafts with your own hands well, you need to find suitable instructions on the Internet and decide what materials will be used.
To begin with, you should choose the most affordable and simple options for crafts, so that the materials for them are inexpensive and easy to find.
Next, you need to find suitable instructions on the Internet or rely on your own preferences and experience if you have previously made other crafts.
Santa Claus from a pine cone
You will need: cones, polymer clay, PVA glue, brush, superglue, hairspray, glitter, thin wire, ribbon.
Master Class
- Make a Santa Claus hat in this way: roll a ball out of polymer clay, then make a cone, bend the tip and attach it to the pine cone.
- Make 4 balls of polymer clay: one ball should be large - make a beard from it. Make two medium-sized balls - form a mustache out of them, and use one small ball for the nose.
- Attach the pieces to the pine cone.
- Brush over mustache and beard to create realistic stripes.
- Thread a piece of wire through Santa's hat and twist a loop.
- Place the craft in the oven for 15 minutes (135 degrees) to allow the clay to harden.
- Remove the craft from the oven. Polymer clay may peel off due to high temperature. If this happens to you, don’t despair - just glue the fallen parts back on.
- Tie the ribbon to the wire.
- Spray the hat with hairspray.
- Sprinkle with glitter.
Santa Claus made from pine cones is ready!
Ostrich
Another version of a bird made from cones and plasticine is the ostrich. To get this big bird, you need to get a fir cone. You will also need plasticine (black and brown), toothpicks and a couple of acorns.
Using an awl, make holes in the cone and insert toothpicks into them. These will be the legs of the ostrich.
Stick the acorn to an oval blank made of brown plasticine.
Fix the neck with the acorn on the upper edge of the cone. Attach the acorn caps to the ends of the toothpicks, after making holes in them using an awl.
All that remains is to sculpt the beak and eyes from black and white plasticine.
A tuft made from a miniature alder cone, which can be attached to the acorn using a heat gun, will look very good.
This is what a finished ostrich looks like!
You can decorate the edge of the cone with feathers or inflorescences of dry plants.
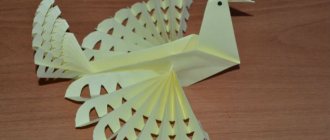
Paper birds
If you want to make beautiful crafts from bird paper, then you should choose a simpler option. There is one good solution - to make an owl out of paper. It's very simple and can be done in a few steps:
- Wrap a piece of colored paper to form a cylinder;
- On one side of the cylinder you need to make bends inside it and connect the edges of these bends with glue so that the inner space is hollow, and there are two high peaks, equally distant from each other. The result should resemble the head and ears of an owl;
- Next comes decoration, which is considered the simplest process;
- It is enough to cut out white circles for the whites of the eyes, black circles for the pupils and connect them together so that the black circles are on the white ones, but at the same time located on their lower part;
- Next, you need to cut out 10-20 identical circles of a different color to decorate the chest of the owl;
- These circles should be closely spaced next to each other or even overlap each other. You can also cut out the tail and glue it to the back of the cylinder;
- The craft is ready.
Pine cone spider
You will need: pine cone, soft brown wire, scissors, eyes for toys.
Master Class
- Prepare 4 pieces of soft wire of the same size.
- Secure pieces of wire between the scales of the cones as spider legs.
- Glue on the eyes.
The pine cone spider is ready!
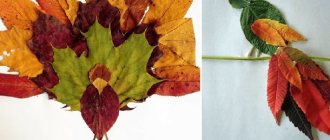
Birds made from natural materials
Very often, crafting a bird from natural material involves the use of high-quality natural feathers, cotton-based threads and a variety of other materials that can be used in the finished bird.
In some cases, real minerals or other natural stones with a beautiful texture are used as the bird's eyes.
That is why, when choosing a good option for implementation, you should focus on the appearance of the product and even combine both natural and synthetic materials with each other.
We recommend reading:
Craft bullfinch: detailed description of how to make a bird with your own hands (115 photos)Crafts from vegetables: 100 photos of the best crafts for children and a review of recipes for adults
- Craft ship: 120 photos, templates, drawings and step-by-step instructions on how to make a boat
A papier-mâché blank goes well with the feathers of a parrot or other brightly colored bird. Pre-dyed feathers will also work.
Cone flowers
You will need: pine cones, brushwood, acrylic paint of different colors, brush, green colored paper, scissors, glue gun, vase.
Master Class
- Paint the pine cones in bright colors.
- Set them aside and let dry.
- Take brushwood and measure the length of future stems using a vase.
- Cut off the excess length of brushwood.
- Paint the sticks green.
- Wait until completely dry.
- Cut out leaves from colored paper.
- Glue the leaves to the sticks.
- Glue the pine cones onto the tip of the stick.
- Place the flowers in a vase.
Cone flowers are ready! I recommend watching the video master class!
Rose from a pine cone.
Pine cone hare
You will need: a pine cone, felt, scissors, glue, eyes for toys, a button, strings for an antennae, a pompom for a tail.
Master Class
- Cut out 2 ear blanks of 2 sizes from felt.
- Glue the blanks together and glue them as ears.
- Cut the thread for the antennae and attach them to the bead.
- Glue the eyes and bead with antennae to the pine cone.
- Glue the pompom in place of the tail.
The pine cone hare is ready!
Goal: To activate children's knowledge about the appearance and habits of birds. Objectives: 1. To introduce the appearance and names of migratory birds. 2. Foster interest and desire to care for birds and protect them.
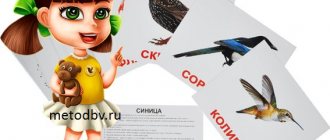
3. Teach children to construct a bird from natural materials. 4. Teach children, after showing and explaining the sequence of work, to make a craft on their own. Materials and equipment: tape recorder and recording of “Voices of the Spring Forest”; illustrations of birds; tree branches in a vase, fir cones, feathers, plasticine.
Progress of the lesson
I. Introductory part. - Today we will talk about our smaller brothers - birds and learn how to construct them from natural materials.
II. Main part. 1. Conversation about birds. - Guys, let's remember what birds winter in our area? (children list in chorus: tits, crows, bullfinches, pigeons, woodpeckers, owls, sparrows, crossbills). - Well done! Now guys, show and name these birds in the picture (2-3 children go to the board and name the wintering birds). - But now you and I will go to the spring forest. Let us listen to the sounds of the forest, and then you tell us what you heard (children listen to the recording of “Voices of the Spring Forest”). — What did you hear in the recording? (voices of birds) - At what time of year and where do birds sing like that? (in the forest in spring) - Look at the board and tell me who you see in the illustrations? (birds) - How did you guess that these were birds? (everyone has wings and everyone can fly) - But not only birds have wings and can fly, but also beetles and butterflies. How are birds different from them? (the body of birds is covered with feathers, they have a beak, two legs with sharp claws). - “feathers”, “plumage” - let’s say these words all together (pronouncing the words in chorus). These words are very similar to each other, but each has a different meaning: all birds have feathers, and plumage is the color of the feathers and it is different for each bird. — Guys, what birds did you recognize? Tell us about them: their appearance, what they eat and where they live (listen to the answers of 2-3 children). Birds that the children do not recognize are named and told about by the teacher himself. - Guys, we found out what birds come to us in the spring. Let's repeat once again what they are called and what they look like (the teacher calls several people to the board so that they show and name the birds they remember). - And now I want to tell you riddles, and you will have to guess them. So, listen carefully! 1. Chik - chirp! Jump to the grain. Peck, don't be shy. Who is this? (sparrow) 2. There is a cheerful house on a pole with a small round window. For the children to fall asleep, the house is rocked by the wind. The father is singing on the porch, He is both a pilot and a singer. (starling) 3. The motley fidget, a long-tailed bird, a talkative bird, the most talkative. (magpie) 4. My knocking can be heard all around. I am an enemy to worms, and a friend to trees. (woodpecker) 5. Sits on a tree, “Kar-kar” screams. (crow) 6.You recognize him immediately: White-billed, black-eyed, He walks importantly behind the plow, Finds worms and beetles. Faithful guardian and friend of the fields, The first messenger of warm days. (rook) 7. Greenish on the back, yellowish on the belly, black cap and stripe of scarf. (tit) 8. Not a crow, not a tit - What is the name of this bird? Perched on a branch - “Kuk-ku” was heard in the forest. (cuckoo) 9. How wildly the flowers bloomed in the gardens! They sing songs loudly... (nightingales). - What great fellows you are! All the riddles were solved and the birds were correctly shown in the illustrations. 2. Physical school The swallows were flying (Running in a circle, imitating flight. All the people looked at the birds) The swallows sat down, (They crouched, lowered their arms. All the people marveled, behind their backs, as if folding them. They sat down, sat. wings.) Soared up, flew. (They run in a circle, wave They flew, they flew, with their hands) They sang songs. 3.Construction from natural materials. 1) Motivating children: - Guys, look, there is a bird sitting on a branch. But she is alone and she is very bored. Let's make her friends?! (children's answers) Then sit down at the tables. Everything we need for work is already on your tables. 2) Showing and explaining the construction sequence. 3) Children constructing birds. The teacher approaches everyone, helps and suggests the correct execution of the bird. Praises for the effort and creative approach to decorating the bird. 4) Summing up the design. Children, with the help of a teacher, plant birds on branches. III. Bottom line. - Why do people say and say correctly that birds are our friends? (children's answers: because they eat insects and caterpillars, preserving trees, fields and vegetable gardens, as well as parks and squares). - How do we help our little friends? (we build birdhouses, make bird feeders in winter, etc.). - They said everything correctly. Well done! After the lesson, you can once again look at the migratory birds in the illustrations.