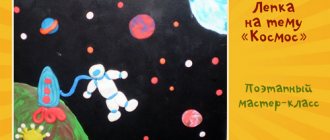
Space idea made of paper and cardboard for April 12
From components such as paper and cardboard, it is easiest to do work for kindergarten and school. Because they are always present in any home. And also scissors and glue. If all this is available, then I propose to build such a composition from a flying spaceship, the sun and Saturn on a black background.
To work you need:
- Cardboard with a black background about 30*25 cm;
- Toilet paper roll;
- Colored paper;
- Gold and silver foil;
- Semolina;
- Scissors;
- PVA glue;
- Pencil.
Manufacturing:
1. Cut the sleeve in half. At one end we cut off the edges to create the nose of the rocket.
2. From blue paper, cut out three blue cones, which we bend in the middle. These will be our rocket engines. We glue them to the uncut (back) part of the sleeve.
3. Glue the rocket onto a black background.
4. Cut out two petals from red and gold paper. This will be fire coming out from behind the ship.
5. Glue the flame and the cut out window.
6.Draw the sun on gold foil, and Saturn with a ring on silver foil. Cut out and glue both shapes onto black cardboard.
7. Apply glue to the background and sprinkle semolina on top. This is our milky way. Beautiful craft is ready!
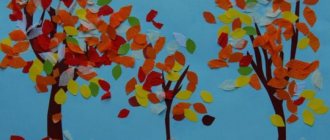
Did you like the collage? If you have schoolchildren, you can make a flying luminous object below.
Summary of a lesson on application in the senior group “Flight to the Stars”
Program content:
Expand children's knowledge about space and space flights; activate the vocabulary: space, stars, starship, astronomy; develop symmetrical cutting skills from a sheet of paper folded in half; develop in children a sense of composition, teach how to harmoniously place details on a sheet of paper, and learn how to decorate their work.
Materials and equipment:
Audio recording “Look at the stars” (Gr. AIR), strobe light, sheets of black cardboard, templates of silhouettes of different spaceships, colored paper, pencils, scissors, glue, glue brushes, pieces of foil, sequins, sparkles.
Progress of the lesson:
At the beginning of the lesson, children are invited to go on a space journey. The windows in the room are darkened, a strobe light and audio recording are turned on. Children sit on the floor on cushions. If you have a media projector, you can display an image of outer space on the screen. After playing the audio recording, the teacher conducts a conversation.
Educator: Guys, did you like the music? How did you feel, what was it like?
Sample answers from children: Space travel, flight into space.
Educator: Correct. Guys. Do you know that the science of astronomy deals with the study of space? From the ancient language “aster” is translated as “star”. And today we will build our own spaceships and also go on a real space journey! But first we will play with you!
Children stand in a circle, facing the center and repeat the movements and words after the teacher.
Our magical spaceship is setting off! (Children fold their hands into a mouthpiece in front of their mouths and walk around the group in different directions.)
Put on your spacesuits quickly! (Stop and imitate movements.)
take your seats quickly! (They scatter and sit down.)
We take off from the cosmodrome and fly straight to the stars! (They stand up, raise their arms up through their sides, and connect them above their head. Jump up.)
Let's fly, fly, we've reached the Star! (They run, then stop.)
We walked around, looked and flew back. (They walk around the group in different directions, then stop at the cosmodrome landmark.)
After the outdoor game, the teacher invites the children to the tables and reminds them of the rules of conduct during applique classes. We have everything ready. But before we hit the road, we'll stretch our fingers:
Now I’ll look at the sky through a huge telescope (children look through the folded fingers of both hands with their right eyes)
and see something that I would not have been able to see before (look through the folded fingers of both hands with the left eye)
I see stars and planets, asteroids, comets, I see satellites of the planets (children bend their fingers)
It's a pity there are no flying saucers in this telescope! (look through the telescope alternately with the left and right eyes)
After finger gymnastics, the children get to work.
Stages of work:
1. Choose the color of your future starship and its shape template. Fold a sheet of colored paper in half and trace the template. Cut along the contour. We also prepare portholes, antennas and other decorative details according to the child’s design.
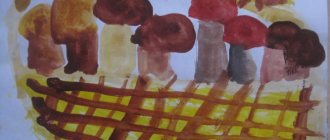
2. Place the applique blank on a sheet of black cardboard, glue on the starship and decorative elements.
3. Children decorate the applique with sparkles, sequins and pieces of foil to imitate stars, asteroids, and the milky way.
After the lesson, an exhibition and discussion of the work is organized, where all children can talk about their craft.
DIY Cosmonautics Day crafts. Starships, space stations
In this section we will tell you about one interesting way to make crafts with your own hands for Cosmonautics Day. A beautiful starship or space station can be made from waste material that you can easily find at home. Using a glue gun or double-sided tape, fasten all the parts of the craft together. Finally, paint your Cosmonautics Day craft with silver spray paint. Additional details can be painted with acrylic paints.
Here is another example of a similar craft for Cosmonautics Day. The body of the space station is made from an old aquarium filter, a wheel from a typewriter, a plastic bottle, remnants of pens and all sorts of broken toys, the wings are a cut floppy disk. Everything is covered with spray paint. Link .
If your space-themed craft made from scrap material doesn't have many small parts, you can simply wrap it in foil at the end. Look at this lunar rover made from a plastic jar and bottle caps.
Simple crafts for kids in kindergarten on Cosmonautics Day
I suggest making a rocket with the kids from a sleeve (you can even use toilet paper) and colored paper. It turns out such a long and stable little thing that can be placed on a blue background and next to an astronaut figurine.
Add some foil and you'll have a more realistic spacecraft.
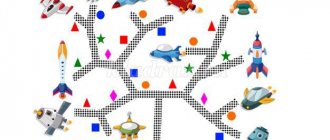
Let's make a starship out of paper. You can do this simply according to the diagram below.
And here is the finished version. Color it as you wish.
Or we’ll make an unidentified flying machine out of thick paper. You can make several of these things and put them again on the blue sky.
Look how colorful and at the same time original UFOs we produce.
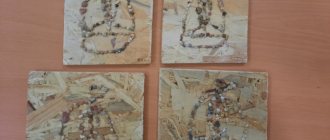
Let's use the baby's favorite toy - plasticine. It is pliable, soft and adheres well to almost any surface.
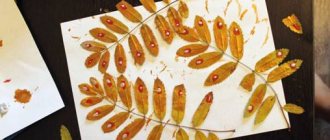
Here are some applications you can make with it in disposable plates.
Saucers - open space
Oh, and we parted ways! Let's sculpt a cute alien. It will look good next to a paper flying saucer.
Funny alien
Don't feel like folding paper? So let's blind her too, because there is a lot of plasticine!
When working with plasticine, the first thing you need to do is explain to children that this is an inedible material and should not be put into their mouth.