Sound setting [C]
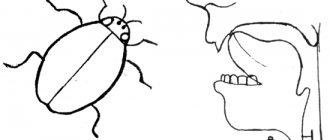
The articulation of “C” is as follows:
- lips need to be stretched into a weak smile;
- bring your teeth closer, but do not close them;
- lean the tip of the tongue against the front teeth of the lower row, arch the tongue, resting its sides on the molars;
- create a strong and narrow air stream.
Before starting sound production, you should make sure that the child’s articulatory apparatus is ready to pronounce whistling sounds. For preparation, a set of special speech therapy exercises is used to improve the articulatory apparatus.
The sound “C” is placed in several ways:
- By imitation. Sitting with your child in front of the mirror, show how to pronounce the sound “C”.
- By imitation with game moments. For this method, visual aids and bright objects are used, with which you can imitate the sound “C”. For example, the balloon deflates - “SSSS”.
- Based on reference sounds. To learn to pronounce the sound “S”, a child must be able to pronounce the sounds “I” and “F”, which are the reference sounds for him.
- Mechanical setting. Using a spatula, the speech therapist sets the child’s tongue in the desired position and asks to gently but forcefully blow out the air.
The main thing is to give the child the opportunity to remember the position of the articulatory organs when playing the sound “C”, only then can it be automated in syllables, words and sentences.
Set the sound [C]
The articulation is as follows:
- lips are in a neutral position;
- teeth are brought closer by 1-2 mm;
- the tip of the tongue is lowered, touching the lower incisors; Initially, the back of the tongue is strongly curved, forming a bow with the incisors, then its front part quickly moves to the position of the “C” sound, forming a groove in the middle;
- the air stream should be strong and uneven.
The sound “C” is produced if the child clearly pronounces the sounds “S” and “T”. The baby is asked to quickly pronounce “TS”, as a result of which the desired sound appears.
There are 3 ways to make the sound “C”:
- Method of imitation using play techniques (“The locomotive, stopping, says - tss-ts-ts”, “The mouse is sleeping, don’t make noise - tss-ts-ts!”).
- Reception of reference sounds (in this case these are “T” and “S”).
- Acceptance of the features of articulatory structure. Invite the child to open his mouth, rest the tip of his tongue against the incisors of the lower row of teeth, lift the tongue and stretch it so that its front part is pressed against the palate. In this position, the back of the tongue should touch the upper incisors. Without turning on your voice, invite your baby to pronounce the sound “T”, lifting the tip of the tongue with the pressure of a stream of air from the front teeth of the lower row. The lips should be tense and in a smiling position. This exercise helps to remember the position of the organs of articulation when the sound “C” is pronounced.
Features of sound production
Work on correcting sound pronunciation begins with the sounds that are most accessible to the baby. All analyzers are used: vibration, auditory, visual and tactile. In the first lessons, you should not create completely new models of articulatory movements and phonemes in order to evoke the desired sound. Initially, the work is based on the maximum use of models available to the child.
Children diagnosed with reduced kinesthesia or phonemic hearing disorders are recommended to acquire intermediate articulations. The articulation itself can be improved by performing exercises to lengthen the exhalation and the required air flow pressure. Therefore, production of sounds usually begins in a lying position, developing lower-diaphragmatic breathing. This is how the child learns to smoothly inhale air through his nose and exhale it steadily through his mouth.
When working on the formation of articulatory praxis (the ability to pronounce a series of sounds of native speech), you need to take into account how strong the relationship between the muscles of the articulation organs is. It is useful to use the following techniques, which should be based on visual control (the child should control the exercise in the mirror):
- to move the tongue a little deeper in the mouth, push the corners of the mouth forward mechanically (for example, with your fingers);
- to move the tongue forward, the corners of the mouth are moved to the sides.
When correcting the pronunciation of sounds that the child distorts, you should not name them - this will cause their incorrect pronunciation.
Sounds are produced using the following methods:
- By imitation: for example, invite your child to roar like a tiger (rrr) or make the sound of a drill (drrr).
- By reference sounds: for example, we study sounds in this order - V-Z-Zh, M-B, N-D, S-SH-Z-ZH, F-V, F-S-SH.
- From the gymnastics of the language by sound, but use the correct diction - T, D, N. If the child pronounces sounds interdentally, then they should be taught to pronounce them correctly, and then put in defective sounds.
- Mechanical method (using a spatula, fingers, nipples, probes).
If you are working on correcting sound pronunciation, you should not forget about the following features:
- Parallel work on correct breathing and articulation is mandatory.
- The child must consciously control his own pronunciation by ear.
- The sounds being studied must be designated with special symbols.
- For older preschoolers, the letter designation of sounds is introduced, which promotes further literacy learning.
- Automation of sounds and their use in different conditions - in syllables, words and phrases, sentences.
- Prevention of dysgraphia.
Now that we've sorted out the theory a little, let's get down to practice.
Speech therapy classes and exercises: developing a child’s correct speech - read here.
Articulation gymnastics for children from 3 to 7 years old
Vocabulary development in preschool children: methods and techniques, here.
Set the sound to [Z]
The articulation when producing the sound “Z” is similar to “S”, only the sound “Z” is more sonorous, so you need to use your voice when pronouncing it. The sound “Z” is placed after successful automation of “S”.
Setting “Z” is similar to working with the sound “S”, only you need to make sure that the child connects his voice and feels the vibration of the ligaments. It is very important to be able to convey to the child that these sounds differ in their sound. To do this, invite your baby to put his hand on his throat and pronounce both sounds alternately. The child will understand this difference by vibration. When the sound “Z” is heard clearly, invite the child to pronounce it louder and clearer. After this, automate the sound through exercises on pronouncing syllables, words, and sentences.
We put the sounds [L], [L']
To set the sounds [L], [L'], use the exercises “Needle”, “Painter”, “Turkey Poults”, “Steps”, “Ladle”, “Hunter”.
If the sound [L] is absent in the child’s speech, it is placed in 2 stages:
- Interdental production of sound, when the child is asked to say the combination of sounds “ya”. When pronouncing the sound “y”, you need to pronounce it briefly, straining the articulatory apparatus. Next, pronunciation is carried out by squeezing the tongue between clenched teeth. Repeat the exercise until the clarity of the sound is established - you need to establish the position of the jaw in which it was possible to reproduce the sound.
- Dental production of sound - the tongue is moved to a position behind the teeth, it is pressed firmly to the alveoli, and they pronounce “ly-ly-ly.”
It is important to develop the correct direction of the air stream. If a child has several sounds in interdental pronunciation, it is worth developing motor skills of the tip of the tongue. You can help with this in any convenient mechanical way.
If a child replaces the sound [L] with the sound [Y], he is asked to place a round tube on the middle part of the side of the tongue, with his mouth open, and the tip of the tongue should be tucked behind the upper incisors. The main difficulty is that the child continues to hear the sound that he played earlier. Therefore, it is important to connect the baby’s auditory attention to the sound that he pronounces during its production.
We put the sounds [K], [G], [X]
The sound “K” is made mechanically using a spatula. The articulation looks like this:
- the lips should take the position of the next vowel sound;
- You can’t keep your teeth closed;
- the tip of the tongue needs to be lowered and touched with it to the incisors of the lower dentition;
- the lateral parts of the tongue are adjacent to the upper lateral teeth;
- the back of the tongue should form a bow with the palate;
- the soft palate rises at this time, blocking the passage to the nasopharynx;
- there is no need to strain the vocal cords, they are open;
- During exhalation, the resulting stream of air should explode the bow, causing a characteristic sound.
The first version of the production is from the sound “T”. It is used if the child pronounces the sound “T” clearly, cleanly, without unnecessary overtones.
Invite your baby to play the sound “TA”. At the same time, press the spatula on the front part of the back of the tongue, as a result of which the sound “TY” will be heard. Next, you need to move the spatula a little further into the depth, which will provoke the pronunciation of the sound “KY”. Even deeper pressure on the tongue gives a clear pronunciation of the sound “KA”. The use of the mechanical method is stopped when the child remembers the location of the articulatory organs for pronunciation of the sound being studied.
The sound “K” can be made while inhaling. This exercise is reminiscent of imitation snoring - silent or whispering. Encourage your child to snore for fun. After the exercise, you can hear a sound reminiscent of “K”. Invite your child to say “KA” while inhaling and exhaling. After this, automate the sound traditionally: “KA-KO-KU-KI-KE-KYO.”
The articulation of the sound “G” is similar to the articulation of the sound “K”. However, the voice is involved in this process - the vocal cords must close and vibrate during exercise.
The sound "G" can be placed from "Y". To do this, invite the child to throw his head back and, while exhaling strongly, say “YYYYY”, simultaneously pushing his lower jaw forward, raising it and lowering it. By analogy with the production of the sound “K” from “TA”, you can place the sound “G” from “DA”.
The articulation of the sound “X” differs from “K” in that the back of the back of the tongue should form not a bow with the palate, but a gap along the midline. The sound “X” can be made like this: invite the child to open his mouth the width of two fingers and blow warm air on his palms. If the sound does not work, you can try throwing your head up in the process. The sound “X” can be placed from “S” and “Sh”. They use a mechanical method: when the child pronounces these sounds, you need to use a spatula to move the tongue deeper into the mouth.
Set the sound [Y]
Most often, the sound “Y” can be produced by imitation, supplementing the exercises with showing correct articulation and the tactile sensation of the expiratory stream when pronouncing “YYYY” in a drawn-out manner.
They make a sound from pronouncing the sounds “AIA” or “IA”. The exhalation must be intensified when the sound “I” is pronounced, and the short “A” must be pronounced without interruption. Sometimes placing the “Y” sound in words where it comes first is effective.
From the syllable “ЗЯ” the sound is made mechanically: the child pronounces the syllable, and the adult, using a spatula, presses on the front part of the back of the tongue, gradually moving it back until the desired sound is obtained.
